Update These Xbox Settings To Get The Most Out Of Each Gaming Experience

While the latest console generation has been a little slow to bring must-have gaming experiences, there are still plenty of quality of life enhancements and visual upgrades to justify making the jump.
That said, most people have found that it's not enough to simply upgrade to the newest console. Audio and visual improvements may require you to purchase new hardware, such as soundbars and TVs, to get the most out of them. But what good are all those upgrades if you aren't getting the absolute most out of your games?
In this article, we'll guide you through a series of measures you should take to ensure you're getting the most heightened Xbox gaming experience possible, whether that's tweaking your TV settings to display the most accurate and vibrant colors, or amplifying every bit of nuanced movement to go along with all the boom in games like "Call of Duty: Modern Warfare II."
Make sure 4K, 120Hz is turned on

The Xbox Series X is designed to provide a top-notch visual gaming experience, and one of the ways it does that is by supporting 4K resolution and a 120Hz refresh rate. To take advantage of these capabilities, it's essential to make sure these settings are turned on. Here's how you can do it:
-
Open the Xbox's Settings menu.
-
Navigate to General > TV & Display options.
-
Under the "Display"section, make sure the "Resolution" dropdown is set to the highest possible resolution your TV or monitor supports. You can choose from 720p up to 4K UHD. Note: Xbox Series S gamers can only max out at 1440p.
-
For the refresh rate dropdown, choose your display's highest supported setting. Both the Xbox Series X and Series S support up to 120Hz.
Enabling 4K resolution and a 120Hz refresh rate on your Xbox Series X and S will provide you with a vivid and smooth gaming experience. The latter is especially important: not only does it improve the overall fluidity, but it can also improve your response time and cut down on input lag.
Following the steps above is a great start, but there are many more stakeholders tucked away in Xbox's menus that can have a heavy impact on your gaming experience.
Don't forget VRR, HDR, and Dolby Vision

To that end, you'll also want to ensure variable refresh rate is enabled, a feature that is exclusive to the Xbox Series X and Series S. This can cut down on screen tearing in games that ramp up or down, which happens to be a vast majority of them.
-
Go to Settings > General > TV & display options > Video modes.
-
Ensure "Allow auto low-latency mode" and "Allow variable refresh rate" are toggled on.
HDR and Dolby Vision are also key. Both these technologies — available on the Xbox Series X, Series S,and Xbox One X — expand the color gamut to billions of shades, and Dolby Vision takes it a step further by sharing specific color information with your TV as encoded by game developers. (By the way, the same goes for the cinematographer's vision when watching films).
The list of games that support Dolby Vision for Gaming is growing, so you'll want to enable it if your TV has the capability.
-
Go to Settings > General > TV & display options > Video modes.
-
Toggle on "Allow 4K," "Allow HDR10," "Allow Dolby Vision," and "Dolby Vision for Gaming."
-
Optionally, toggle on "Auto HDR" to allow the Xbox to automatically enhance older games with more vibrant color. This option doesn't always look great, but it's worth a shot if you feel things are looking a little dull.
Calibrate your TV
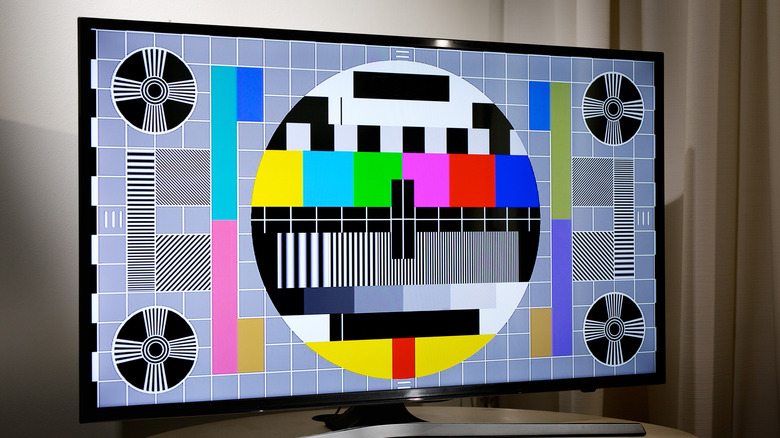
Xbox consoles have a built-in calibration tool that walks you through tweaking your TV's settings to ensure you're getting the best visual experience possible. As every TV and viewing environment is different, you'll want to take the time to go through this process.
To find this tool, go to Settings > General > TV & display options > Calibrate TV. You aren't changing any settings on the Xbox here, but the Xbox will offer a series of visual guides to help you dial in your TV's settings, offering optimal improvements to black levels, contrast, saturation, and more.
The calibration tool tries its best to describe the names of common settings in most TVs, but the exact names of these options will be slightly different for every model. Grab the manual (if you didn't toss it away) and your TV remote, then follow the instructions as best as you can until your TV matches the visual expectations set by Xbox.
Change these settings in your game's video or display menu

Many games on the Xbox One X, Xbox Series X, and Xbox Series S have different graphics modes. You'll often find that you can choose between prioritizing frame rate and prioritizing resolution. Prioritizing frame rate is best in high action games, like multiplayer shooters, racers, fighting games, and sports simulations. This is because it'll offer the best responsiveness and fluid motion overall, which gives you a better chance at triumphing over your opponents.
If you're playing a cinematic single player experience, you may want to go for resolution. This'll help all those highly detailed environments and characters pop off the screen.
However, many of the latest games — especially those designed for Xbox Series X and Series S — don't force you to sacrifice visual fidelity if you opt for the fastest possible frame rates. Sometimes, the difference is negligible and virtually unnoticeable during regular gameplay. Our best advice is to give all of these options a try and see exactly how it impacts the experience, and then settle on the one you prefer.
Also, don't forget to go through that specific game's brightness calibration menus. Whereas the Xbox's built-in tool is meant to settle your TV's settings, the game's menu will have its own brightness sliders to help you get the best dynamic range and to experience that game's specific ambiance as intended by the developers.
Use Dolby Atmos for cinematic perfection

Don't underestimate the importance of good audio. An atmospheric, cinematic soundtrack anchored by subtle ambient noise and explosive sound effects can be even more important than the visuals.
Like Dolby Vision, Dolby Atmos delivers this audio with exact precision as envisioned by the game developers. Even in games that don't specifically implement this spatial audio engine, enabling Dolby Atmos makes for a much more impressive soundstage.
You'll need a compatible TV and soundbar to use Dolby Atmos, but there's also a version for headphones that can work with even the budget-minded options. Here's where to enable it once you have the prerequisite hardware.
-
Go to Settings > General > Volume & audio output
-
Under Speaker audio > HDMI audio, select "Dolby Atmos for home theaters."
-
For Headset Audio > Headset format, select "Dolby Atmos for Headphones."
Note that Dolby Atmos for Headphones can work with almost any headset designed for Xbox Series X and Series S, but you must pay for the Dolby Access app, which you can find in the Xbox store. For the best results, you'll also want to disable any audio enhancement features built into the headset.
Alternatively, you can choose to use Windows Sonic for Headphones (a free alternative) and DTS Headphone:X, though most developers are leaning toward Dolby Atmos. Don't forget to head into the game's audio setting menus. Some games will offer a sound mix designed specifically for headphones, home theater systems, and other common setups.