GPU Settings That Are Ruining Your PC Gaming Experience
The Windows operating system and your graphics drivers do a decent job out of the box, with optimized defaults that will work on the majority of PC hardware. Some of the defaults can ruin your PC gaming experience in the wrong cases, so it's essential to know which default settings to change once you have everything installed. Some of these settings are part of the Windows operating system, which has improved at supporting gaming in recent years. Others are inside the manufacturer-specific control panel that adjusts the various settings for your GPU.
These settings could improve frame rates, make your gaming experience feel smoother, or increase the power your graphics card has to play with. Some are buried deep inside menus and don't come with comprehensive instructions for their use. These settings will improve your PC gaming experience, from making visuals crispier to smoothing jagged edges and reducing the power your GPU needs to output quality frames.
Using the wrong graphics adapter
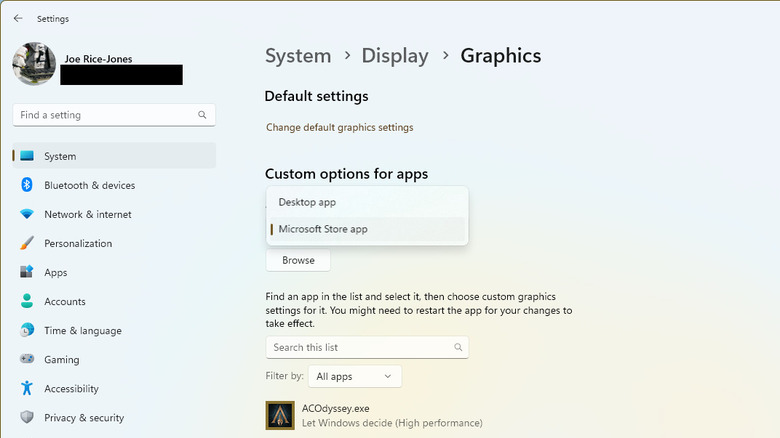
If your PC or laptop has multiple graphics adapters, it could be that Windows is choosing the incorrect one for your games. This is more common with gaming laptops, as bypassing the discrete graphics card on desktop PCs requires plugging the display cable into a different port. To fix this, head into Windows settings:
-
Open Settings by pressing Windows + I.
-
Select Display from the right pane.
-
Scroll down to Related settings and select Graphics
You will see a section called Custom options for apps, with a list of apps. Set any games in this list to High performance, telling Windows to use the discrete graphics card in your system rather than the integrated graphics adapter.
Find the game in the list, select Options, then High performance. It should also mention your graphics card name in the options list. If your desired game isn't on the list, select Add an app, Desktop app, or Microsoft Store app to search for it. Once the new game is in the list, set it to use High performance as before.
Adjust the Nvidia Control Panel
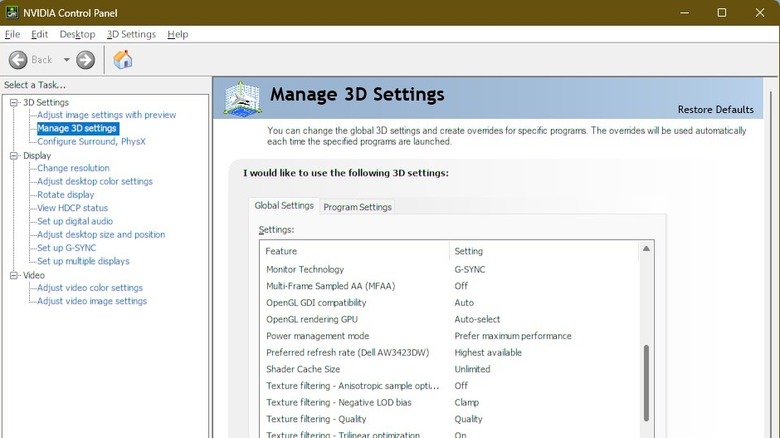
All modern graphics cards, including those from Nvidia, have a utility as part of their driver package to control individual settings. In this case, the Nvidia Control Panel can be accessed from Windows' right-click menu when on the desktop or from searching on the Start menu. The section you want to head to first is called Manage 3D settings. The few dozen options on this page have optimized defaults from Nvidia. Some of these settings are better for gaming when changed from the defaults, and some depend on the monitor you own.
The main settings to change are:
-
Image sharpening – Set sharpening to 0.20 and film grain to 0.17.
-
Ambient Occlusion – Off or Performance.
-
Anisotropic Filtering: 16x.
-
DSR – Off.
-
Low latency mode – on (or ultra if you have G-Sync and V-Sync on).
-
Power management – prefer maximum performance.
-
Threaded optimization – Auto.
If you have a G-Sync compatible monitor, you also want to set Monitor technology to G-Sync and enable V-Sync. Also, set Max Frame Rate to on, and set it to a minimum of 3 FPS below your monitor's maximum refresh rate. Blur Busters heavily tested how various G-Sync settings combine, and this was their conclusion for the best combination for most users.
Adjust AMD Radeon Settings
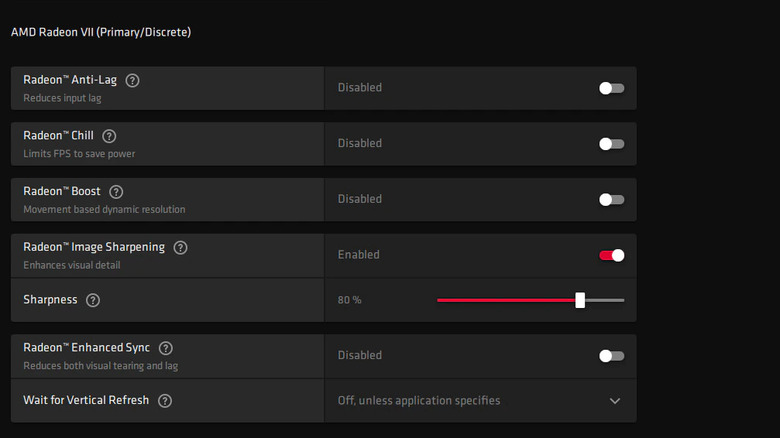
AMD Radeon cards have a control panel with tweakable settings to get the most out of your GPU. Once you have Radeon Control Panel open, most of the settings you want to tweak are on the Graphics tab. You don't need everything enabled, and most options will be off by default. Radeon Anti-Lag is worth turning on, as it can reduce your input lag when your GPU is under heavy load. Image Sharpening is also worth turning on, making your games' graphics crispier. That's especially worth it with TAA antialiasing to counteract the softening effect that the AA method brings.
Enhanced Sync is also good, reducing screen tears even if you don't have a FreeSync-capable monitor. If you have one, turn FreeSync on while in this menu. It'll sync your monitor's refresh rate to your frame times, so you get smooth frames. Gain a little bit of headroom by setting Texture Filtering Quality to Performance. If you notice that games aren't running as smoothly as possible, select Reset Shader Cache to clear out potentially corrupted shaders. To check the results of your tweaking, use CTRL+SHIFT+O while in a game to open the performance overlay.
Use Game Mode in Windows 10 or 11
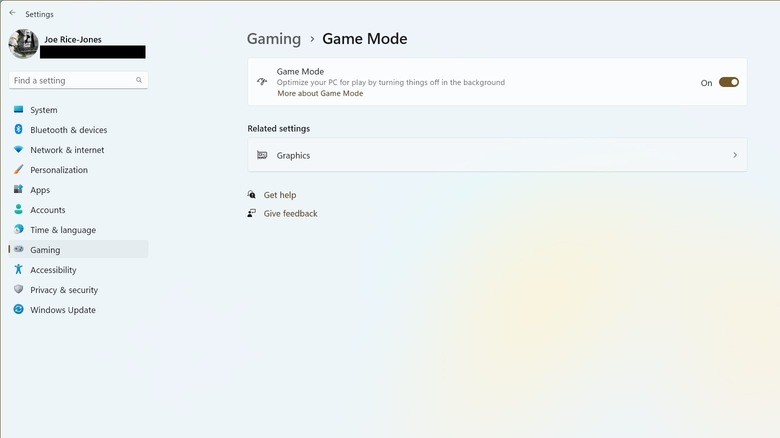
Windows likes to run background tasks when it thinks you have the resources to do so, and it also has a nasty habit of running them when you're in the middle of marathon gaming sessions. That's no good for your concentration or the number of hardware resources being siphoned off from running your game. Thankfully, Microsoft has created Game Mode, a setting that watches out for running game programs, and when it detects one, it stops Windows 10 or 11 from running background tasks or other resource-heavy things like anti-virus scans.
To enable Game Mode on Windows 10 or 11, head into Settings. Select Gaming from the left panel, and Game Mode appears with a toggle switch. Toggle it to On, and Windows won't perform any non-essential background tasks while you game. It also stops apps from interrupting you with the Windows notification system. You only have to set Game Mode once, after that Windows will handle switching it on and off as it detects games running. The other thing to be aware of is that if you are live streaming your gaming with OBS, the official line is to have Game Mode enabled (via OBS).
Use the fastest refresh rate for your monitor
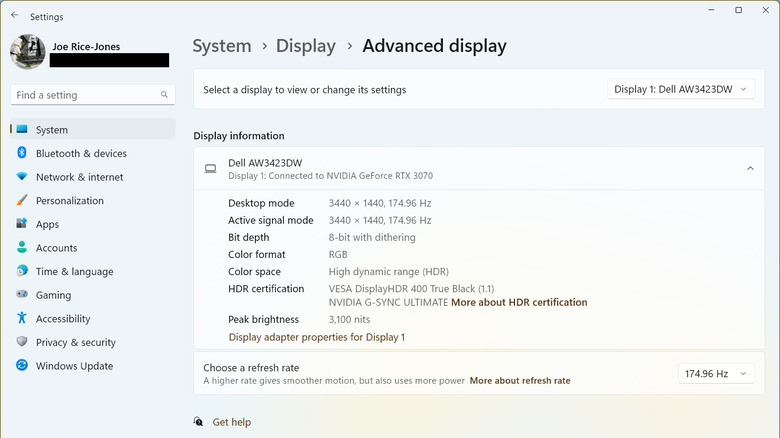
Is your powerful gaming PC feeling laggy and slow? Check your Windows settings to ensure your high refresh rate monitor is thoroughly utilized by your GPU. Until fairly recently, a refresh rate of 60Hz was the most your LCD monitor could handle. Now gaming monitors routinely reach refresh rates of 240Hz or more, with ASUS creating an IPS display with a blisteringly fast 540Hz refresh rate (via ASUS). Windows sometimes glitches and forgets that it was set to use the faster refresh rates for your monitor, leading to sluggish-feeling mouse cursor movements and other irregularities.
The process of changing your monitor refresh rate is the same for Windows 10 and 11:
-
Open Settings.
-
Select System.
-
Click on Display.
-
Select Advanced display.
-
Choose an option from the dropdown next to Choose a refresh rate.
That will get your computer to use the refresh rate you chose, which should be the fastest frequency supported by your monitor.
Outdated drivers
One of the most significant sources of poor GPU performance is outdated drivers. Grab your latest drivers from Intel, AMD, or Nvidia – they often have bug fixes and optimizations that will get the best out of your GPU. If you didn't build your PC or if it's been a long time and you don't recall your graphics card maker, it's quick to find out. Right-click on the Windows menu and head to Device Manager. Expand the Display adapters section, and it will show you the model of graphics card you are using.
While Windows Update can upgrade basic GPU drivers, it's better to get them straight from the manufacturer. That way, you get all the software and tools usually packaged with the drivers, giving you more control over your graphics card. The respective driver packages for AMD Radeon cards, Intel integrated graphics, Arc discrete cards, and Nvidia GPUs are on the manufacturer's help pages. Look for the Display adapter name from Device Manager and download the corresponding driver. Once installed, the software control panel will let you set up automatic downloads of future driver updates, so you'll always be up to date.
Adjust the in-game settings
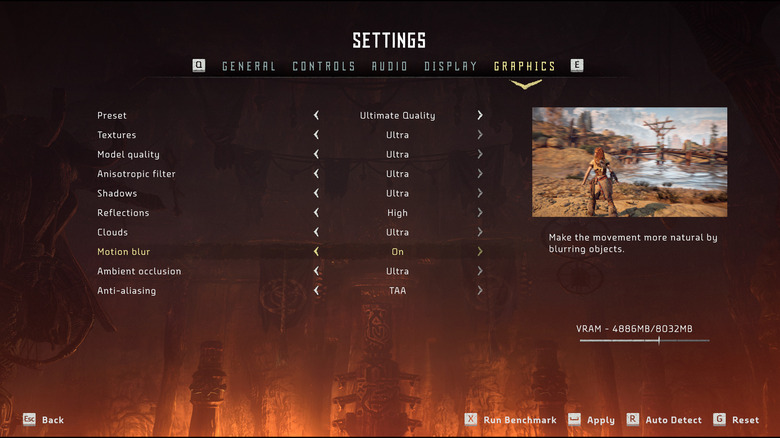
While inside a game, there are four primary settings to adjust for a better experience – Anti-aliasing, Motion Blur, Shadow and Lighting quality, and Vertical Sync. Anti-aliasing (AA) removes jaggies, the pixelated jagged edges on curved surfaces in your game. It has less effect as your monitor scales up, as the increasing pixel count gives more area to draw curves. There are multiple ways games handle AA, with MSAA and TAA using the most system resources over the lighter FXAA. Motion blur has two types, camera and per object. The most common type is camera motion blur, which blurs the entire screen when you move the camera. You can turn it off without penalty. Per-object blur is more realistic but takes more system resources. Keep it on unless you find the game chugging in hectic scenes.
Shadow and lighting quality are among the most intensive tasks for your GPU. Turning these and any ray-tracing effects down will get higher performance out of any graphics hardware. V-Sync prevents screen tearing. It also adds input lag, which isn't what you want in twitchy fps titles like "Counter-Strike: Global Offensive" or "CoD: Warzone." Turn it off in-game, even if you are using variable-refresh-rate technology like AMD FreeSync or Nvidia G-Sync. Turning down texture quality can also help if you find your GPU using most of its memory.
Use AI upscaling
One way to get higher performance out of your GPU's hardware is by AI upscaling. Your graphics card renders a frame at a lower resolution and then uses AI algorithms to upscale the frame to your desired resolution. There are a few ways to do this, and each major graphics card manufacturer has its own secret sauce. AMD's FSR uses spatial upscaling, which runs every frame through a preset algorithm. Intel's XeSS and Nvidia's DLSS are temporal upscaling techniques that look at the frames before the current one, analyze them for movement, then use that information to better upscale the current frame. The end result is that you get higher-resolution gaming while using fewer GPU resources.
Reducing the overhead on your graphics card means you can run at higher resolutions, enable resource-intensive features like real-time ray tracing, or get higher frame rates from the resolution you usually play at. The only problem with the current methods of AI upscaling is that the game you want to play has to be written to support it. Nvidia's DLSS has the most supported titles right now, with around 200 games that use one of the three versions of DLSS. AMD's FSR 2 has 54 supported titles (via AMD), with over 40 in development. Intel's XeSS is the newest AI upscaling to hit GPUs, with a smaller list of supported game titles that number around two dozen.
Use optimizations for windowed games
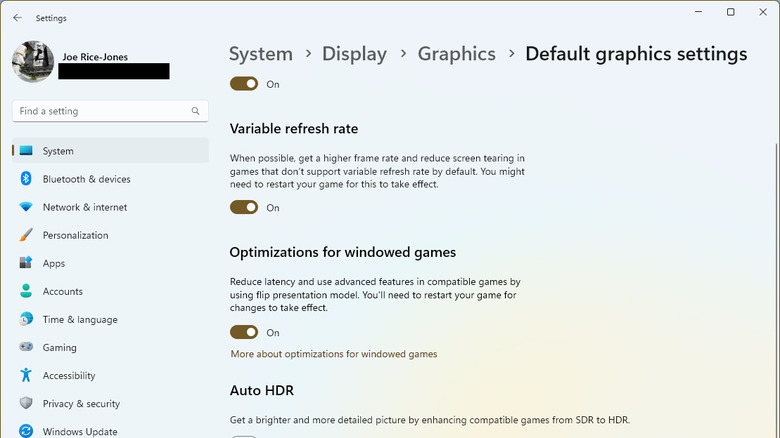
Windows 11 has a new option that benefits DirectX 10 and DirectX 11 games running in windowed or borderless windowed modes (via Microsoft). The optimizations result in lower frame latency, enable Auto HDR, and allow for variable refresh rates while running games in anything but exclusive fullscreen. Games running in DX12 already use this set of optimizations so that Windows can adjust things like refresh rates while keeping the desktop settings static.
To use the new optimizations for windowed games in Windows 10 and 11:
-
Open Settings.
-
Click on System.
-
Select Display.
-
Choose Graphics.
-
Click on the link to Change the default graphics settings.
-
Scroll down and toggle the switch next to Optimizations for windowed games, so it is on.
That will enable the new tweaks while you are running games in windowed or borderless windowed modes. That helps with using Alt-Tab to switch between the game and other tasks, like a walkthrough for the game you are playing, without the risk of your game crashing. If you are using Auto HDR Windows will automatically enable the optimizations for windowed games as it is a required element.
Overclock your graphics card
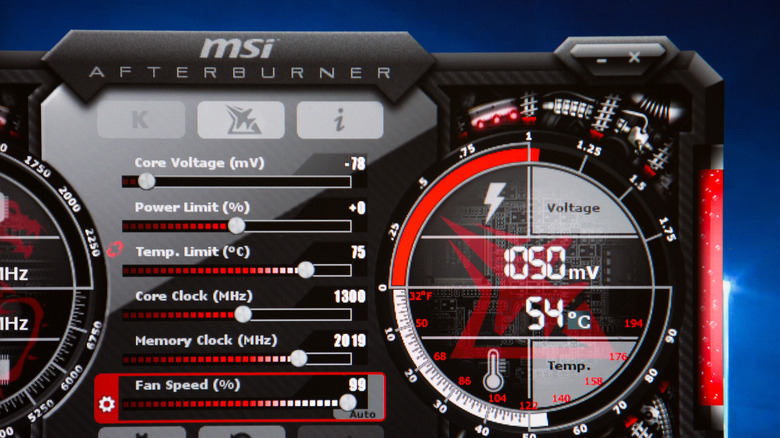
Modern graphics cards from the last generation come from the factory with a base level of performance close to the maximum for that piece of silicon. You can still get some performance gains from running things a little faster, but it's not a huge percentage anymore. Older graphics cards can be more variable, with bigger gains from overclocking.
Which tool you use depends on which manufacturer your GPU came from. Previously, you needed a third-party tool like MSI's Afterburner to overclock Nvidia graphics cards. Now the in-game overlay for Nvidia cards has a one-click automatic GPU tuner to take any guesswork out of things (via Nvidia). Open the overlay with Alt + Z and click on the Performance menu. Click on the toggle next to Enable automatic tuning and let the scan do its thing.
For owners of AMD graphics cards, open the AMD Radeon Control Panel. Click on the Performance tab, then on Tuning. Set Tuning Control to Automatic and Auto Overclock. For Intel Arc owners, press Alt + I to get the Arc Control overlay on the screen, then select Performance Tuning. No automated overclocks here but you can gain decent performance by increasing the GPU Temperature Limit to 90C and slowly increasing the GPU Power Limit until you notice issues. Back the power limit down a few watts, and you've overclocked your Arc GPU.