How To Install Windows On Your Steam Deck

The Steam Deck is a handheld gaming device designed to offer an experience comparable to a gaming laptop — or, at best, a gaming PC with decent specifications. However, the user interface (UI) installed on the console limits its ability to offer that kind of experience. The Steam Deck runs a custom UI called SteamOS, which is a Linux-based operating system designed to crank the performance of the hardware. While SteamOS has been optimized to provide a gratifying experience through easy navigation using the console's joysticks and buttons, it lacks support for Steam's entire library of supported games on Windows because the games run through an emulation tool called Proton.
Therefore, if you want to run almost every title that you like playing on your gaming PC, it can be a good idea to replace the existing operating system with Windows. In March 2022, Valve introduced Windows drivers for the Steam Deck as a gesture to signal Windows compatibility, though it doesn't offer support for those who attempt to install Microsoft's OS. The only parts of Windows that wouldn't work on the console initially involved the inbuilt speakers and the 3.5mm headphone jack, but Valve patched the issue later on by rolling out the audio drivers for the Steam Deck.
Why you should install Windows on Steam Deck
Steam Deck is a capable device for gaming, but it does have some limitations. For example, the console limits the number of supported titles on Steam and prevents you from playing those that are available through other platforms. For instance, you cannot inherently play "Fornite" or other titles exclusive to the Epic Games Store or EA's Origin store.
Installing Windows is a great method to bypass those restrictions, though doing so does come with some risks. Further, the Steam Deck has a touchscreen that — despite the small size — makes interacting with the hardware easier. If you don't like to use that, you can simply use the integrated touchpad or connect a wireless keyboard and mouse for a more familiar experience.
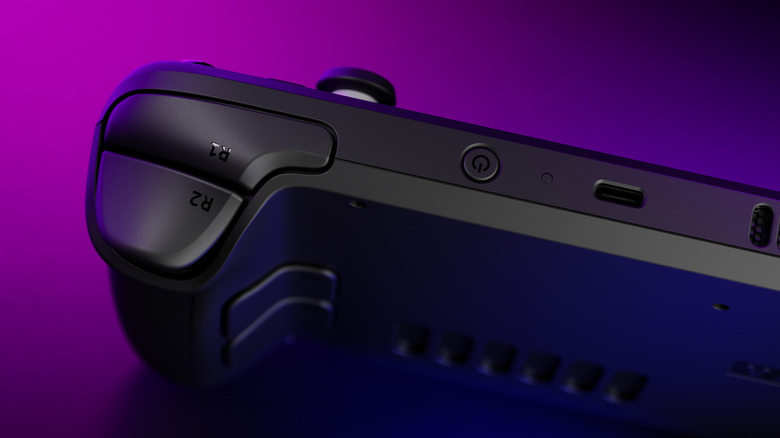
The Steam Deck's custom Aerith APU made by AMD and the built-in 16GB of RAM are sufficient for you to have a decent experience, while the USB-C port can cast the screen over HDMI using a dongle or directly via the Display Port protocol. While these contraptions take out the mobile aspect of the Steam Deck, they give you a reasonably portable gaming PC that you can carry around with you anywhere. In case you would like to try out Windows on the Steam Deck, here are the steps that will help you do that.
Things you need to install Windows on your Steam Deck

To begin installing Windows on your Steam Deck, you will need a few things:
-
A USB thumb drive (preferably with a USB Type-C connector) that has at least 8GB of free space.
-
A USB Type-C dock if you don't have a thumb drive with USB-C or a microSD card with an SD card reader.
-
A desktop or laptop that has Windows installed
Before you start the process, the first thing to do is to create Windows installation media, which can be created using the tool made available on the Windows download page. Valve recommends installing Windows 10 on the Steam Deck since Windows 11 requires a new BIOS to add support for firmware-based Trusted Platform Module (fTPM), which is essential to install Windows 11.
Once you download the installation tool for Windows 10, plug the USB thumb drive into your existing Windows machine and run the tool. "Accept" the terms, and then select the option to create "installation media for another PC," followed by "Next." You may also install Windows 10 on the microSD card to plug it directly into the Steam Deck's microSD port. You will have created a Windows 10 installation drive by completing this process. Now, download all Windows drivers for the Steam Deck and copy them to the same thumb drive. You are now all set to start installing Windows on your Steam Deck.
How to Install Windows on a Steam Deck

Assuming you followed the steps in the previous section, you're now ready to install Windows on the Steam Deck. The process is fairly simple, though if you've never installed Windows on a machine before, it may feel a tad intimidating. In case you get stuck during the process or want to roll back to Steam OS, you can use the rollback instructions by Valve. With that in mind, follow these steps to install Windows on the handheld console:
1. With the Windows 10 installation media handy, you can start by plugging it into your Steam Deck. Next, switch off the gaming console so that you can enter its Boot Manager while restarting. To enter the Steam Deck's Boot Manager, hold down the power and the volume down buttons simultaneously.
2. Once you enter the Boot Manager, use the direction pad to move down to options other than the default one. Find "EFI USB Device" and press the button A to select the option. This will make your Steam Deck boot into the Windows installer.
3. Choose your region, language, and keyboard type on the Windows installer, and then tap "Next" using touch input on the Steam Deck. On the following screen, tap "Install Now."
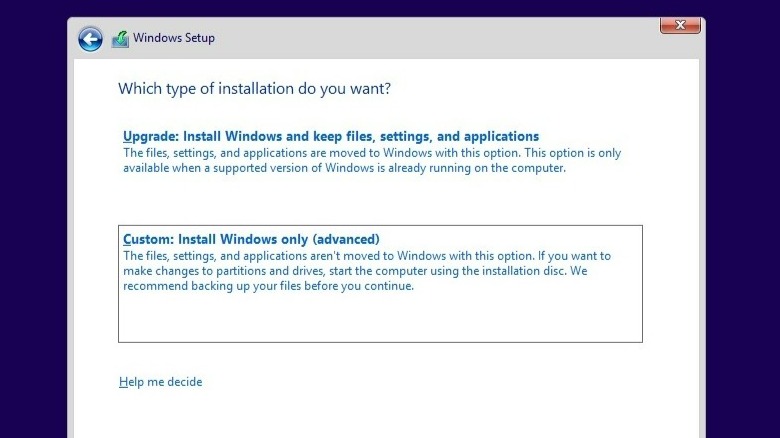
4. If you have Windows 10 product key, you can input it on the next screen. If you don't, tap "I don't have a product key." Agree to the terms on the next page and then choose the option that says "Custom: Install Windows only (advanced)."
5. Next, you will have to delete the existing storage partitions and create a new one so that the existing operating system does not interfere with the fresh Windows 10 installation. Tap each partition and then tap "Delete." You can also proceed by simply formatting the partition with the largest storage space.
6. Once the storage has been formatted, select the largest drive and tap "Next." The Windows installation will begin, and you will have a freshly installed copy of Windows. Go through the setup, and you will land on the Windows desktop once you finish. Note that the Wi-Fi will not work during the setup process, and you will need a USB-C dongle with Ethernet support if you need to sign in to your Microsoft account while setting things up.
7. After installing Windows 10, install all the drivers one by one. Further, the last step is to flip the display orientation from portrait to landscape. To do that, go to System Settings > Display and select "Landscape" under "Scroll down to Display Orientation."
Now you will have installed Windows 10 successfully on your Steam Deck, and you can enjoy various games for Windows, including ones that are available through other game stores.