TwoTrees TS3


If you can get over the quirks of positioning and inverting your design, the TS3 has a lot going for it. The high power output is great for getting designs done more quickly with less failed cuts, and the included honeycomb plate makes clean-up easy. The advantage of a fully enclosed machine is clear: it's a lot safer, both in terms of the large acrylic laser cover built into the case, and the exhaust fan. You don't need a complex extraction system set up—just dropping the exhaust hose out of a window will make a massive difference. If you want a machine for the family home, this is an obvious choice, while still being affordable.
- Brand: TwoTrees
- Laser Power: 10W
- Screen: Touchscreen
- Software: LaserGRBL
- Working Area: 23W x 21D x 11H inches (including exhaust adaptor)
- Connectivity : USB, Wi-Fi, microSD
- Exhaust system works fantastically to remove fumes and smells
- Powerful laser cuts up to 8mm plywood easily
- Very clean, fast cuts on thin materials
- Safe for use with kids around the house
- Integrated flame alarm
- App connectivity isn't worth the hassle of getting Wi-Fi to work
- Very limited in material size
- Awkward co-ordinate system can be complicated to configure
The democratization of complex computer-aided machines has meant a glut of affordable laser engravers has now hit the market. But you might be having second thoughts about putting a device in your home that's designed to literally burn things, could permanently blind you, and makes the house stink. That's quite understandable.
Last year, I entered the world of laser engraving with the beginner-friendly Totem S from TwoTrees, and it's fair to say I was blown away by what it could do, but not impressed by the smell it left in my hobby room. And the bedroom. And the kitchen.
TwoTrees is now crowdfunding for its newest model, the TS3: a completely enclosed design that hides away a powerful 10W laser, with an exhaust fan to carry away nasty fumes and smells. Read on to find out what I thought of the TS3, and whether it's time to upgrade your laser engraver—or jump in as a beginner.

Building and Setting Up The TS3
Out of the box, you might be wondering how much skill or effort is needed to put things together. The good news is: very little, because it arrives almost fully constructed. You will however need to remove some components that are strategically cable tied to inside the machine, and fit the exhaust—more on that later.
I should also mention that one of our end stops has been pushed out of alignment during shipping, which caused the laser head to crash into the rear during homing. A quick message to support and they were able to easily identify the issue though, which was easily rectified.
Filter or Exhaust?
If you backed the TS3 Kickstarter, you should receive a model equipped with a cotton air filter to start you off, or optional exhaust. The filter is a consumable item, and needs to be replaced every month or so. For those purchasing at retail, yours will only come with an exhaust hose. To be honest, you're not missing much.
Initially, I tried the air filter. In this configuration, the fans pull air into the machine, and in theory recirculates the air through the filter. In practice, the base of the machine is vented, and I found the smoke was simply pushed out from there. It's mildly better than an open-frame laser cutter, but only just.

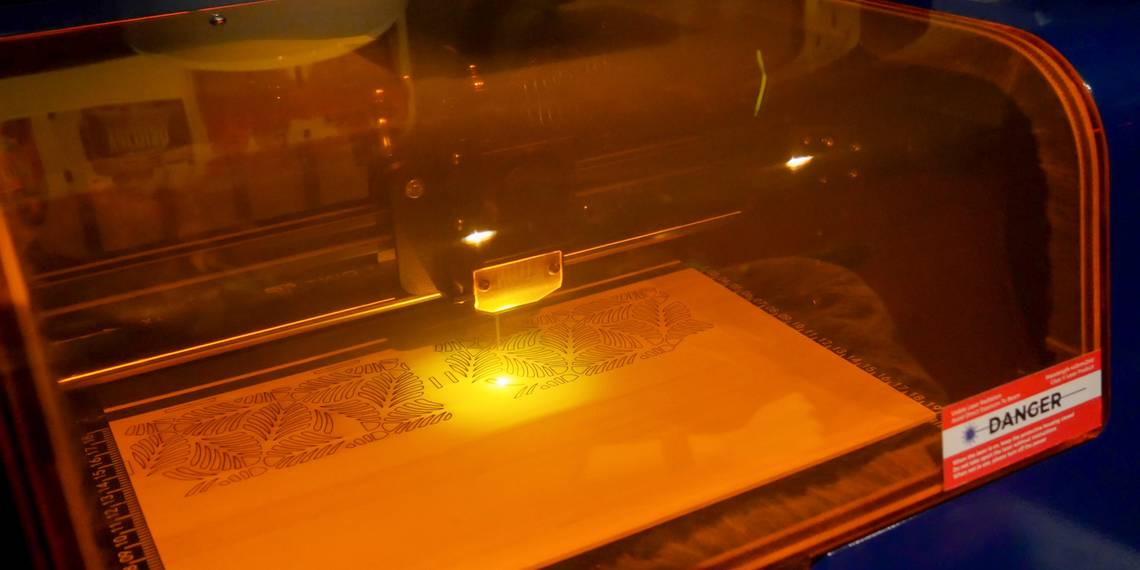
So I quickly grabbed the manual for instructions on fitting the optional exhaust hose. This requires unscrewing the back panel, reversing the fans, fitting the exhaust outlet, then attaching the flexible hose to that; it took about 30 minutes to complete. We were given a generous length of concertina exhaust hose—around 2 meters—which was more than enough to reach out the window. Once fitted, this made a world of difference. It almost completely eliminates odors, and vents noxious fumes and particulates, which is particularly important when working with any kind of composite wood materials or acrylic.

This exhaust alone and the additional safety it offers is a huge reason for those looking to use a laser engraver in a family environment. The nature of my job means that safety often takes a backseat, and if like me, you don't have an enormous workshop in which to build a proper ventilation system or fit a fume cupboard, having an exhaust you can sling out a window is a massive boon.
Safety Features
We've talked about the exhaust, which works incredibly well to carry off particulates and odors. The laser head is another concern, especially since it's twice the power of cheaper models. The TwoTrees TS3 eliminates the need to wear special goggles by building the entire front panel of the machine out of laser-blocking acrylic. You can safely watch the laser at work, even on full power—as can your kids. That said, there's no alarm or safety shutoff when the lid is lifted.
Lastly, a loud flame alarm is built into the right side of the machine. If it detects the presence of a flame for more than four seconds (because flashes of small flames are nearly always going to occur when cutting wood), it'll sound a 100dB beeping alarm.
Specifications
The TwoTrees TS3 is a large machine, with an overall footprint of around 23 inches wide and 20 inches depth when the exhaust is fitted. While the height of the machine is only 11 inches, you'll also need to allow clearance for the acrylic lid for fully lift up, which results in a total vertical space needed of about 24 inches.
It features a 10W laser, though I have no way to verify the power output other than my experience with what materials it can burn. The previous 5W model I tested was capable of cutting through a 3mm acrylic sheet in 5 or 6 passes. Sure enough, the TS3 managed it in 3 passes (100mm/min, 100% power).

To further test the power output and claims that it can cut through 8mm of wood, I taped together four sheets of 3.6mm plywood, for a total thickness of around 15mm. In theory, it should have been able to cut through two layers, and sure enough, with two passes it managed to cleanly cut two layers. I also tried three and four passes, which almost made it through another layer, scorching the final layer below, but the focus at that point wasn't quite able to finish the job. 8mm appears to be a physical limit due to the focus of the laser, though in theory you could move the laser down a few millimeters and try again, but you risk pushing either the material or laser head out of alignment.

The engraving area of the TS3 is 20x30cm, however, in practice, you're restricted in terms of material size by the enclosed nature of the machine. With open-framed machines, you can engrave larger materials by placing the engraver on top of them. With the TS3, your working material needs to be no greater than roughly a piece of A4 paper. I found this to be the most significant limiting factor when it came to what projects I could make on the machine. And, because of the other quirks of the TS3 when it comes to the coordinate system, I often had to reduce the design even further to avoid triggering the soft limits.
Using the TS3
Let's get to the most exciting part: actually making something. Not so fast though.
First, you'll need to check the thickness of your material. While you can cut up to 8mm easily, you can also engrave or simply mark thicker materials, but you'll need to remove the honeycomb plate first, then possibly use something else to raise up your piece. Removing the honeycomb plate is easy, but putting it back is awkward, as it latches in at the front and requires you to use a long spatula to snap the latch back. If you could push the plate in from the back, that would be a lot easier, but there's not enough clearance. In fact, it feels very much like the filter shouldn't be there, and was perhaps an afterthought.

Then you'll need to focus the laser. The TS3 helpfully ships with a measuring cylinder (46mm tall) and discs (2mm, and two 1mm thick), to ensure the optimum distance. For engraving and marking, you should use all of these stacked together (50mm total) and adjust the laser head using the height adjustment dial to be exactly 50mm from the surface. For cutting materials, you should focus inside the center of the material. So, for an 8mm thick material, the head should be 46mm from the surface (ie, 4mm down into it). For a 2mm thick material, it should be 49mm (the 46mm + 2mm disc + 1mm disc). Anything in between will require a quarter-turn of the adjustment dial up or down as well. This is much easier than it sounds once you're used to it, but be careful not to lose the measuring cylinder.

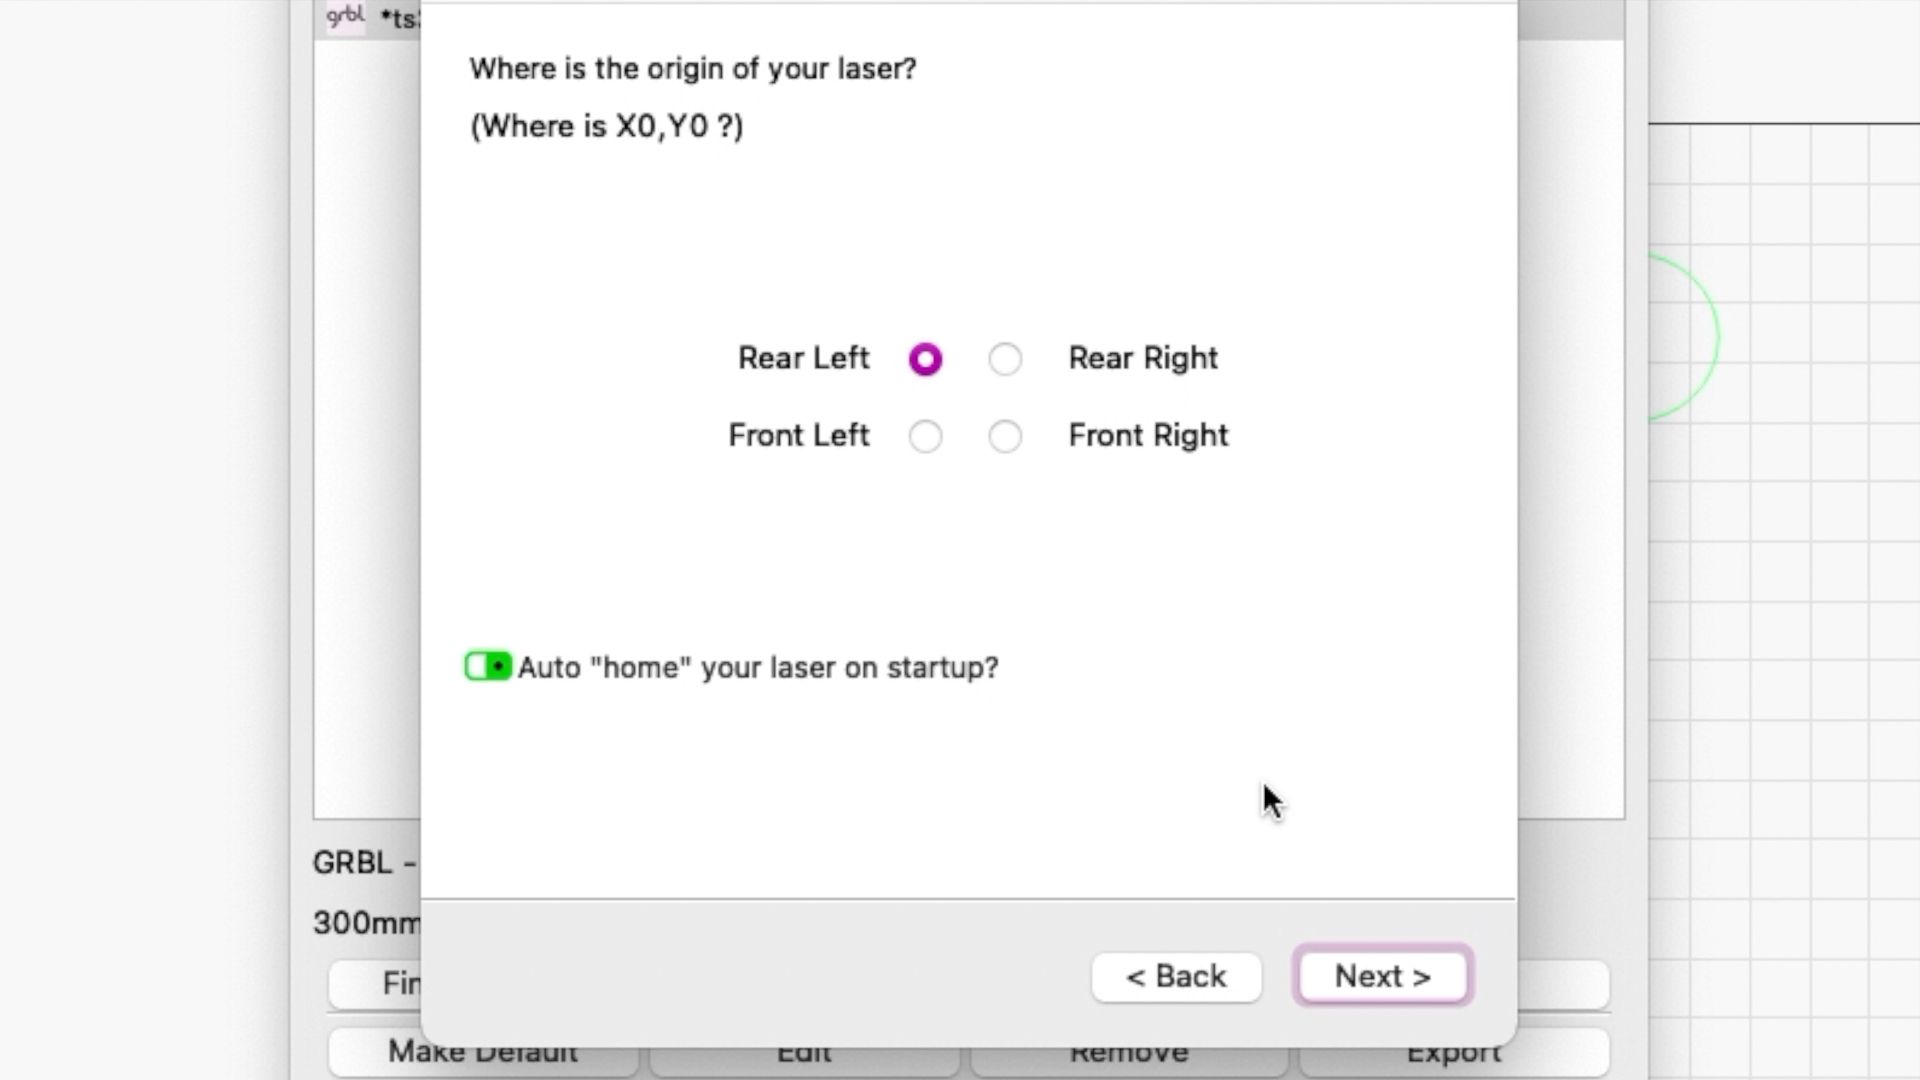
Like most engravers, you can use either the free GRBL software, which is functional but basic, and only runs on PC; or purchase a license for LightBurn, which is cross-platform and feature-packed. There is a one-month trial available to check it works with your type of machine first. I opted to use LightBurn, as it's what I'm now familiar with, and already own a license. Unfortunately, there are a few quirks when it comes to positioning your design and using the TS3 that you should be aware of. After some back and forth with the TwoTrees support line and plenty of experimentation, here's the procedure to start a print from the TS3 that worked for me:
- Turn on the machine and select HHome from the Control menu.
- Use the arrows from that menu to manually move the laser head to the front-left.
-
In Lightburn, ensure your machine is set to use the origin as rear-left.
-
From the print tab, set the print origin as Current Position.
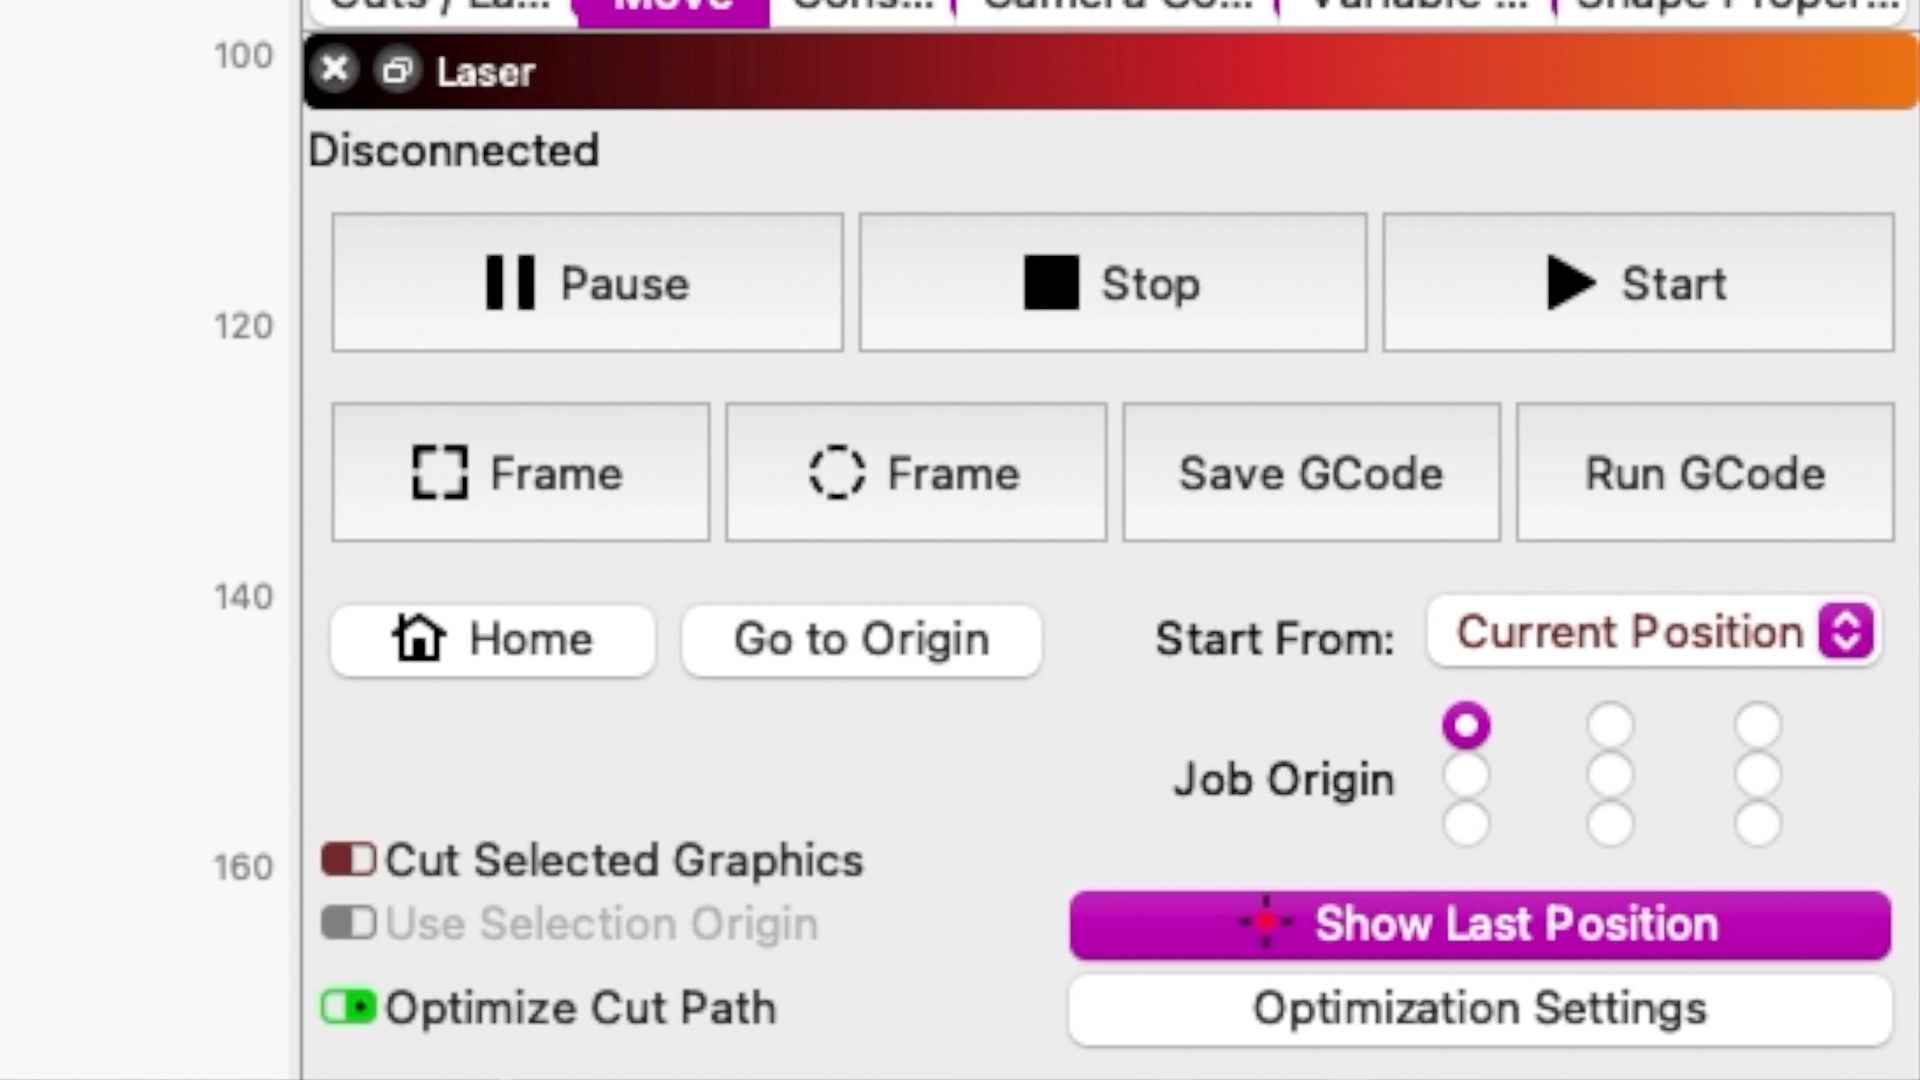
- Set the current position at the return point.
- Ensure your design has been inverted on the Y-axis.


If that sounds like a bit of a faff, then you'd be right, because it is. You get used to it though, and you can ignore the last step if your design doesn't include any text, since it won't matter that comes out back to front.

This added complexity stems from the fact that the machine works with the X-axis being positive, and the Y-axis being negative (compared to the more typical positive for both axes). In theory, setting the machine origin to rear-left should account for this, and it's entirely possible I've messed something up, but I've followed the manual, followed the steps given by support, and this just seems to how it is.
Since there's neither a positioning camera, nor an additional low-power targetting laser, you'll need to use the boundary feature of whatever software you use to get a broad idea of where the design will be cut or engraved. For even more accuracy, I found that creating an additional layer with just an outline of the design, at 6000mm/min speed and 1% power (while disabling all other layers temporarily) made it easy to see exactly where the design would be burned. Running at the lowest power and fastest speed mean no marks will actually be left on the material, but you'll still be able to see the laser.
Interestingly, the TS3 also has a micro-SD slot for offline use. The included sample had a .nc file of a TwoTrees business card, but it should also be compatible with GCode from LightBurn or another engraving package. This means if you have a design you need to regularly print multiple of, without needing a computer connected via USB, you should be able to do so. For power users, that's a massive feature. For home users who are likely going to be printing one-off unique designs, it's easier to just use USB.
Samples
The increased power meant that cutting elaborate patterns out of 2mm plywood was super quick and produced beautifully clean cuts. I was able to quickly knock out some Chinese-style lanterns.

I also found a few box designs to make from 1mm MDF; these took a few minutes to knock out.

Did you know you could bend wood given enough cuts? MakerCase is a free online web app that makes it easy to design your own custom-sized boxes, curved or otherwise. If you want to quick and easily cut complex designs from thin materials, no more than an A4 sheet at a time, the TS3 is fantastic.

I also wanted a sign to scare the kids off our land, so I found a thick bit of scrap wood to work with. Unfortunately, the size limitation meant I had to settle for a relatively small sign, but it produced a pleasing result, with the different grains in the wood-burning at different rates. Fill operations take significantly longer than vector lines, however, and this sign took a few hours to complete (not that you need to watch it the entire time, mind).

Finally, I found 10W is more than enough to etch away the surface of stone, or slate. It's not as contrasted as I'd like, and even invisible at a certain angle of bright light, but something I'll be experimenting with more in the future.

While cutting through 8mm of plywood wasn't difficult, the same can't be said for MDF. I used the highest power, slowest speed, and barely made a dent (it marks and engraves beautifully). On the second pass, I observed some somewhat scary persistent flames, so I aborted. Again, I had no issue cutting through thin MDF, but the material is just too dense to cut fully in any significant thicknesses.
Wi-Fi: Forget It
The TS3 features Wi-Fi connectivity, though it's quite temperamental. Not only does it only work with 2.4Ghz networks, but it also requires a simple password with no symbols. The Kickstarter claims you can connect using Wi-Fi Direct, however that didn't appear to be ready in our test firmware yet.
Successfully connecting to Wi-Fi gives you two features that you wouldn't otherwise have: the ability to remote control the machine from a web browser or connect it to a smartphone app. The app is four years old, and beyond replicating exactly what is already available on the touchscreen on the machine itself, you can also send a scribbled design direct from your smartphone. The scribble feature isn't all that compelling if we're brutally honest, and I don't think you should be remote controlling any potential fire hazard. So in my opinion, you can safely forget about using the Wi-Fi feature—there's just no reason to use it.
Cylindrical Engraving
One of the major features touted by the TwoTrees Kickstarter campaign is that a cylindrical engraving adaptor is included in the box, unlike other machines where you have to buy it separately. Ironically, it wasn't included in my test package, so I can't comment on how it works. That said, there are no modifications needed to change the mechanisms—the TS3 has a gear switch around the back, which would normally be switched to the position marked "1". To use it with the cylindrical engraving adapter fitted, just switch that over to "2", and the fourth axis will be useable.
So Is the TwoTrees TS3 for You?
If you can get over the quirks of positioning and inverting your design, the TS3 has a lot going for it. The high power output is great for getting designs done more quickly with less failed cuts, and the included honeycomb plate makes clean-up easy.

The advantage of a fully enclosed machine is clear: it's a lot safer, both in terms of the large acrylic laser cover built into the case, and the exhaust fan. You don't need a complex extraction system set up—just dropping the exhaust hose out of a window will make a massive difference. If you want a machine for the family home, this is an obvious choice, while still being affordable.

On the other hand, the enclosure does add its own limitations. As well as a smaller overall working area (and a larger machine footprint), your materials will need to be cut to size prior to being inserted. With an open-frame design you might have a limited working area, but you're free to move the material around so the design can be a part of something larger.