

Make the most of Google's Android 12 software with these expert-approved steps and adjustments.


Android 12 is truly a tale of two different Android updates — at least, from a practical perspective.
On the one hand, if you own a Pixel phone, Google’s latest and greatest software is easily the most significant Android release since 2014’s Android 5.0 Lollipop era. Android 12 introduces a whole new interface and design language that’s much more than just a fresh coat of paint. It reimagines Android’s identity and transforms practically every part of the operating system — extending even into an ever-increasing number of third-party apps.
If you own a Samsung device, on the other hand, Android 12 probably doesn’t feel that earth-shattering. As is often the case, Samsung has omitted many of Google’s most meaningful design changes and skipped over some of the software’s core feature elements. As I’ve been saying for years, there really are two completely different Android experiences — the Google Android experience that’s present mostly just on Pixel phones at this point and then the alternate-reality version of Android that Samsung delivers to its devices.
If you own a phone made by anyone other than Google or Samsung — well, time will tell. Until more phone-makers start to get Android 12 to their devices, we won’t know for sure. But odds are, it’ll probably fall somewhere between those two ends of the spectrum.
No matter which flavor of Android 12 you’re tasting, though, a trove of new treasures is just waiting to be discovered. Read on to learn the ins and outs of your phone’s snazzy new software and how to make the most of its changes, both big and small.
Privacy protection
1. While Android 12’s most important privacy progress is under the hood and invisible, one front-facing addition you’ll absolutely want to uncover is the software’s new series of switches for controlling your phone’s microphone and camera.
In short, Android 12 gives you the ability to disable either item at a moment’s notice and with a single fast tap. But in many cases, it’s up to you to surface the switches ahead of time and make sure they’re available in case you ever need ’em.
Here’s how:
- Swipe down twice from the top of your screen to open your full Quick Settings panel.
- Look for the option to edit the Quick Settings. In Google’s version of Android, it’ll be a pencil-shaped icon in the lower-left corner of the panel. On Samsung phones, you’ll have to tap the three-dot menu icon in the panel’s upper-right corner, then select “Edit buttons” in the menu that pops up.
- Find the “Camera access” and “Microphone access” tiles. You may have to scroll down (or right, on Samsung devices) to the inactive tile area to find them.
- Once you see them, press your finger onto them, one at a time, and drag them into the active area of your Quick Settings panel.
- Tap the left-facing arrow in the corner of the screen (or tap the “Done” button at the bottom, with Samsung) when you’re finished.
With that step out of the way, you’ll now have one-tap toggles for turning your camera or microphone off, should the need for such a swift switch ever arise.
2. Android 12’s other prominent front-facing privacy enhancement is the software’s new Privacy Dashboard. It gives you a simple, streamlined place for seeing exactly what system permissions your apps have been using and then pulling back on that access as you see fit.
You can find the Privacy Dashboard by heading into the Privacy section of your system settings. There, you’ll see a little something like this:

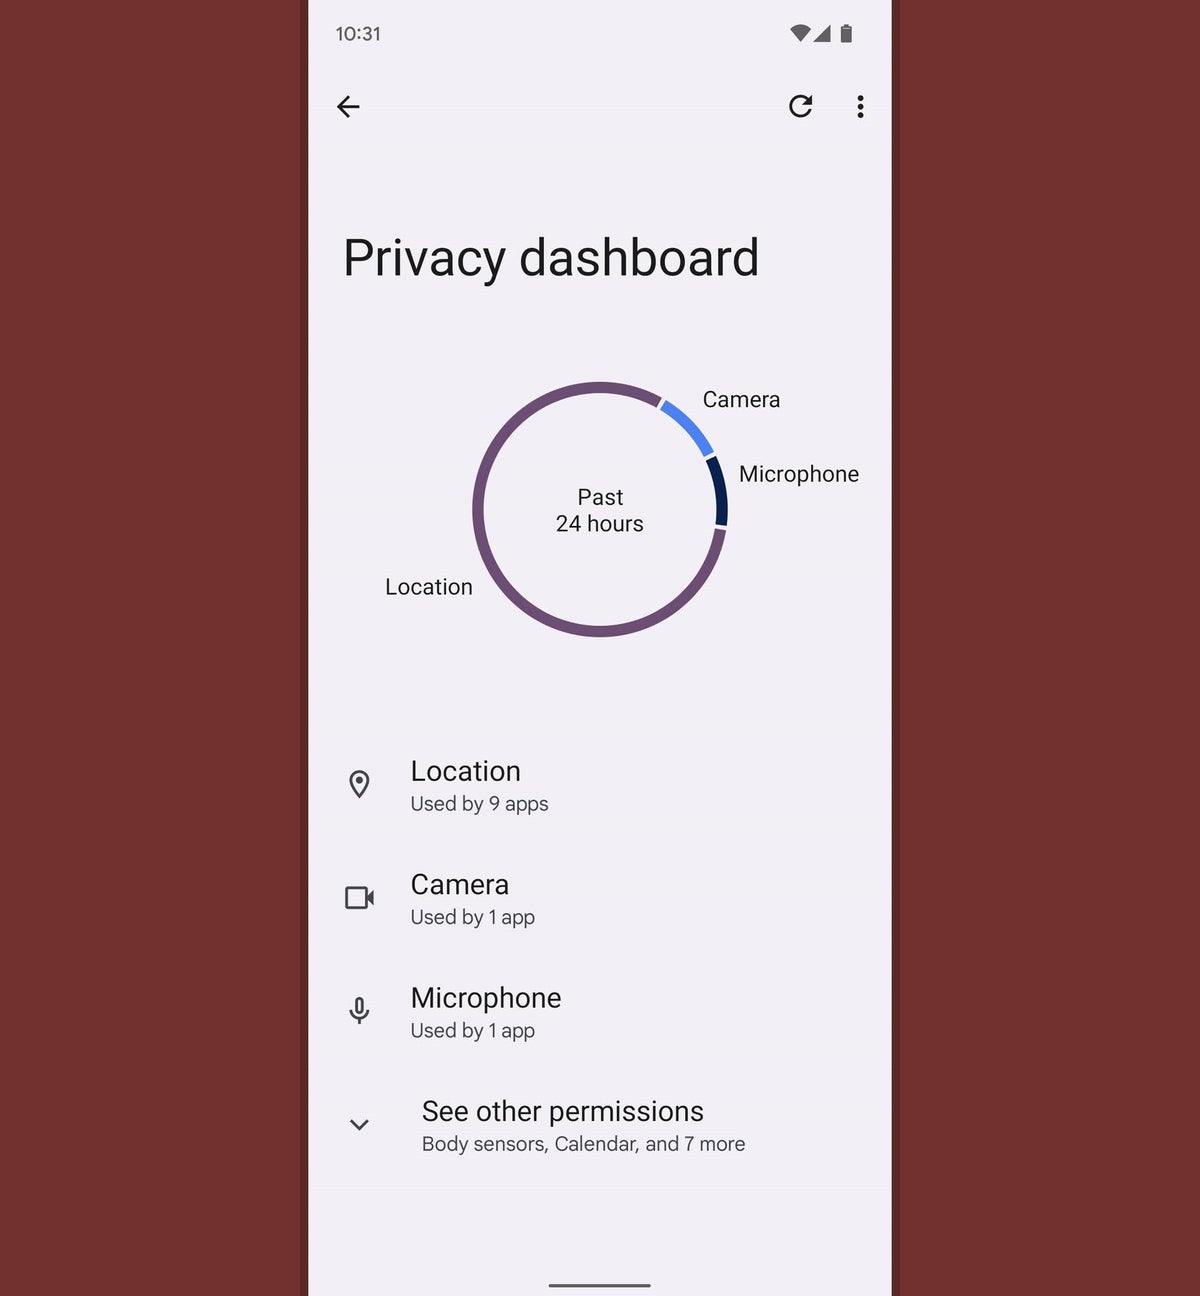
The Android 12 Privacy Dashboard, as seen in Google’s version of the operating system.
It’ll look a bit different on Samsung devices, but the basic elements should all be present on most any device with Android 12 in place.
What’s worth noting is that you can tap on any specific permission to reveal a detailed timeline of exactly which apps tapped into that area of data and when:
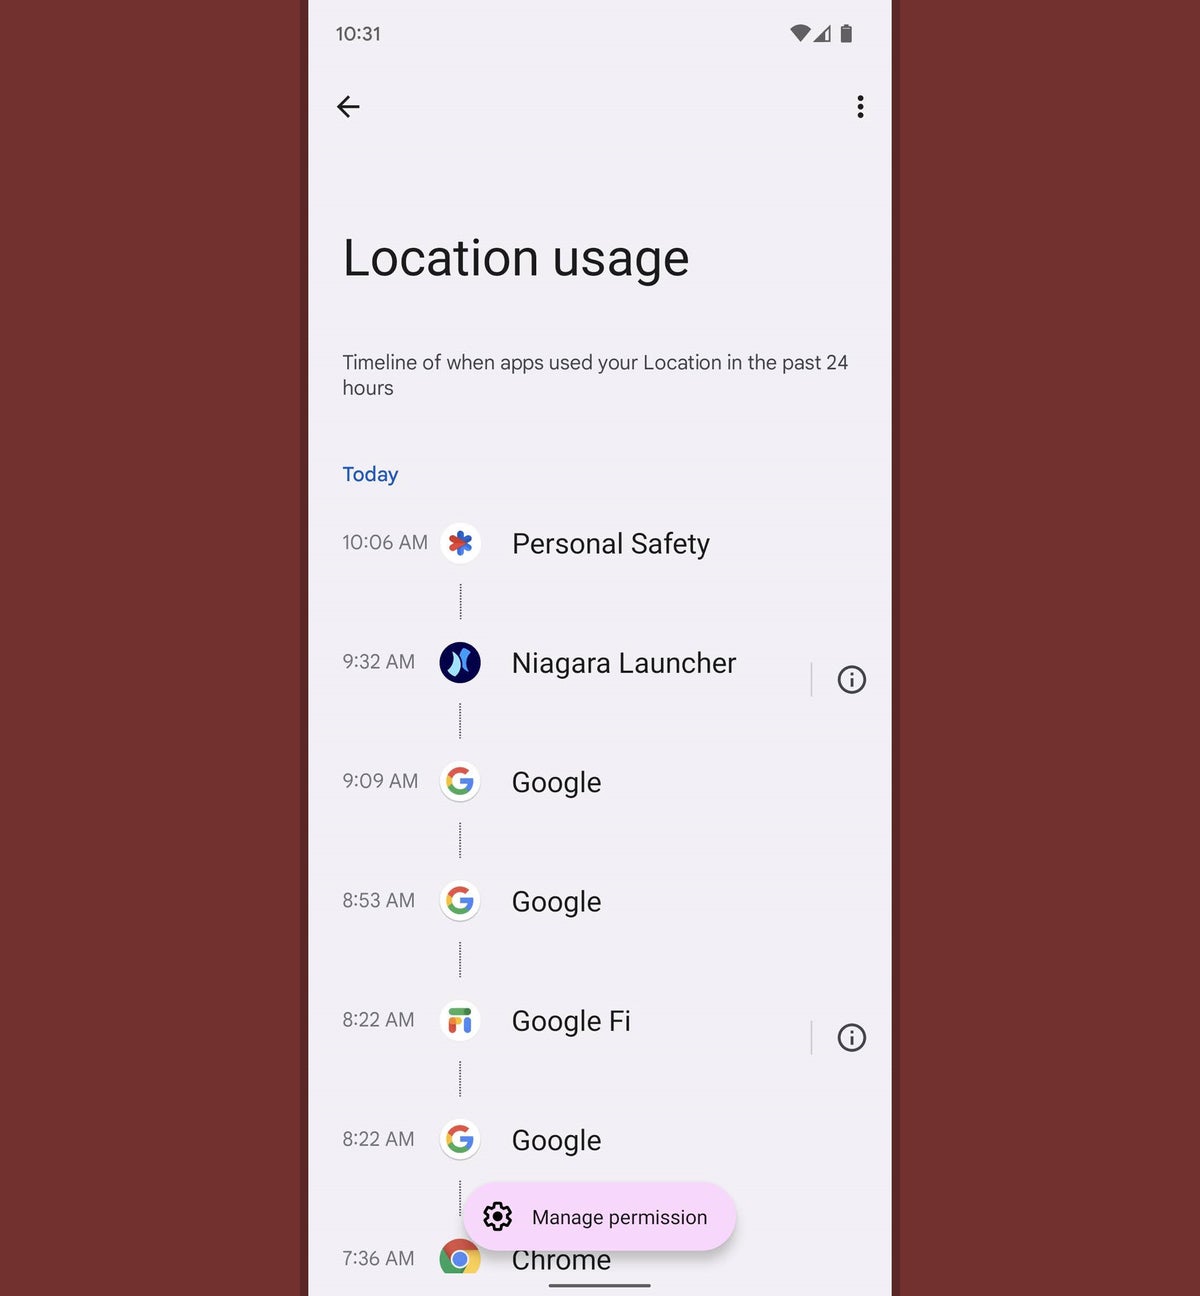
Android 12 makes it easier than ever to see exactly how permissions are being used.
And from there, you can sometimes even see specific explanations of why an app required that permission — if the developer took the time to provide that context. You’ll know that info’s available when you see a small circled “i” to the right of the app’s line.
3. Whilst looking at Android 12’s new Privacy Dashboard, tap any app’s name to review all of its permitted permissions and optionally revoke or scale back any of those areas of access. Notably, the permissions for location, camera, and microphone offer more nuanced options for allowing access only when an app is actively in use or even for requiring manual authorization every time access is requested.
4. You can get more nuanced yet with location access in Android 12 and decide whether you want an app to have access to your precise location — as in, your exact whereabouts, provided by GPS — or if you’d rather limit an app to seeing only your approximate location, which shows just your general vicinity based on your current network connections.
Open up the “Location” permission in that same area of your Privacy Dashboard and then select any app in the list to find the option.
Experience enhancements
5. Android 12 includes a new one-handed mode that can make it a heck of a lot easier to get around your phone with a single paw. In Google’s version of Android, you can activate it by going into the System section of your phone’s settings, then tapping “Gestures” followed by “One-handed mode.”
Flip the “Use one-handed mode” toggle into the on position, then consider whether you want the system to shrink your entire screen down into a smaller area of the display, like this:
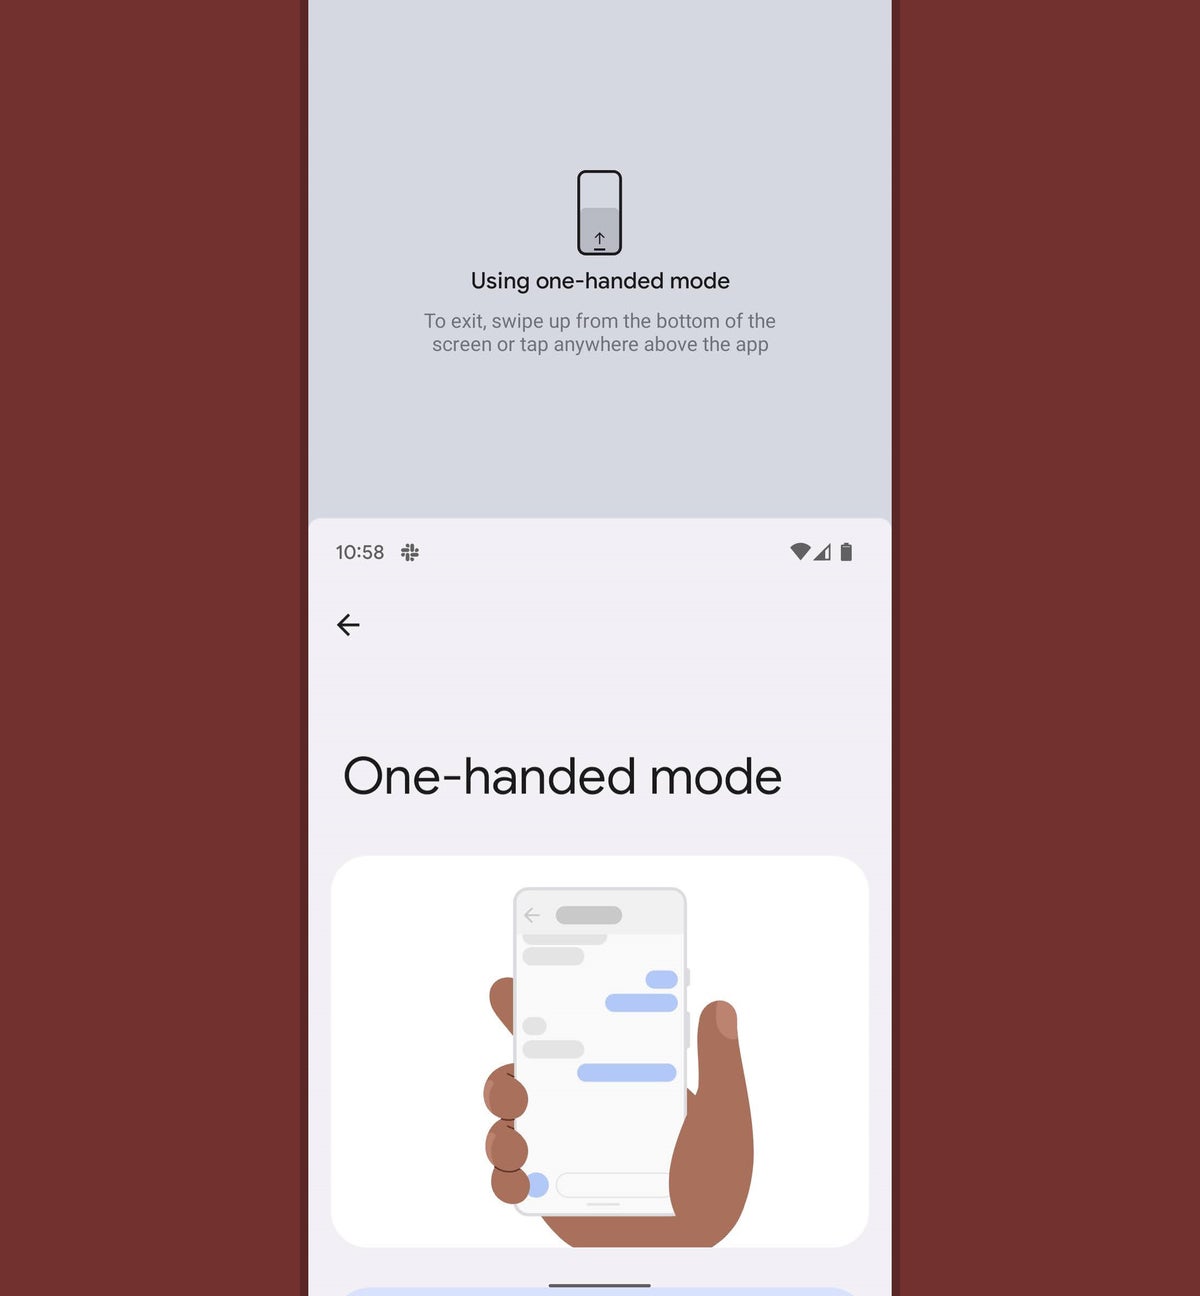
Android 12’s one-handed mode can shrink the active area of your display down to make things easier to reach.
…or if you’d rather simply have it pull down your notification panel without forcing you to stretch all the way to the top of the screen.
Either way you go, once it’s activated, you can launch one-handed mode by swiping downward on the bottom-center area of your screen — starting about a half-inch from the bottom and moving to the lower perimeter. And note that you’ll need to be using Android gestures in order for it to work.
On a Samsung device, look in the Advanced Features area of your phone’s settings and then tap “One-handed mode” to get started. Once activated, the system (which was actually available in that environment even prior to Android 12’s arrival) will work more or less in the same way as what we just went over, only without the notification panel possibility present as an option.
6. Speaking of notifications, notice a curious new icon in the lower-right corner of your various alerts?


An unfamiliar icon might catch your eye in Android 12’s notifications.
That’s a new look for Android’s notification snoozing function, which had been tucked away behind a long-press in previous Android versions (and consequently had been overlooked by most phone-totin’ organisms).
Now, all you’ve gotta do is tap that lovely little symbol anytime you want to send a notification away and schedule it to return at some future time. By default, your notification will be snoozed for one hour, but you can also choose to have it return in 15 minutes, 30 minutes, or two hours, if you prefer.
7. Android’s had a helpful Notification History option for a while now, but Android 12 continues the vexing tradition of keeping that feature disabled by default and completely out of sight — so most folks never even know it’s available.
Here’s how to buck the trend and activate it on your Android device:
- Head into the Notifications section of your system settings.
- In Google’s version of Android, tap the line labeled “Notification history.” On a Samsung phone, tap “Advanced settings” and then tap “Notification history.”
- Turn the toggle at the top of the screen that comes up next into the on position.
And that’s it: You can now always pull up a list of recent notifications in that same area to review any recent alerts, even after you’ve swiped ’em away.
8. Ever find your phone too bright for comfort, even at its lowest display brightness setting? Try out Android 12’s newly added Extra Dim switch for extra-comfy dark-room viewing. The option is available as a Quick Settings tile, so swipe down twice from the top of your screen to find it — and if you don’t see it there, use the same steps we went over in our first tip to unearth it and bring it up into the active area.
9. Attention, Pixel owners with a Pixel 4 or higher: Make sure to march your way into the Display section of your device’s system settings and tap “Auto-rotate screen.” There, you’ll find a clever new option for allowing your phone to use its front-facing camera to automatically detect which way your face is positioned and then make sure your screen’s orientation always matches.
That way, even if you’re lying sideways on a couch and holding your phone at an angle, the screen will remain in its portrait orientation instead of flipping into landscape and driving you batty.
Next page: Step-saving shortcuts and system smarts →
Step-saving shortcuts
10. Here’s another Pixel-specific Android 12 treat: Provided you’re using the Pixel phone’s default home screen environment in Android 12 (and not a custom Android launcher), swipe up from the bottom of your screen to open your app drawer and then tap the search box at the top of that area.
You’d never know it, but the Pixel’s app drawer search function got a major upgrade in Android 12 — and you can now search for contacts, conversations, settings, apps, and shortcuts within apps from that one streamlined spot to find anything you need in a snap.

The Android 12 app drawer search box has some spectacular hidden search powers on Pixel phones.
11. Make that new universal search system even more efficient by tapping the three-dot menu icon within the Pixel app drawer’s search box and then tapping “Always show keyboard.” That’ll cause your on-screen keyboard to automatically pop up and be ready for input as soon as you open the app drawer, saving you the step of having to tap on the box to get it to appear.
12. Need to get someone else on your Wi-Fi network, whether in the office or at home? Android 12 has a handy new system for sharing your current network’s configuration wirelessly over Bluetooth. Tap the Internet tile in your device’s Quick Settings area, then tap the gear-shaped settings icon next to your current network’s name. Tap the “Share” command on the screen that comes up next, then tap “Nearby” and hold the other person’s phone back to back against yours.
You should see a prompt on the second phone to turn on Nearby Share and accept the information, after which the network should automatically connect — no manual password typing or clunky QR code scanning required.
13. If you find yourself missing the excellent connected-device control panel that was built into the power-button menu in Android 11, set a mental reminder: That same info is still available in Android 12 — only now, it’s in your Quick Settings panel instead of the power-button menu (sigh).
Don’t despair, though! Here’s a teensy trick to make that connected-device shortcut section easier to access within this new arrangement: Edit your device’s Quick Settings area, using the same steps we went over earlier, and look for the new Device Controls tile. Drag it up into one of the top four positions, and it’ll never be more than a single swipe away.
14. You’d be forgiven for failing to notice, but you can also get to Android 12’s Device Controls section directly from your lock screen — at least, in Google’s version of Android.
Provided your phone supports the function, look for a house-shaped icon in the lower-left corner of the lock screen to hop directly to that area — and if you don’t see that icon there, head into the Display section of your system settings, tap “Lock screen,” and then look for the “Show device controls” option to activate it.
15. On a related note, take note: The tiles in your Android 12 Device Controls area may look like basic buttons, but they’re actually much more. In addition to tapping, you can long-press most of those commands to jump directly to the full set of controls in the associated app — and in certain cases, like when a control is for a dimmable light, you can swipe left or right on the button to adjust its level without having to open anything else.
16. Don’t let the name Device Controls fool you. With the right tool and a few minutes of crafty configuration, you can add fast-access commands for almost any shortcut imaginable into Android 12’s Device Controls area. Follow the instructions in this guide if you want to dive deep into some next-level custom time-savers.
17. On a Pixel, Android 12 adds in the ability to snag and share a link to a web page from right inside the system Overview area. Just swipe your finger up about an inch from the bottom of the screen and stop, if you’re using the current Android gestures system — or press the square-shaped button along the bottom of your phone’s screen, if you’re still clinging onto the legacy three-button nav setup — and then find Chrome in your list of recently used apps.
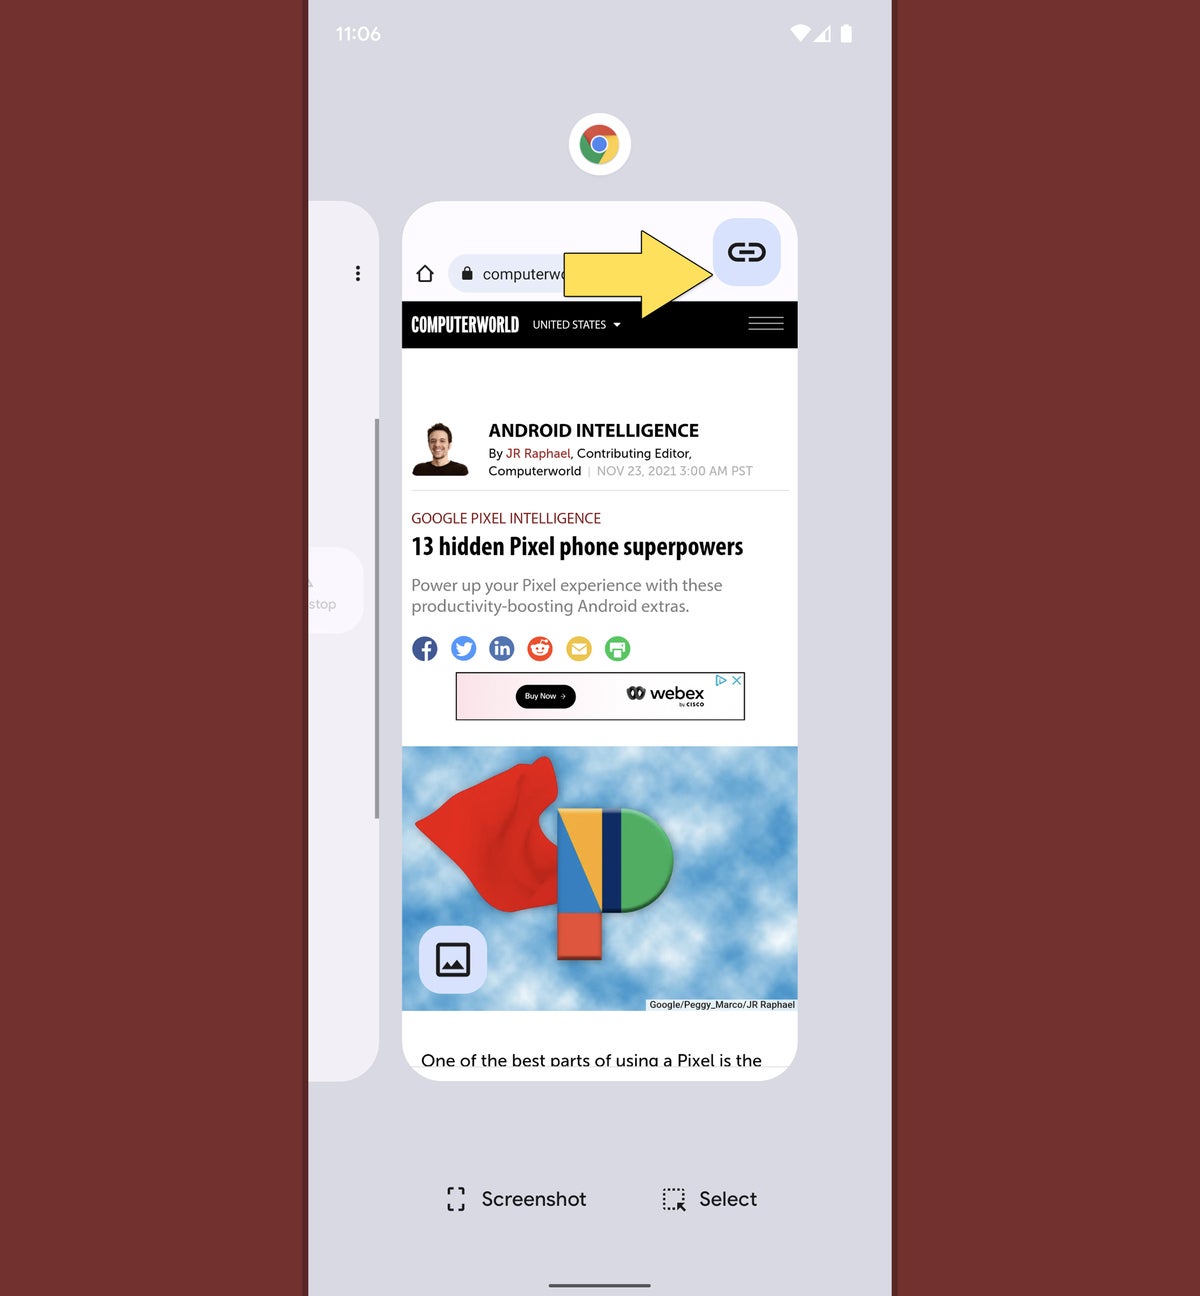
Open up Chrome in Android 12’s Overview area, and a special new button will greet you.
See that funky new button in the browser’s thumbnail? Tap that, and you’ll be able to copy the current page’s link or share it directly to any other app on your phone in seconds flat.
18. Another simple but supremely effective new second-saver in Android 12 (and, yes, another one that’s specific to Google’s own version of Android — sorry, Samsung pals!): When you capture a screenshot and see the confirmation graphic show up in the lower-left corner of your screen, you can now swipe that confirmation away to dismiss it. It’s a small thing, admittedly, but it’s much more natural and intuitive than the awkward old tiny-“x”-tapping action that was required in the past.
System smarts
19. While we’re on the subject of screenshots, Android 12 allows you to capture scrolling screenshots that show more than a single screen’s worth of information. It’s a great way to share an especially long email, web page, or other piece of content without having to capture multiple images.
The function is limited only to apps that support it, but it’s already available in Chrome and Gmail as well as in most parts of the Android system interface. Just press your phone’s power and volume-down button together to take the screenshot, then look for the “Capture more” button (or the icon showing a box with two arrows inside it, on a Samsung phone) within the screenshot confirmation to give it a go.
Android 12’s new scrolling screenshot feature lets you capture an extended area of a website — at last!
20. Google snuck a couple of subtle but welcome improvements into Android’s picture-in-picture system in the Android 12 release. First up is a faster and easier way to resize any picture-in-picture box on your screen with a convenient new gesture.
The next time you’ve got one of those floating windows of content — like when you start a navigation in Google Maps or play a video in YouTube (in certain conditions) and then go back to your home screen — try touching two fingers to the box and then stretching your fingers outward to enlarge it or pinching them together to shrink it down into a smaller state.
And speaking of minimization…
21. Android 12 allows you to push a picture-in-picture window almost entirely off the side of your screen, in case you want to keep a video or navigation playing but need it out of your active viewing area for a while. Just touch your finger to the box and slide it all the way to either side. That’ll leave you with just a sliver of the box’s edge visible, and you can then press and hold that edge to drag the box back into a more prominent area whenever you’re ready.
22. After years of neglect, Google is giving Android widgets some long overdue love as of Android 12 (imagine that!). And if you’re using a Pixel phone, you can find some hidden extra widget elements by adding certain system-level widgets onto your home screen and then making ’em larger than their default size.
If you’ve got a Pixel, try this:
- Press and hold your finger onto any open area of your home screen and select “Widgets” from the menu that comes up.
- Tap the line labeled “Google,” then touch and hold your finger to the 4×2 weather widget in the list of options.
- Drop that widget onto any open area of your home screen.
- See the lines around the widget? (If you don’t, press and hold your finger to it for a second to get them to appear.) Drag the line along the widget’s bottom edge downward to expand it, and you’ll see a forecast for the next couple of days show up beneath the current day’s weather info.
Who knew?!
23. Last but not least, a pair of Pixel-specific surface-level Android 12 additions that are well worth uncovering:
First, press and hold your finger onto an empty area of your phone’s home screen and select “Wallpaper & style.” Scroll down a bit and find the option called “Themed icons.” If the switch next to that isn’t already in the on position, flip it on — then watch the icons from supported apps on your home screen automatically color themselves to match your wallpaper and continue to do so whenever your wallpaper changes. (It’s mostly Google-made apps that support the system at the moment. But with any luck, that’ll expand over time.)
On a Pixel, Android 12 can give your entire device a sleek and cohesive themed appearance — all the way down to the icons on your home screen.
And finally…
24. Once more, only on a Pixel for now: Touch your finger to any open text field to pull up the Gboard keyboard. Touch the three-dot icon along the keyboard’s top row, then tap “Settings” followed by “Theme.”
Find and tap the “Dynamic Color” option, then back your way out of that menu. And just like magic, your phone’s keyboard will now follow that same Android 12 auto-theming system and change its color to match the rest of your system interface based on your current wallpaper.
It may not have any real practical value, but hey: A pleasant working environment can go a surprisingly long way.
Hungry for even more Android 12 sweetness? Keep the Google-flavored tech feast going with my guide to fixing some of Android 12’s most vexing annoyances.


