Clean up your messy entryway with a DIY shoe rack
We won't wade into debate over whether or not it's OK to wear shoes in the house.

Any entryway can quickly become a hazardous mess of cast-off footwear, ready to trip up anyone who enters your home. You may know in your heart that the solution to this inhospitable problem is a shoe rack, but you may not know how easy it is to build one.
There are advantages to building one from scratch, too: Not only will you get to personalize the project to match your style and decor, but you can save money. While the price for a low-quality, assembly-required shoe rack can exceed $100, I was able to put this rustic hardwood table together for about $60. If you already have some of these supplies on hand, you may be able to build yours for even less.
Warning: DIY projects can be dangerous, even for the most experienced makers. Before proceeding with this or any other project on our site, ensure you have all necessary safety gear and know how to use it properly. At minimum, that may include safety glasses, a face mask, and/or ear protection. If you’re using power tools, you must know how to use them safely and correctly. If you do not, or are otherwise uncomfortable with anything described here, don’t attempt this project.
Stats
- Time: 3 to 4 hours
- Material cost: $60
- Difficulty: Easy to moderate
Materials
- 2 (8-foot) 2-by-4s
- 2 (8-foot) 2-by-6s
- 2 (8-foot) 1-by-4s
- 1.5-inch wood screws
- 2-inch wood screws
- 1 quart of wood paint
- 1 quart of wood stain
- 60-grit sandpaper
Tools
- Circular saw (or a hand saw)
- Drill
- ¼-inch drill bit
- Measuring tape
- Pencil
- Square
- Respiratory mask
- Paintbrush
Instructions
1. Prepare the wood for cutting. If you don’t have a dedicated workshop, choose a space large enough to move around and make your cuts. Then, using your tape measure, pencil, and square, mark the following cuts for each piece of the table:
- Table top: Draw a line at the halfway mark on one of your 2-by-6 pieces so you’ll cut two roughly 4-foot boards.
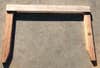
- Shoe rack: Mark the second 2-by-6 at 44.5 inches.
- Legs: Mark each of the 2-by-4s at 29.5 inches from one end and 29.5 inches from the other end, for a total of four cuts. Focusing at the end of one of these soon-to-be legs, mark a line in the center of the board, 2 inches from one of the long sides, and make another mark 5 inches down on the same side. Use your square to draw a diagonal line between the two, giving the bottom of the leg a slight taper. Repeat this on the other three legs.
- Long table top side trim: Mark one of the 1-by-4 boards at 44.5 inches from one end and 44.5 inches from the other end, for a total of two cuts.
- Short table top side trim: Mark the second 1-by-4 at 10 inches from one end and 10 inches from the other.
- Table top supports: Mark the unmarked portion of the second 1-by-4 so it yields three 8 ⅜-inch pieces. Space them apart a little bit to leave room for the approximately ⅛ inch the saw blade will shave off.
Take this time to also remove any barcode stickers and staples from the wood so you don’t have to deal with them when you stain the pieces later on.
2. Cut the wood. Using your circular saw, cut each of the pieces of wood you marked in Step 2.
- Pro tip: For the perfect cut, line your circular saw blade up with the pencil lines, then place your square flush with the left side of your circular saw’s shoe (the flat metal part that rests against the wood) to guide the process.
3. Sand the wood. Using a piece of sandpaper, sand each piece of wood until it is smooth and use a paint brush to clean off any dust and debris.
- Pro tip: If you’re worried about splinters, wear gloves or wrap the sandpaper around a block of wood to create a buffer for your hands.
4. Assemble a set of table legs. Using your drill and screws, fasten two legs together as follows:
- Place two of the legs (the 29.5-inch pieces of 2-by-4) so their outside edges are 44.5 inches apart.
- Place one of the 44.5-inch 1-by-4 trim pieces between the legs so it’s flush with the top (the non-tapered end) and outside edge of each leg.
- Drive four 1.5-inch screws into the wide face of the 1-by-4 to connect it to the legs: two on each side, centered on the 2-by-4 and 1 inch from the closest edge. Make sure the head of each screw goes at least ⅛ of an inch into the wood. (In Step 10, you will fill these holes with wood putty).
- Repeat this step for the other set of legs.
5. Attach the short side trim pieces. Stand one set of legs on its short side so it’s easier to work on this step. Place one 10-inch piece of 1-by-4 against the outside the leg that’s off the ground and closest to you, so it looks like the long trim piece you used to connect the two legs makes a 90-degree turn. Fasten the short trim piece in place with two 1.5-inch screws, each 1 inch from the closest edge and centered on the leg beneath. Repeat this step on the other leg (you can see the result in the photo below Step 6).
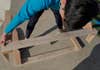
6. Put the two sets of legs together. Place the set without the attached side trim on the ground and put the other one on top. The two should fit together like puzzle pieces. Fasten them together by drilling two 1.5-inch screws into the 10-inch side piece and the 2-by-4, just like you did in the previous step. Repeat this on the other leg. Your table should now be able to stand on four legs, and that means you’re nearly finished assembling it.
7. Install the shoe rack. If you stood your table up to test it, lay it back down on its side and use your tape measure, square, and pencil to mark 6.5 inches from the bottom on all four sides of all four legs. This is where you’ll attach the shoe rack.
Using a ¼-inch drill bit, create two ½-inch-deep holes on the 4-inch-wide face of each leg. Each hole should be ¾ of an inch above the lines you just marked and 1 inch from the closest edge.
Now place your 44.5-inch 2-by-6 between the legs, resting the soon-to-be-rack directly above the lines you drew. The lines should be visible just beneath the board. Finally, drill your 2-inch screws into each of the pre-drilled holes. (In Step 10, you will fill these holes with wood putty).
- Pro tip: Temporarily place a leftover piece of 1-by-4 under the tapered end of each of the legs on the ground. This will match the 1-by-4 screwed to the top of the legs and keep everything level while you work.
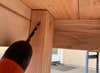
8. Install the table top. Stand your table up. All that’s left is to assemble the top. Place your two roughly 4-foot 2-by-6 planks on top of the table, so they touch at about the center of the frame. They will overhang on all sides. For a sleek finish, use the ¼-inch bit to drill one upward-angled hole on the interior side of each leg closest to the long side of the table and directly beneath the table top. The hole should be centered and 1 inch from the top of the leg, and go into the tabletop about half an inch. Taking care not to bust through the top of the 2-by-6, put one 2-inch. screw into each pre-drilled hole, fastening each leg to the plank on top.
9. Install the table top supports. Take one of your 8 ⅜-inch pieces of 1-by-4 and place it underneath the tabletop against two of the legs on one short side of the table. Screw it into the table top with two 1.5-inch screws, each one 2 inches in from the long side of the table and centered on the 1-by-4.
Fasten the second 8 ⅜-inch piece directly beneath the table top against the other two legs, attaching it the same way. Then center the third 8 ⅜-inch piece between the two short sides and attach it exactly as you installed the other two pieces.
Finally, reinforce the supports you just attached with extra 1.5-inch screws on the outside (one per support on each long side, for a total of six screws). Fasten one screw directly into the center of each end of the three 1-by-4s from the outside through the long pieces of trim.
10. Fill the holes with wood putty. Sand off any debris around your screws and apply wood putty as needed in each of the holes.
- Pro tip: You can use a small piece of leftover wood as an applicator to add the putty if you want to keep your fingers clean and avoid potential splinters.
11. Prepare to paint the table. Sand the entire table, making sure every surface is smooth and removing any debris from the wood putty. Then use your paint brush to remove all the dust from the table.
- Pro tip: If you don’t have a paint cover for your floor or whatever surface you’re on, you can use newspapers and grocery store coupons to keep it clean.
13. Paint the table. Using your paintbrush (make sure you remove any dust), apply a natural wood color stain to the table top and then a solid paint color of your choosing to the rest of the table. Let both the stain and paint dry, and apply a second coat for each.
- Pro tip: Place a piece of leftover wood beneath each of the legs before you start painting—that way the legs won’t stick to your paint cover.
- Note: Make sure to follow the paint or stain manufacturer’s instructions and ensure you’re applying your coats in a well-ventilated area.
Now your foyer will be complete and hazard-free.