
Privacy is a growing concern in the tech industry, but Apple has fallen behind many of its peers when it comes to email security. Fortunately, iOS 15 changes that. Your email address is the key to a vast amount of personal information, not to mention a stepping stone into your other online accounts, so it's great to see new features for iPhones that protect email accounts and their contents.
Many of us, intentional or not, store sensitive data in our email accounts, including drafts, passwords, photos, addresses, personal secrets, and even social security numbers. Obtaining access to an email address can be a gateway to banks, photo backups, credit card numbers, online accounts, and even calendar events. That's why phishers, hackers, and spammers target email with such tenacity.
For some peace of mind, it's essential to turn on and begin using iOS 15's email-centric privacy features right away. Not only can your iPhone block email tracking pixels that monitor how you interact with incoming messages, but it can generate new and random email addresses for you to use with other apps and services, obfuscate your web traffic (including when using email on your phone), and more.
In addition to the newest features, there were already several ways to protect your privacy when emailing from your iPhone, some you may not know. The iOS 15 tips below can help prevent security breaches and unwanted outside access and show why it might be worth switching to iPhone (or sticking with it) if you care about email security.
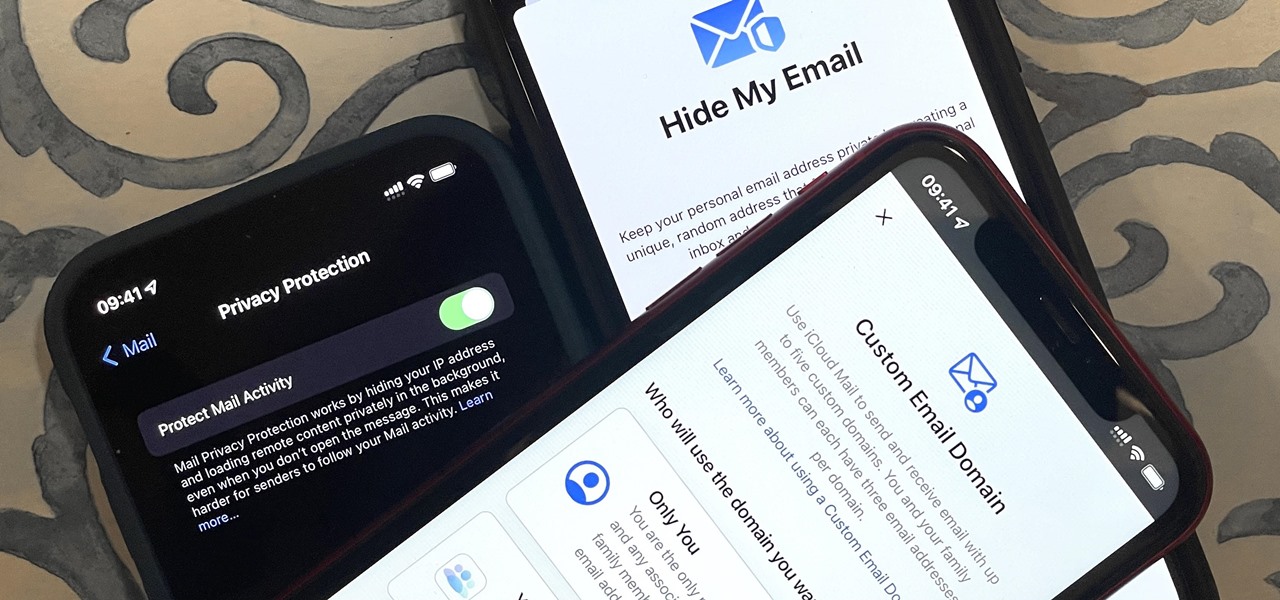
Tip 1: Use Custom Email Domains with iCloud Mail
Your iCloud email address is no secret. It's easy for hackers to find or guess email addresses to begin cracking passwords and accessing accounts, especially when most iCloud email addresses end in @icloud.com and many people use a variation of their name.
Fortunately, if you're running iOS 15, have two-factor authentication enabled for your Apple ID, own a primary iCloud Mail address, subscribe to iCloud+, and own a domain, you can use a custom email domain with iCloud Mail.
Aside from security concerns, a custom email domain will allow you to quickly move between email hosts when needed, can make your business look more legit if you have one, could give each of your family members custom addresses, and keep tech companies from rifling through your emails for advertising purposes.

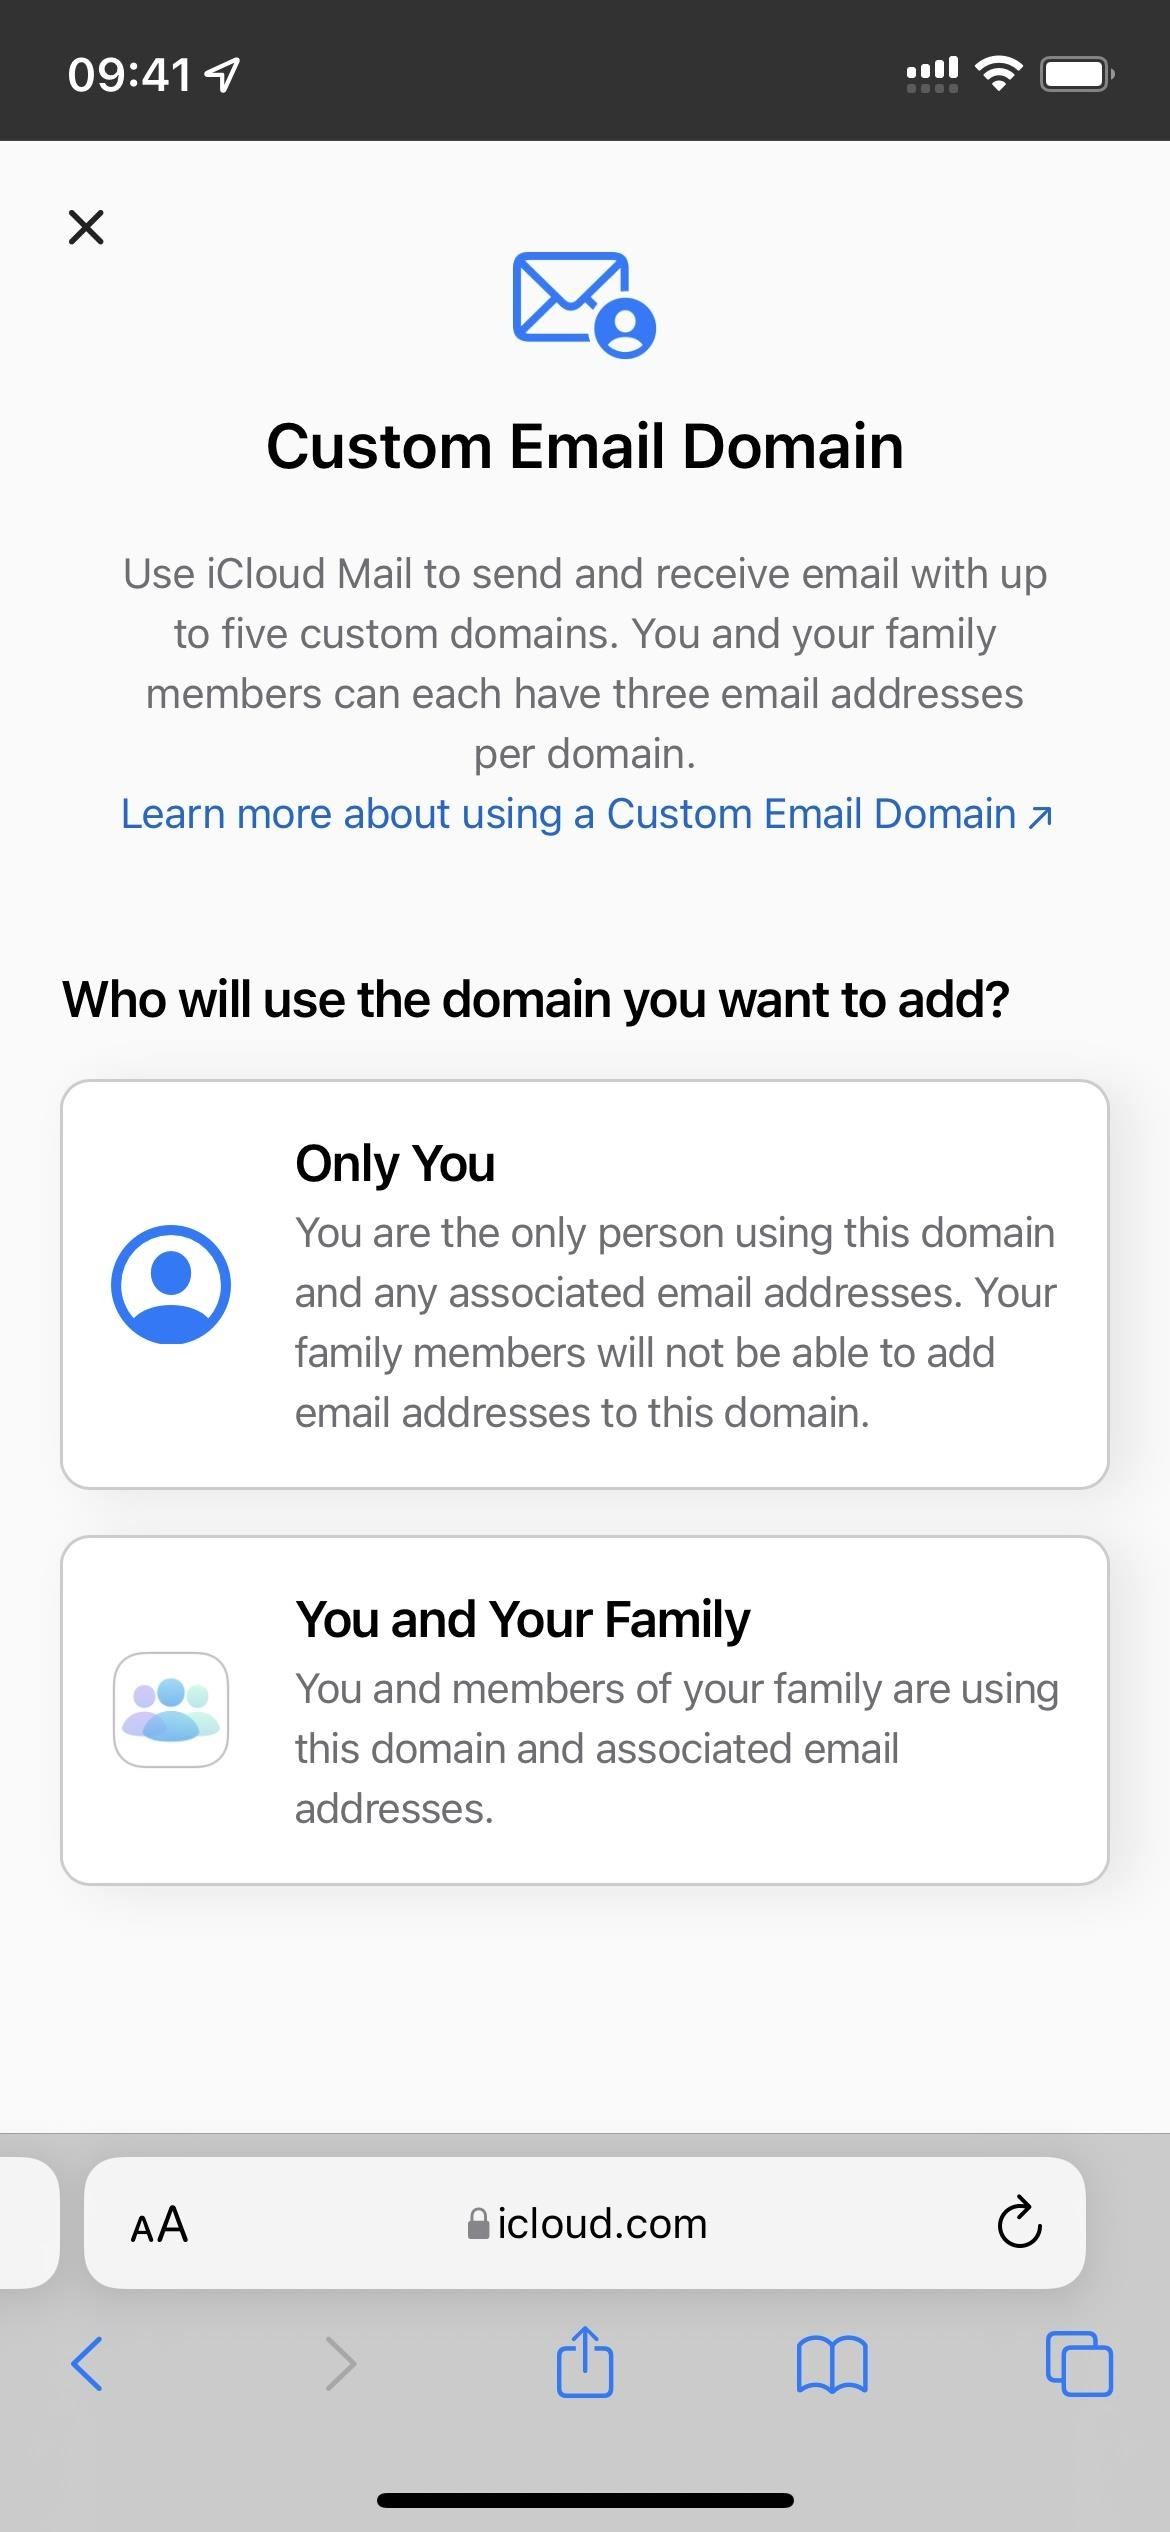
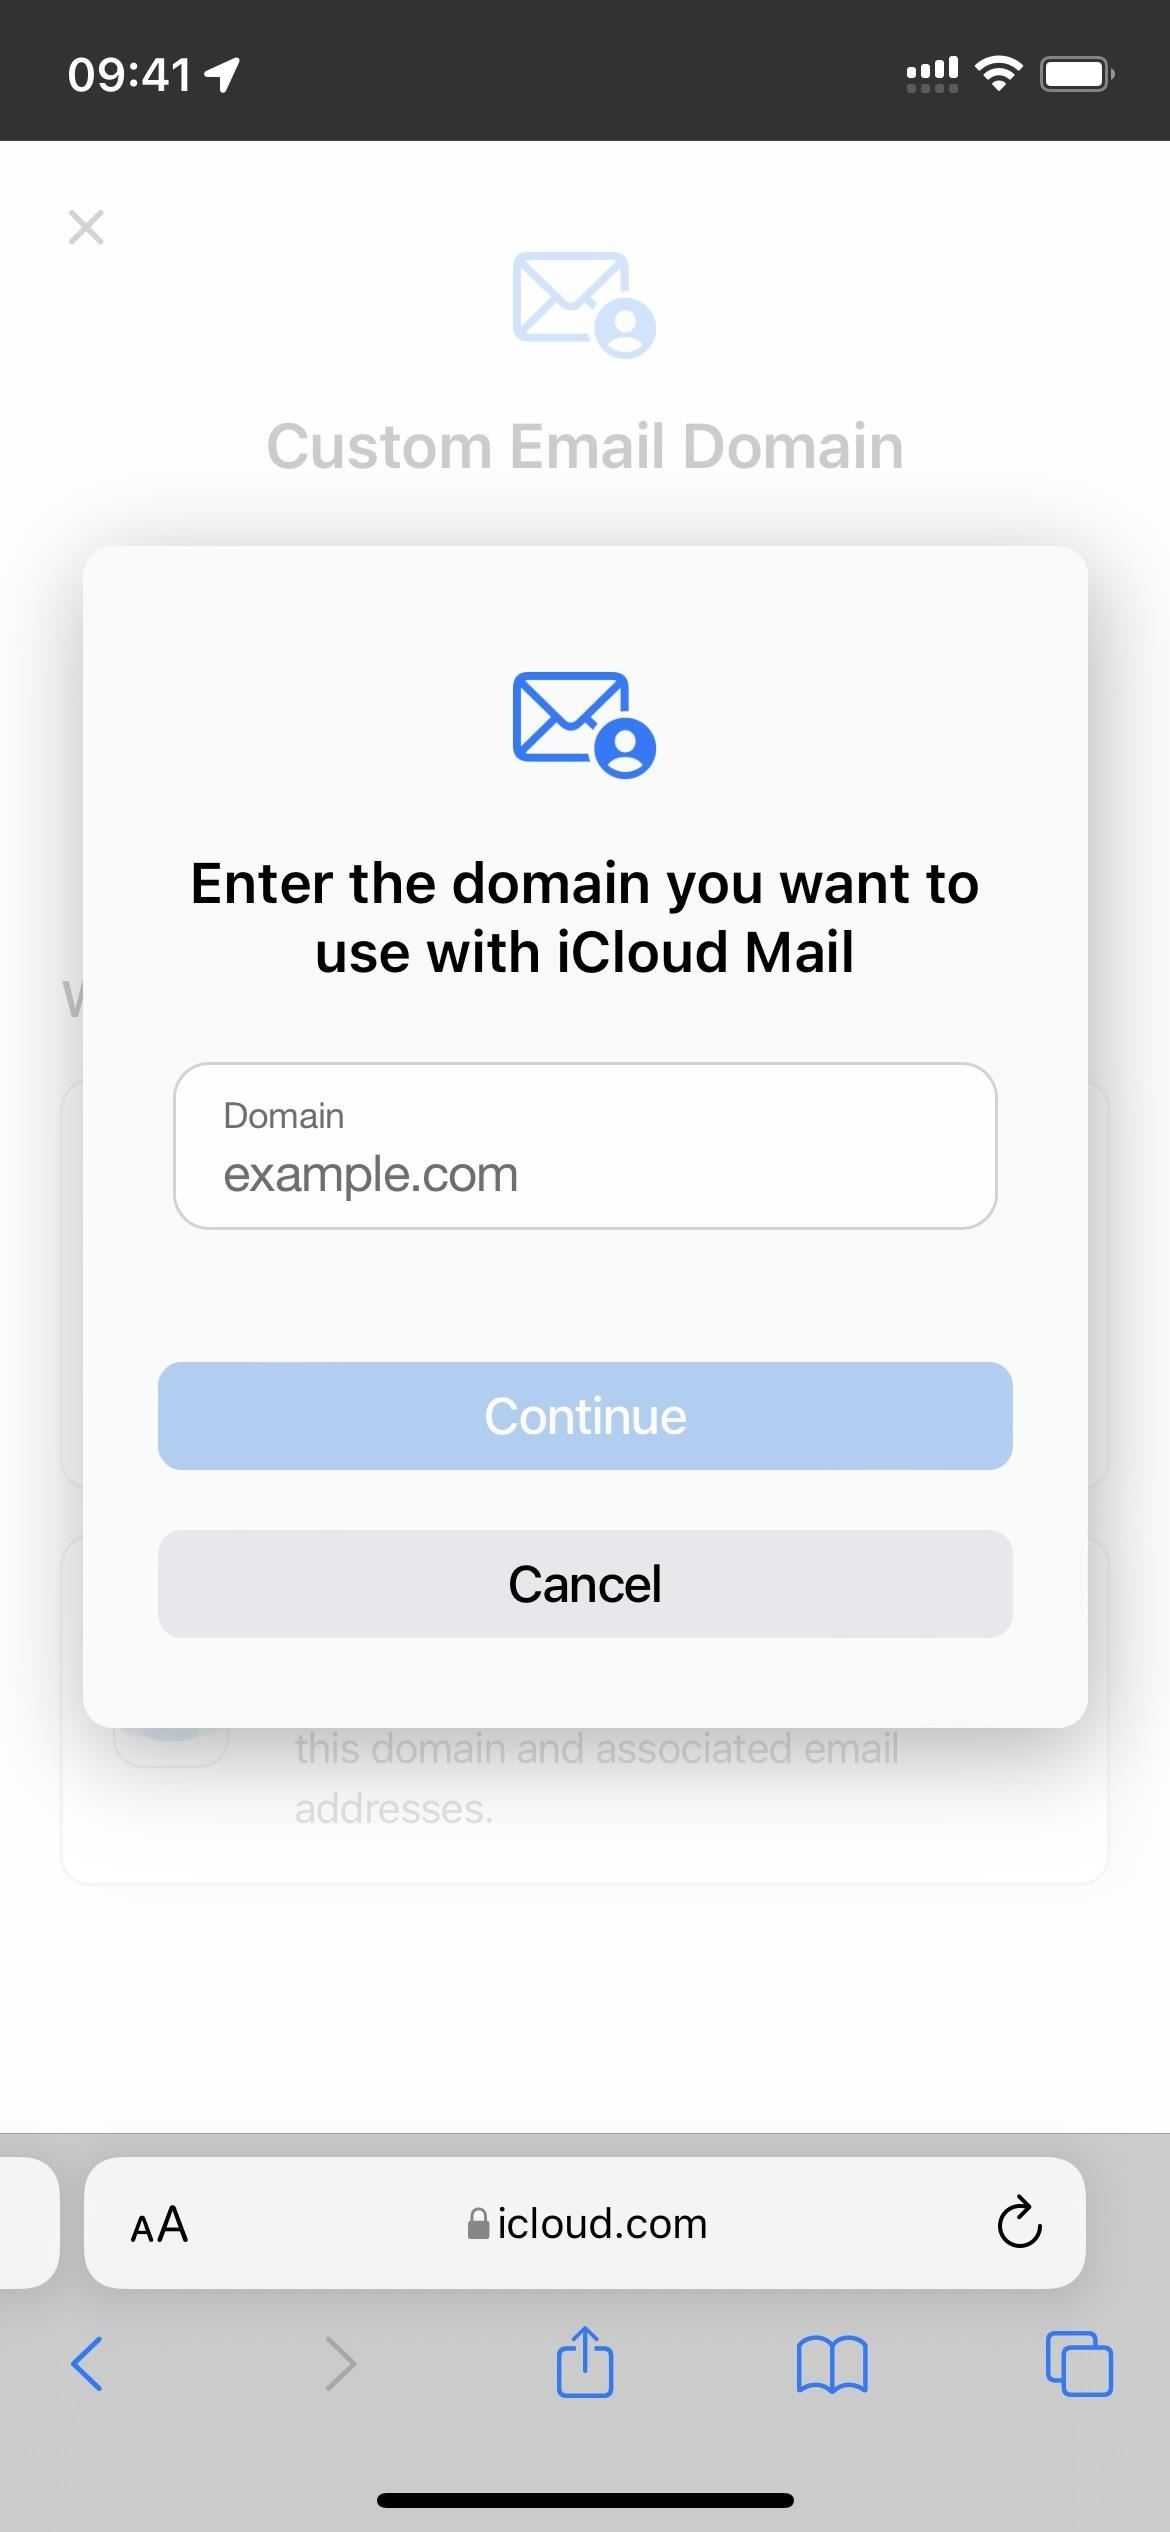
You can point up to five custom domains to Apple's mail servers. Once configured correctly, you and your family can each have up to three email addresses per domain. Unique email domains can make it much harder to coordinate phishing attacks and help make your data that much more secure.
A few downsides include relying on Apple's subpar spam filtering and having all mail from all domains consolidated at your primary iCloud email address.
Tip 2: Use iCloud Aliases
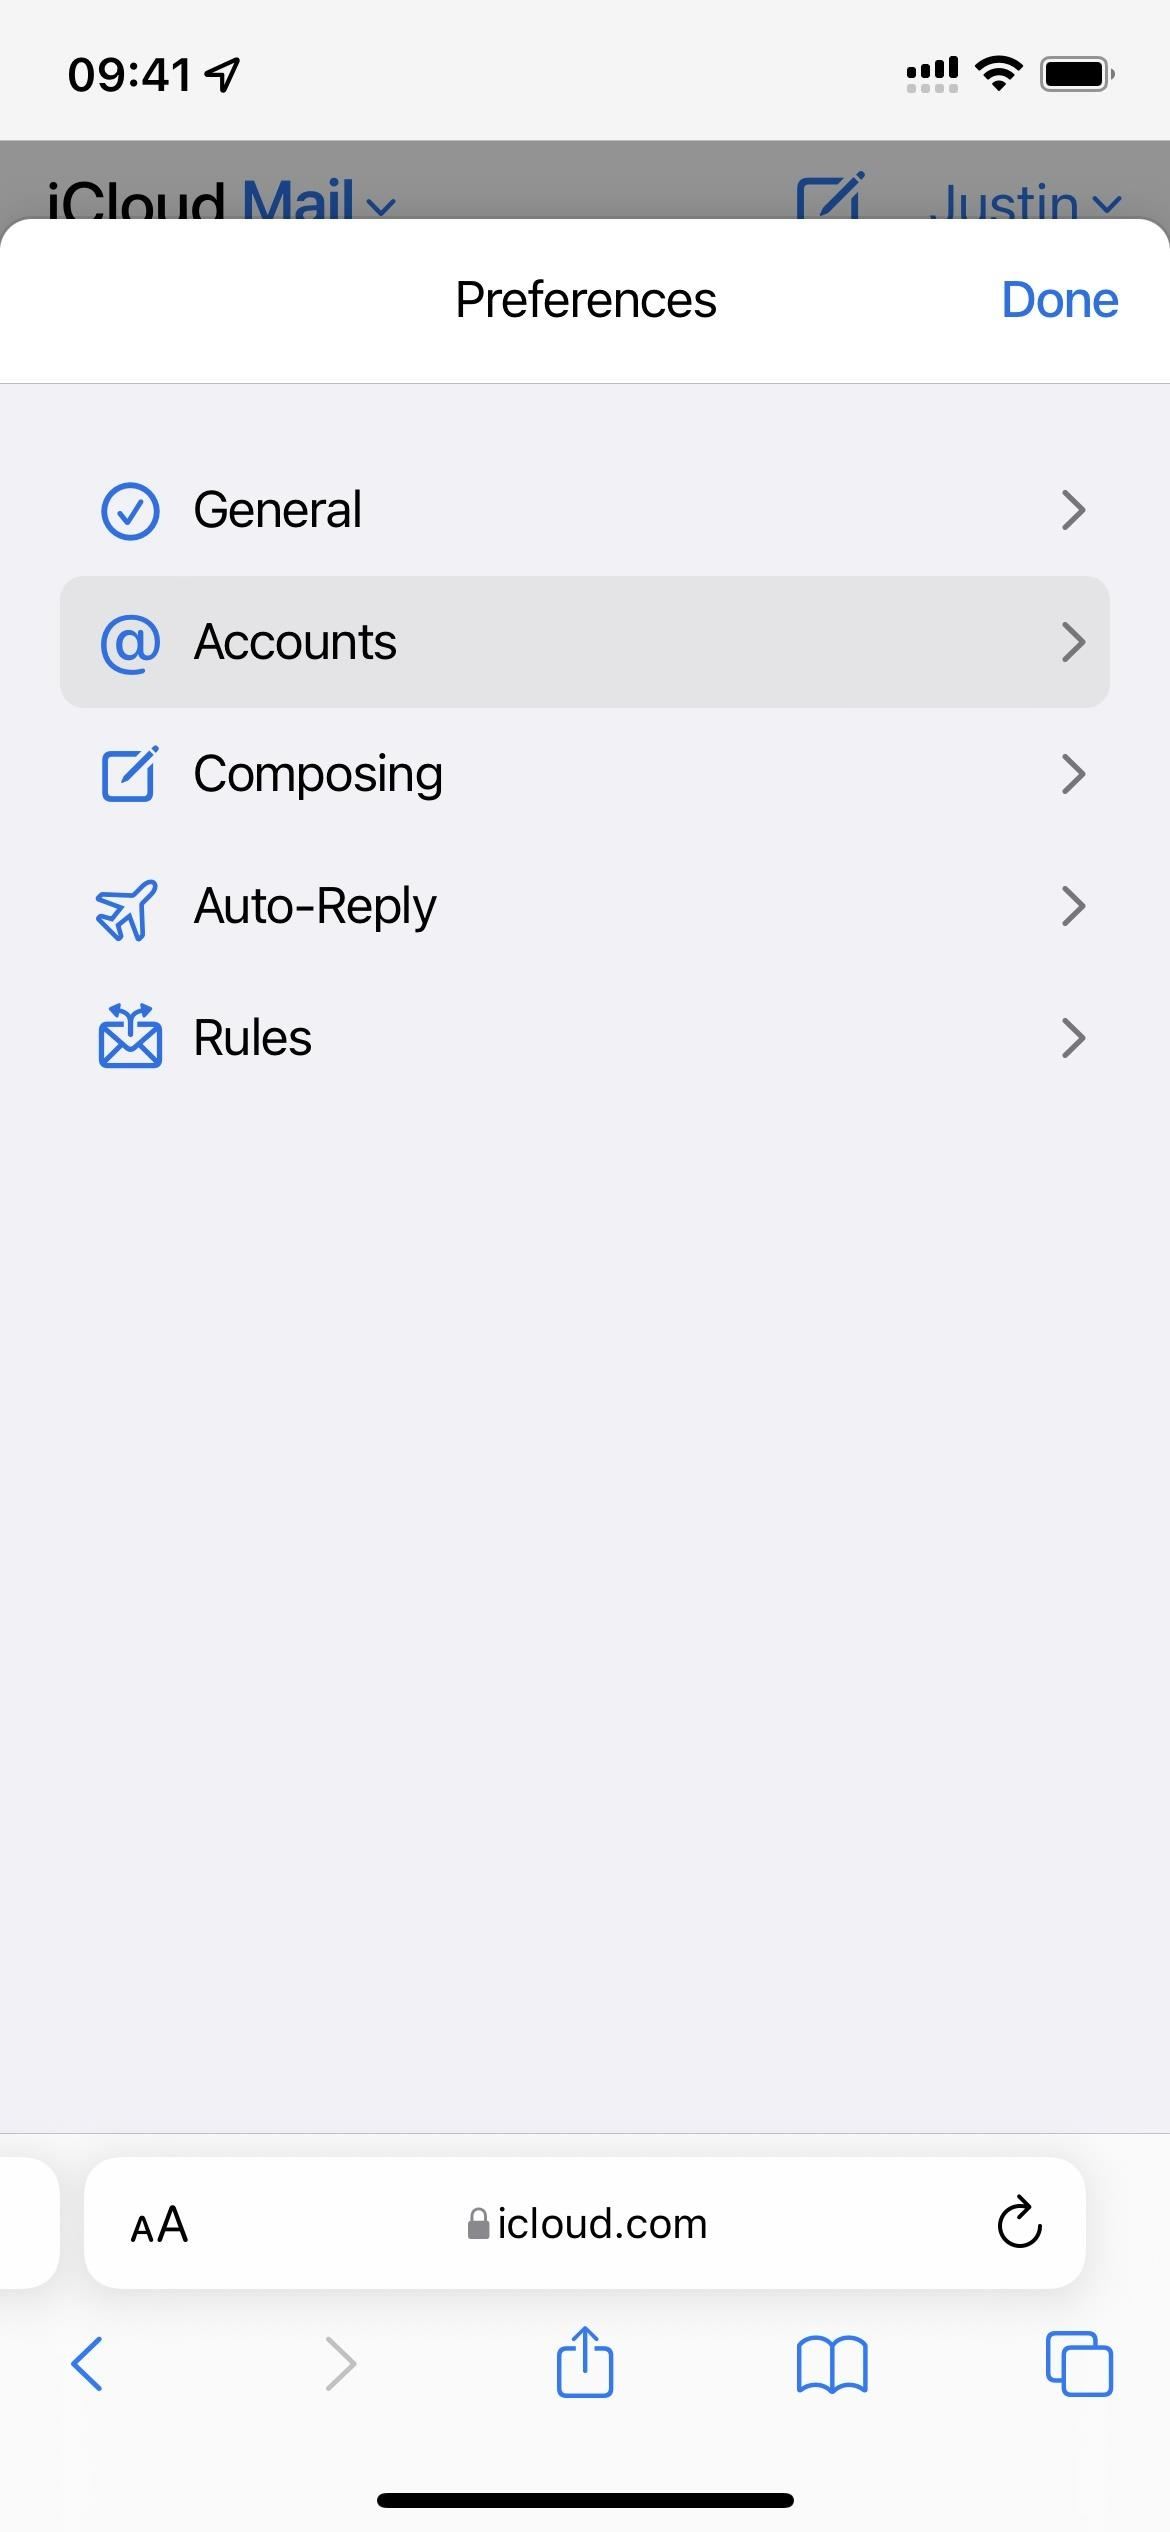
With an iCloud email account, you can create email aliases and stop giving your primary email address out to everyone and everything, isolating unwanted messages and spam from important communications. With an @icloud.com email address, you get up to three aliases, giving you some flexibility.
Once you set up an alias, you can use it to send and receive email via iCloud.com, Mail, or a third-party email client. You can change the full name for the alias whenever needed and add a label like shopping, work, etc. To create or edit aliases, open iCloud Mail in a web browser, tap the settings cog from the all mailboxes screen, choose "Preferences," and select "Accounts."
Once you create aliases, you can select them from the "From" field in the Mail app. If you don't really send any emails with them and only use them for receiving, you can hide them from the "From" selector.
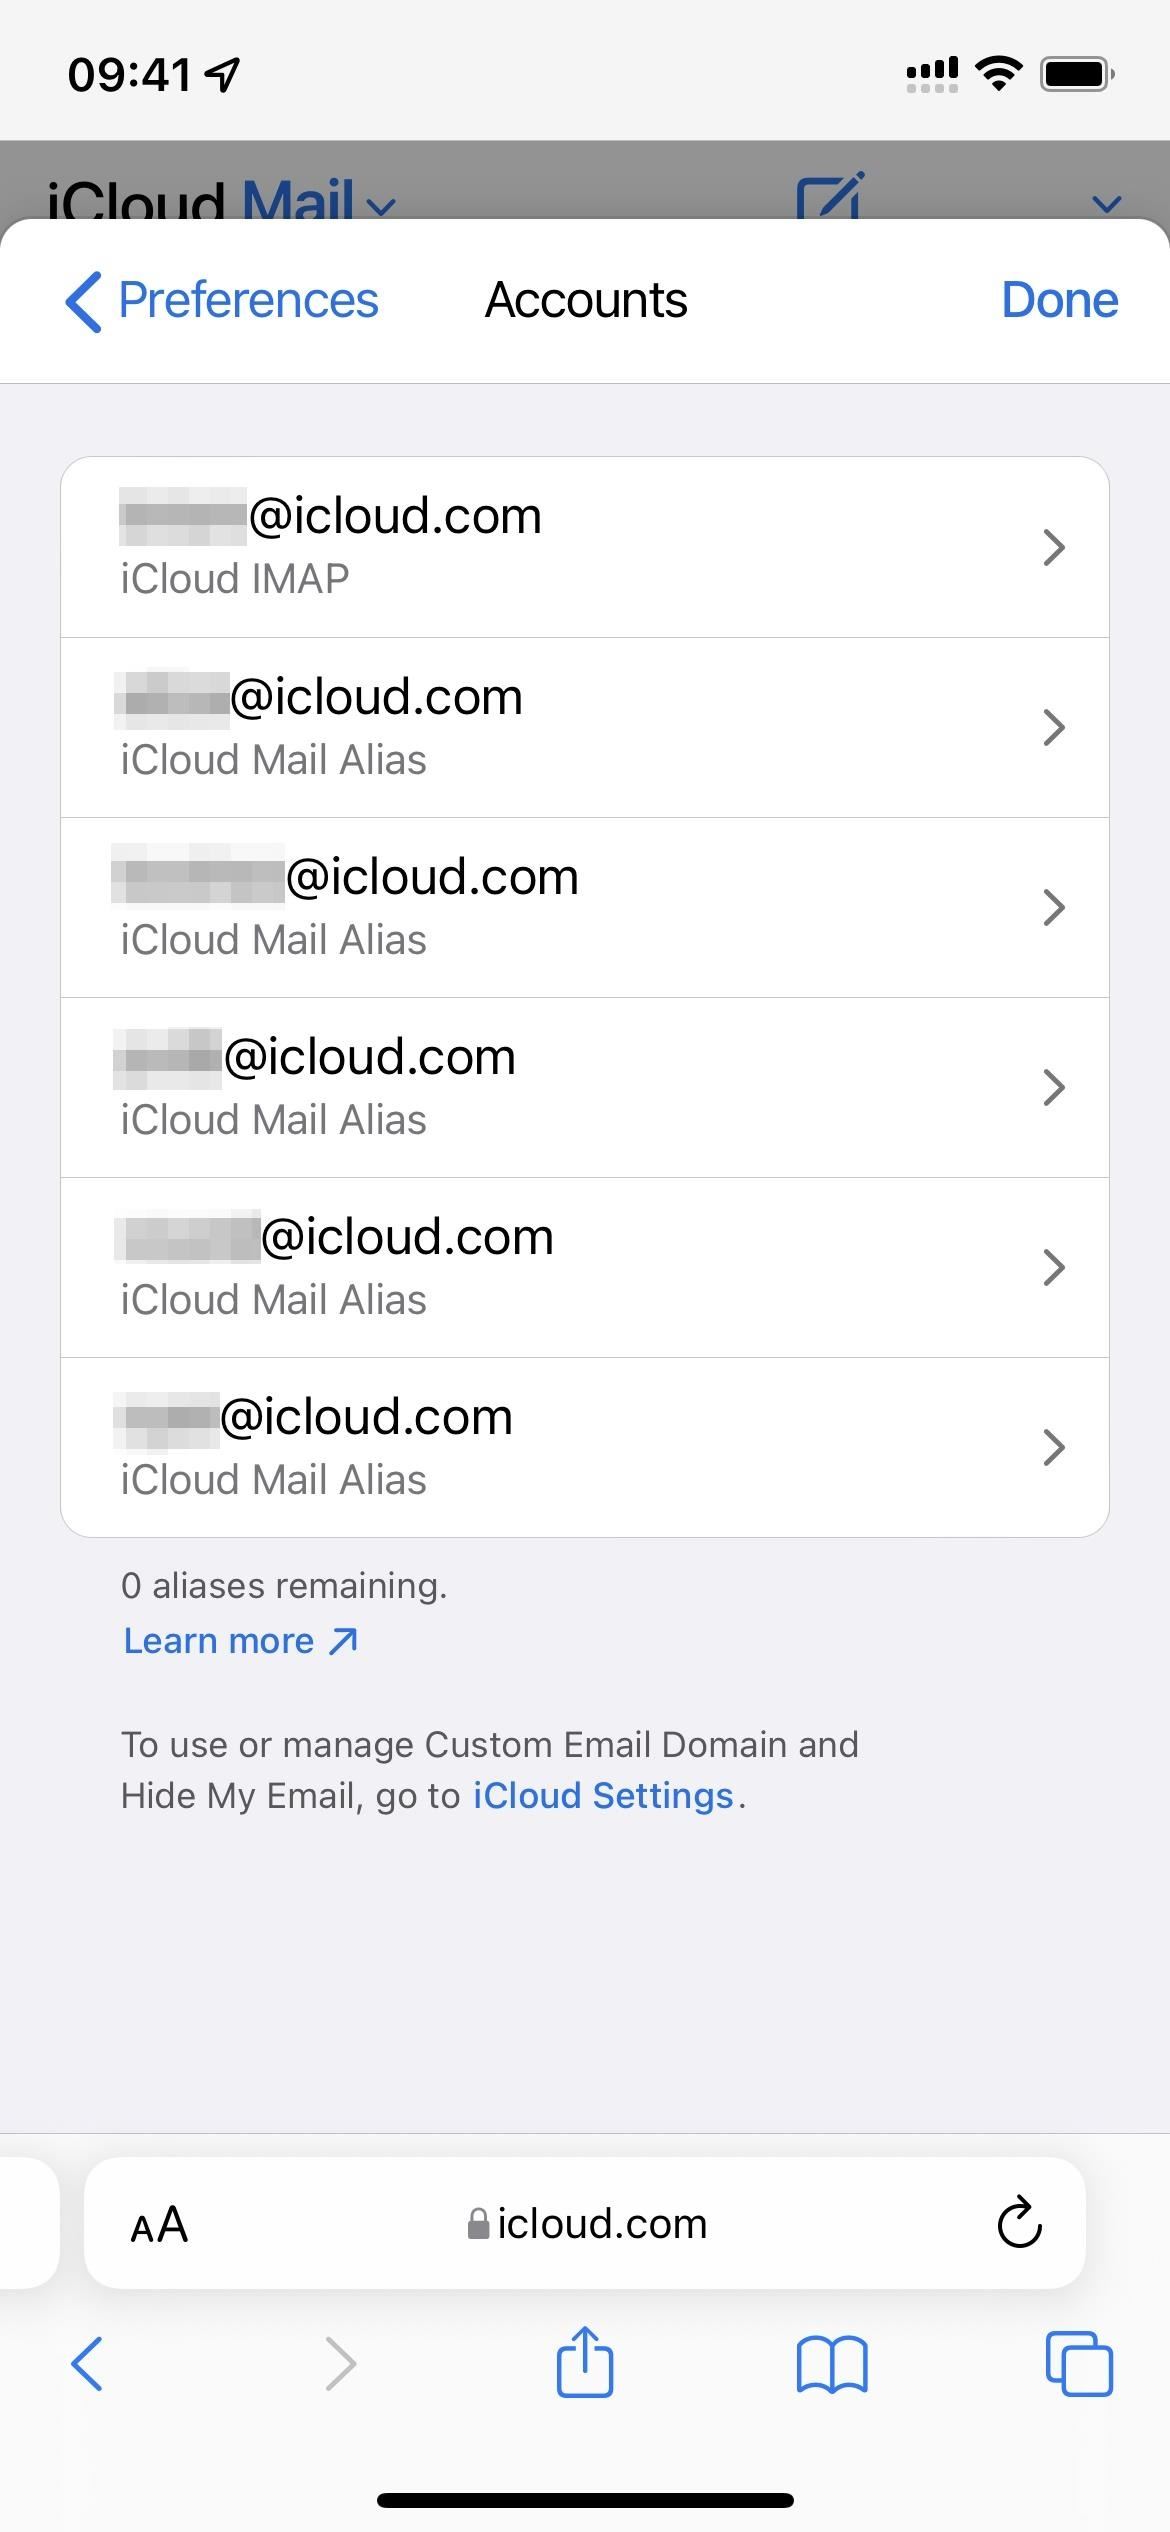
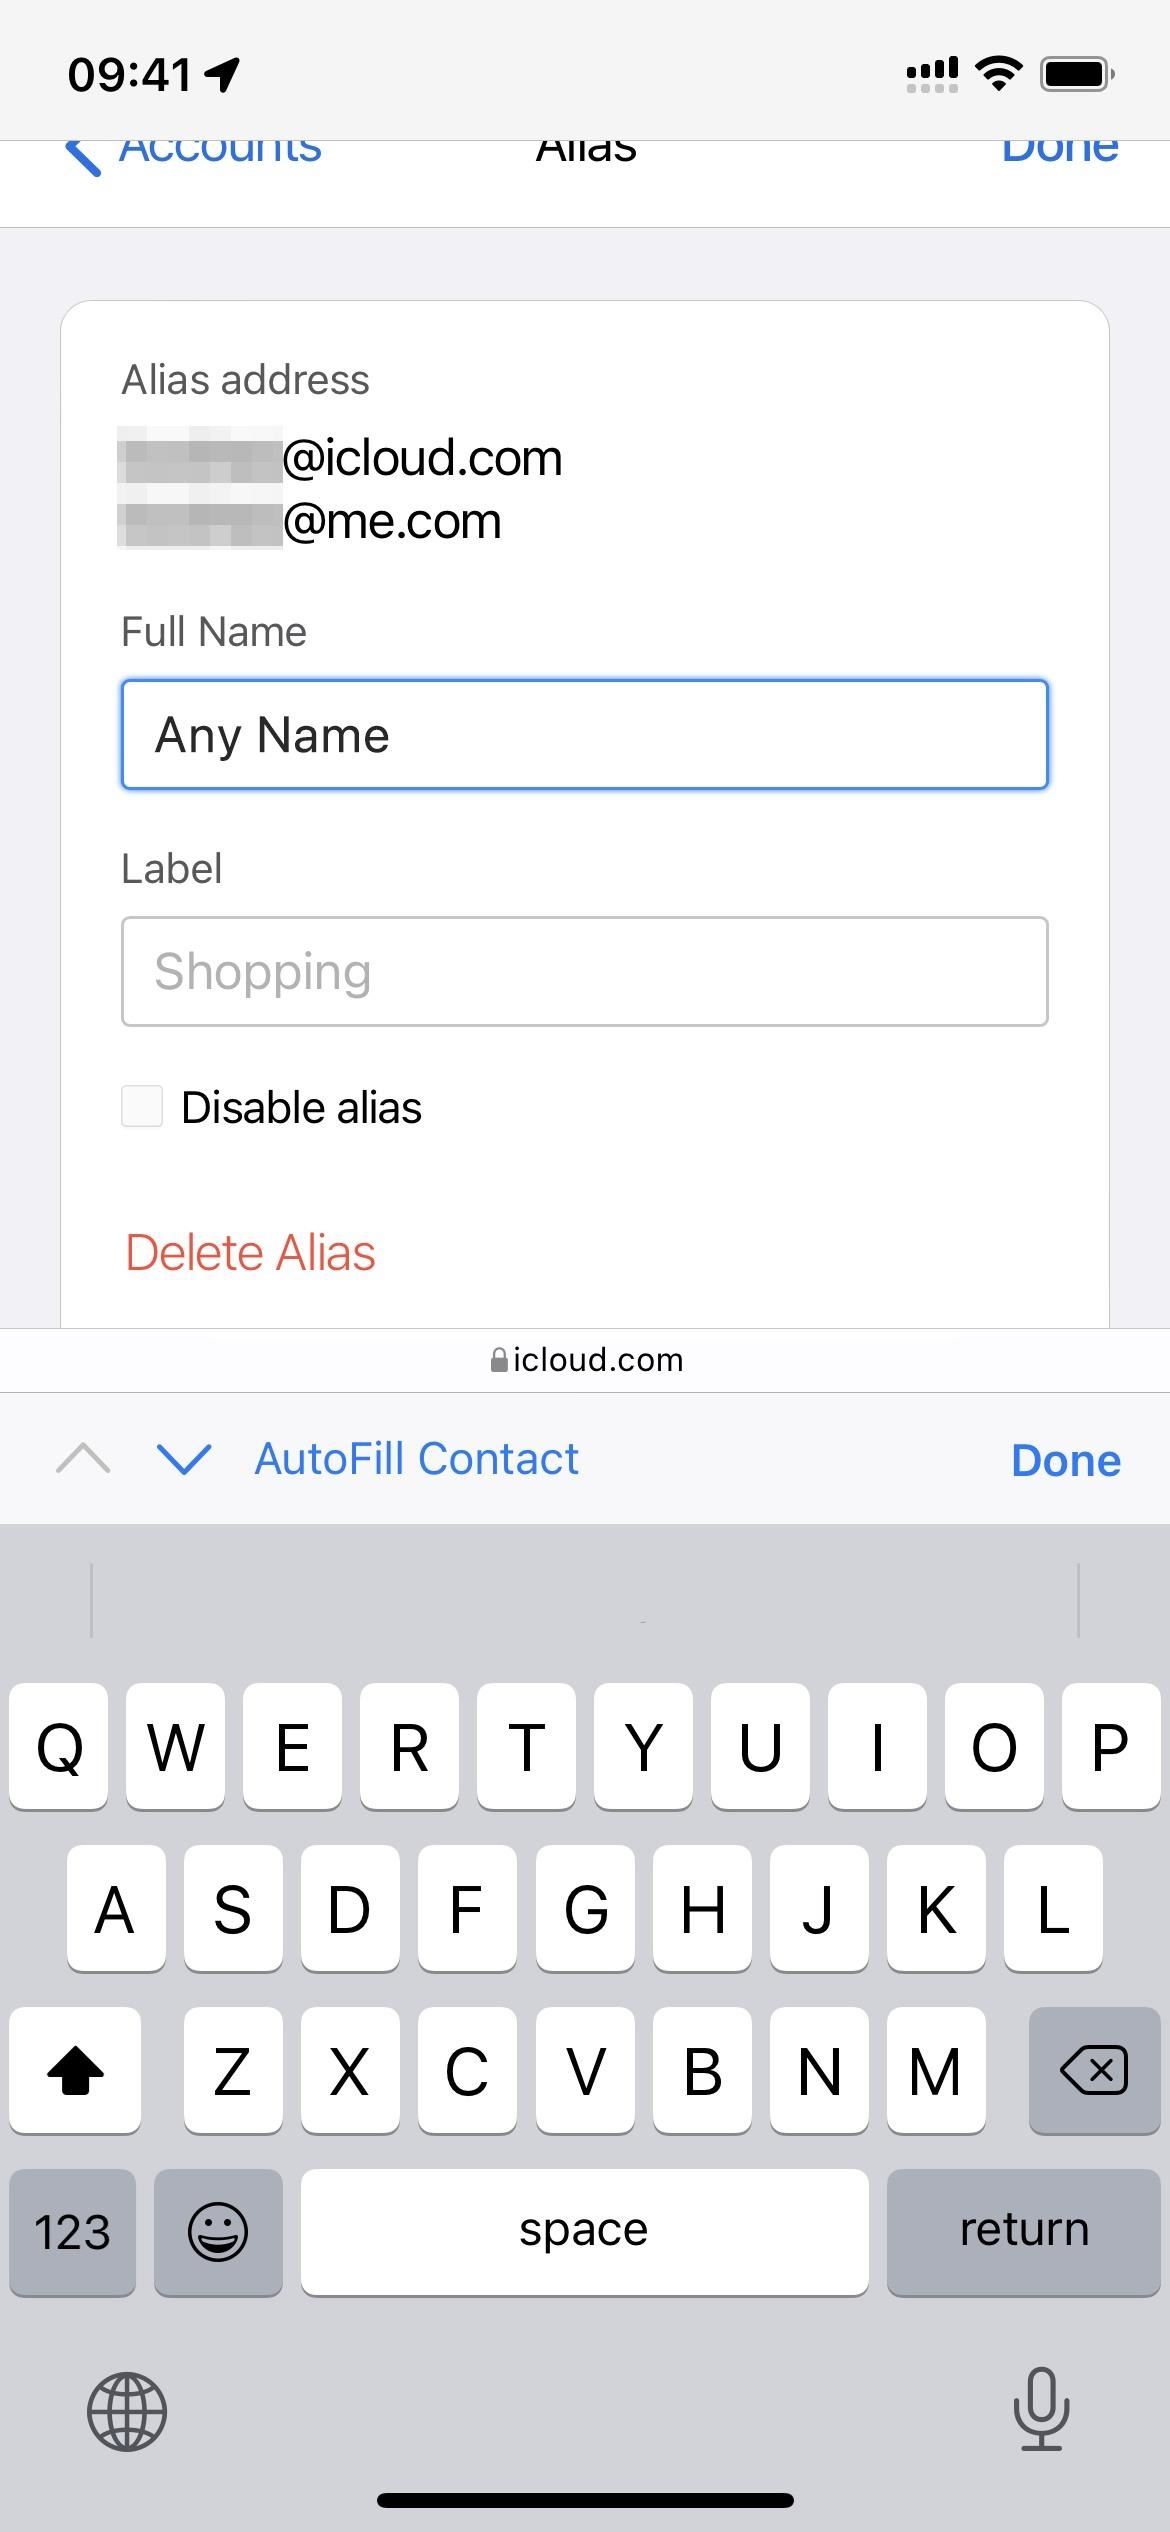
If you've used Apple's mailing system since before it was iCloud Mail, you may already have up to five aliases, each with its own @me.com and @icloud.com variants. You're grandfathered in with more aliases, but if you delete them, you max out at three aliases like everyone else. So it's in your best interest to save them if you want more aliases.
Tip 3: Use Mail Privacy Protection
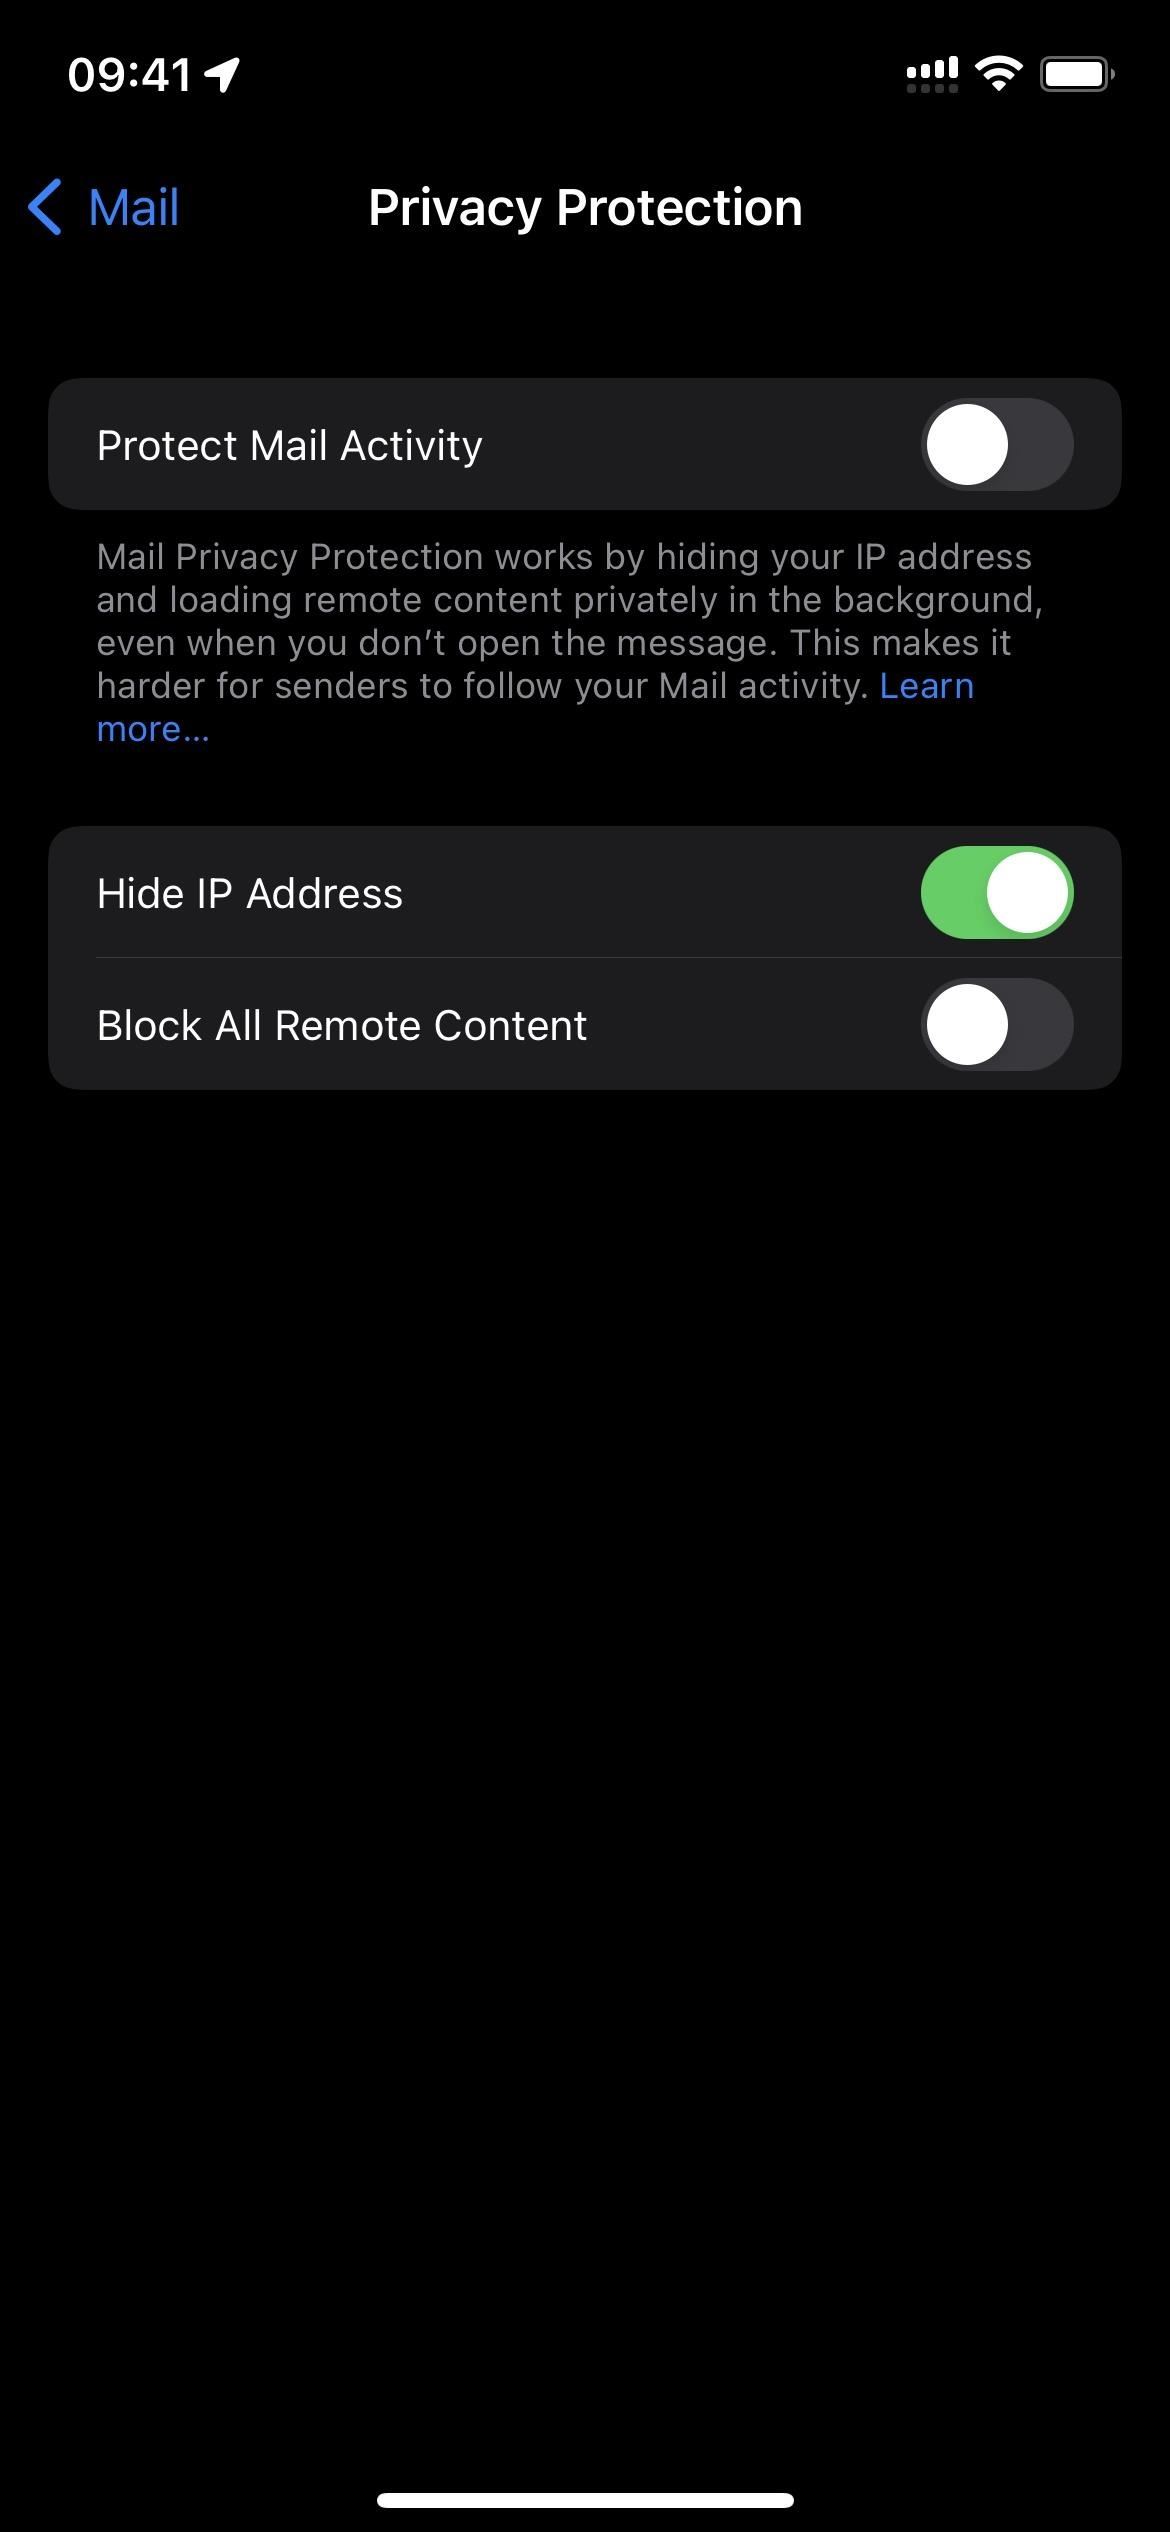
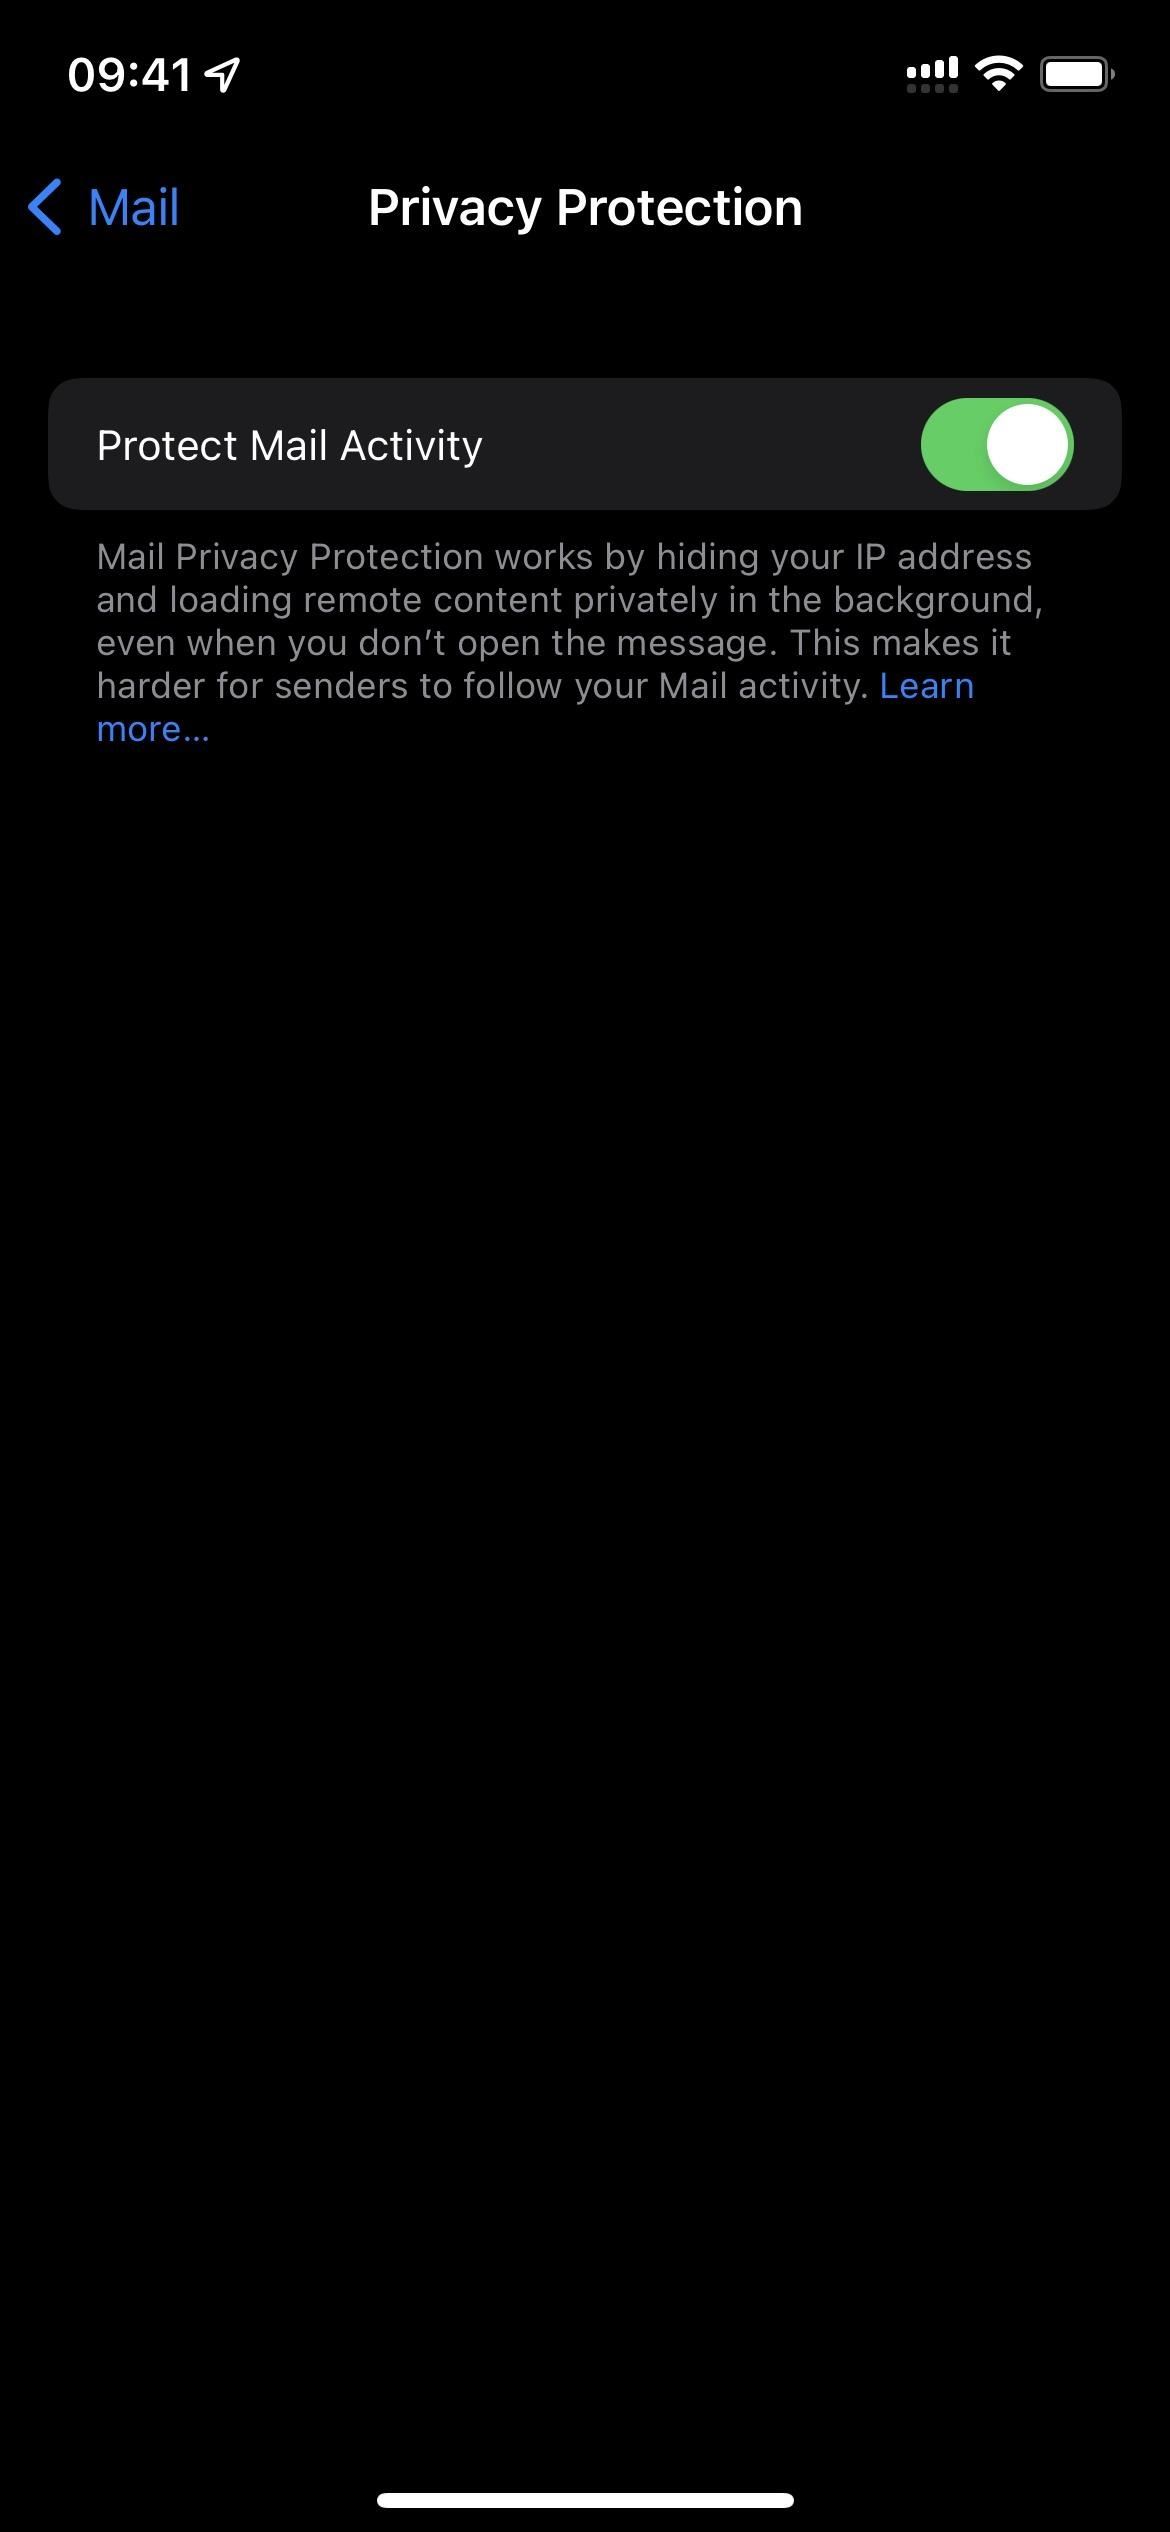
New to iPhone in iOS 15, Mail Privacy Protection helps protect your data by preventing marketers (or malicious actors) from obtaining specific information about you. First, it hides your IP address, which helps keep advertisers from building profiles on you. Second, it blocks tracking pixels by pre-loading remote message content on a proxy server before sending it to your inbox.
Protect Mail Activity routes all remote content downloaded by Mail through two separate relays operated by different entities. The first knows your IP address, but not the remote Mail content you receive. The second knows the remote Mail content you receive, but not your IP address, instead providing a generalized identity to the destination. This way, no single entity has the information to identify both you and the remote Mail content you receive. Senders can't use your IP address as a unique identifier to connect your activity across websites or apps to build a profile about you.
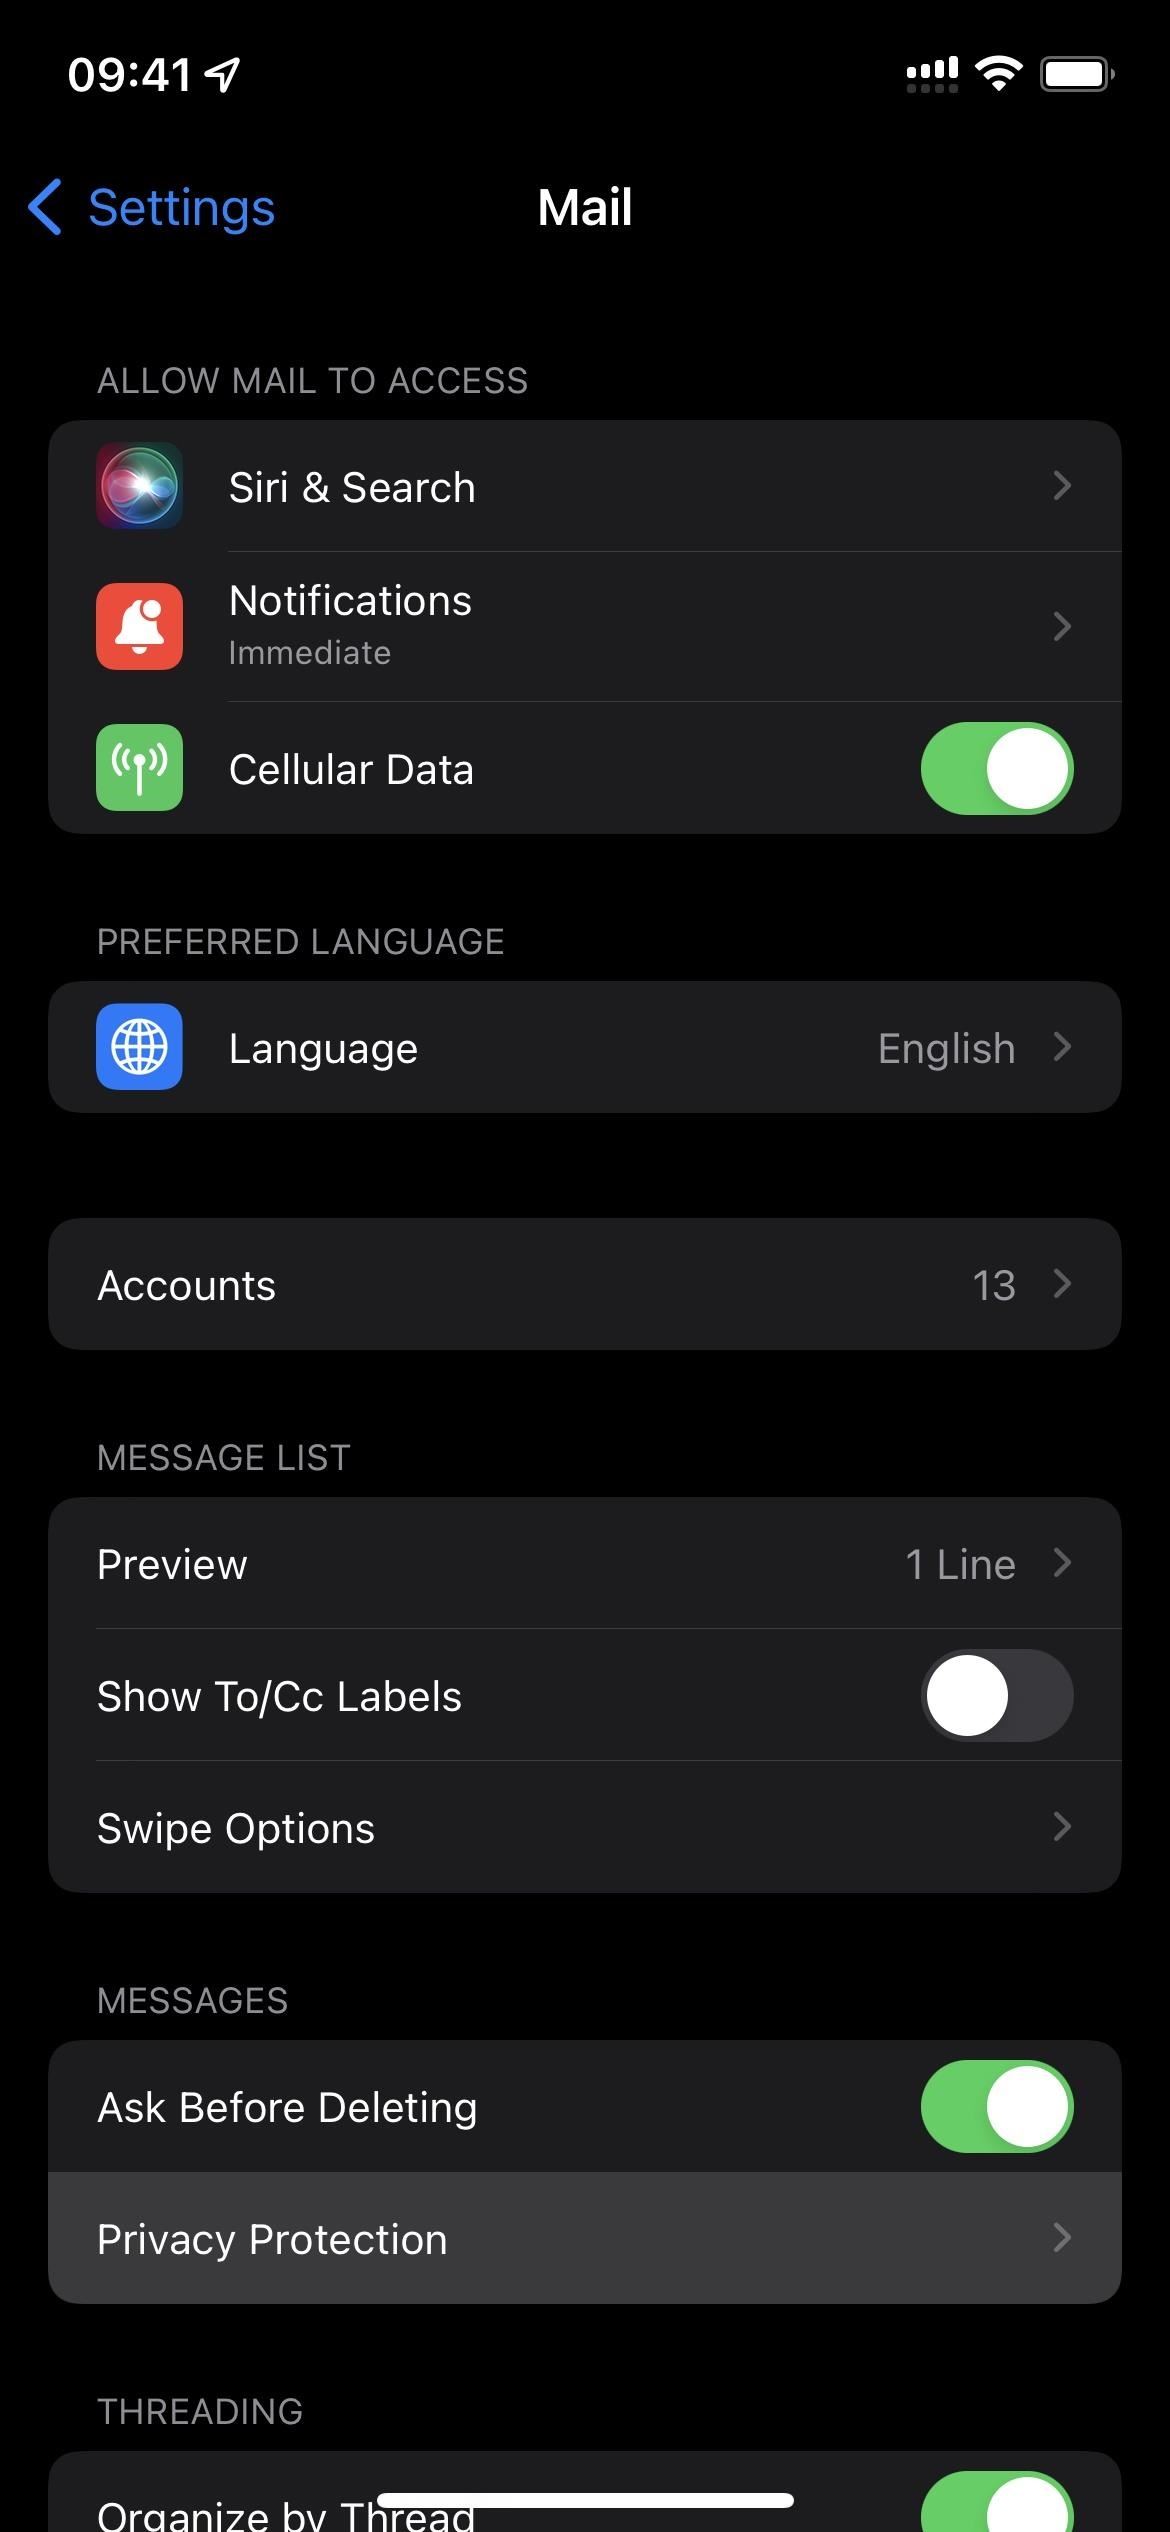
The prompt to activate Mail Privacy Protection should appear the first time you open the Mail app after setting up iOS 15 on your iPhone. To turn it on, just select the option that says "Protect Mail activity." If you missed or skipped the prompt, you can go to Settings –> Mail –> Privacy Protection, then toggle it on.
If you disable "Protect Mail Activity," its two main components will show up as separate toggles in case you want to use one but not the other. "Hide IP Address" alone will hide your location but let senders know if you opened their emails. "Block All Remote Content" alone will pre-load remote content, preventing tracking pixels, but give up your location.
Tip 4: Encrypt Emails with S/MIME
Unlike Android, iOS has the built-in option to encrypt emails with the Secure/Multipurpose Internet Mail Extensions (S/MIME) protocol. It's been around since iOS 5, but it's a little-known feature many still aren't aware of. Encrypting your email with S/MIME adds another layer of security and protects against man-in-the-middle attacks and header spoofing.
To activate this feature on iOS, you need to obtain a S/MIME certificate. Most email certificates will require a paid yearly subscription, like GlobalSign's, and it covers just a single email address. However, there are a few free ones for personal use. Actalis is one certificate authority that provides a free S/MIME certificate that lasts a year, and you can keep getting free ones after the year is up.
First, you need to install your certificate as a profile on your iPhone, then activate it for the email address to use within the Mail app. You then share your public key with people you want to use end-to-end encryption with, and they'll need to share theirs with you. The recipient's public key is necessary to encrypt the messages, and the associated private key will decrypt them.
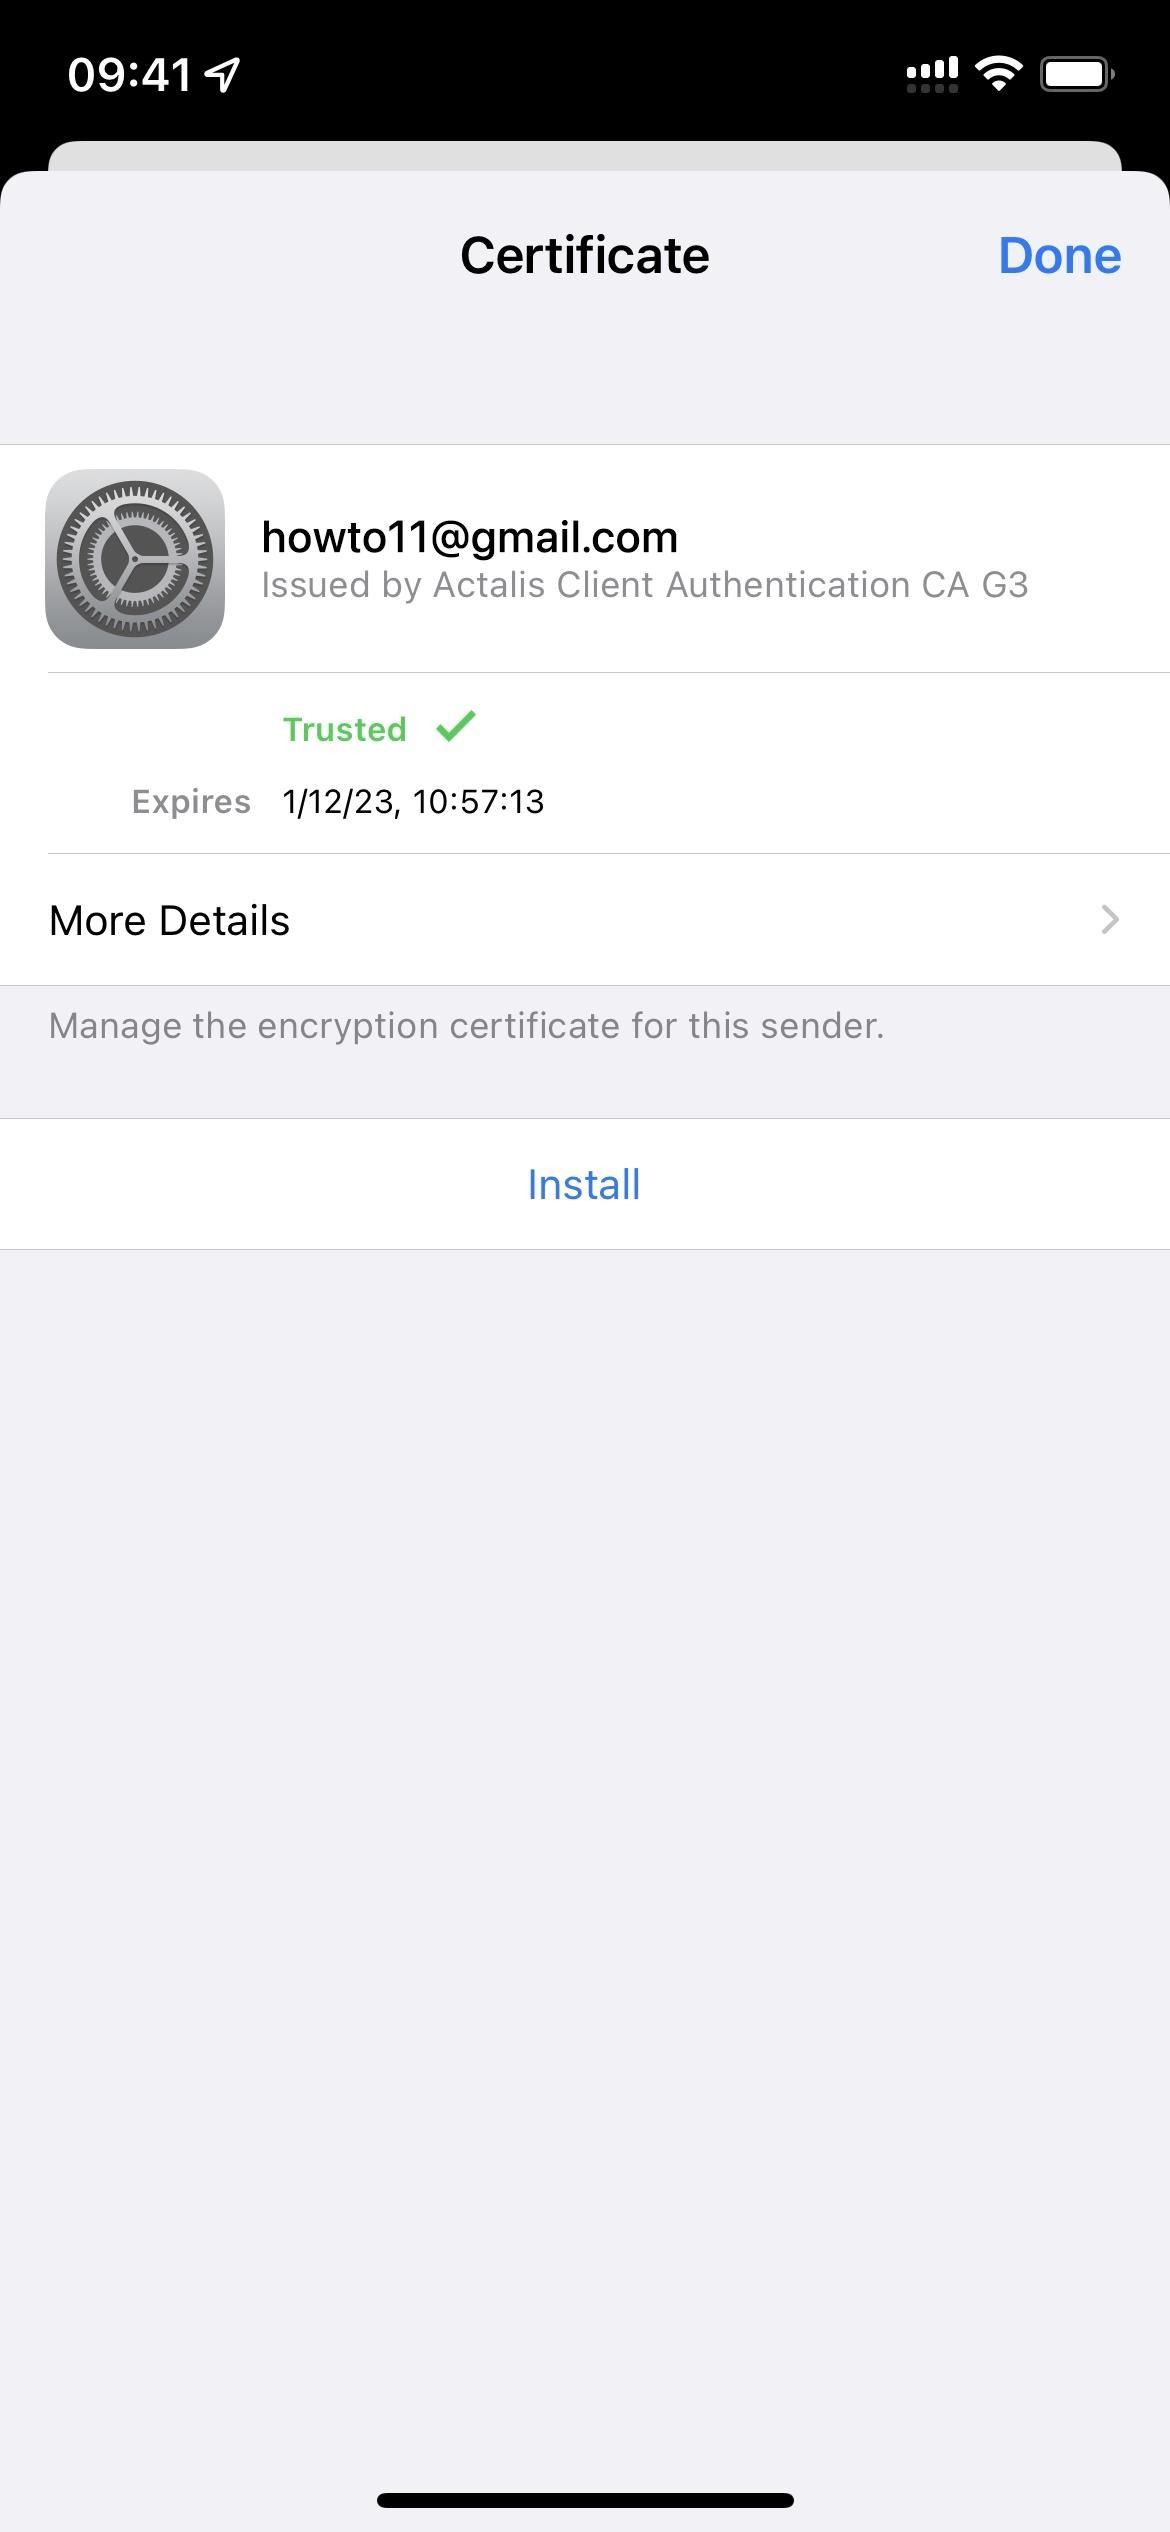
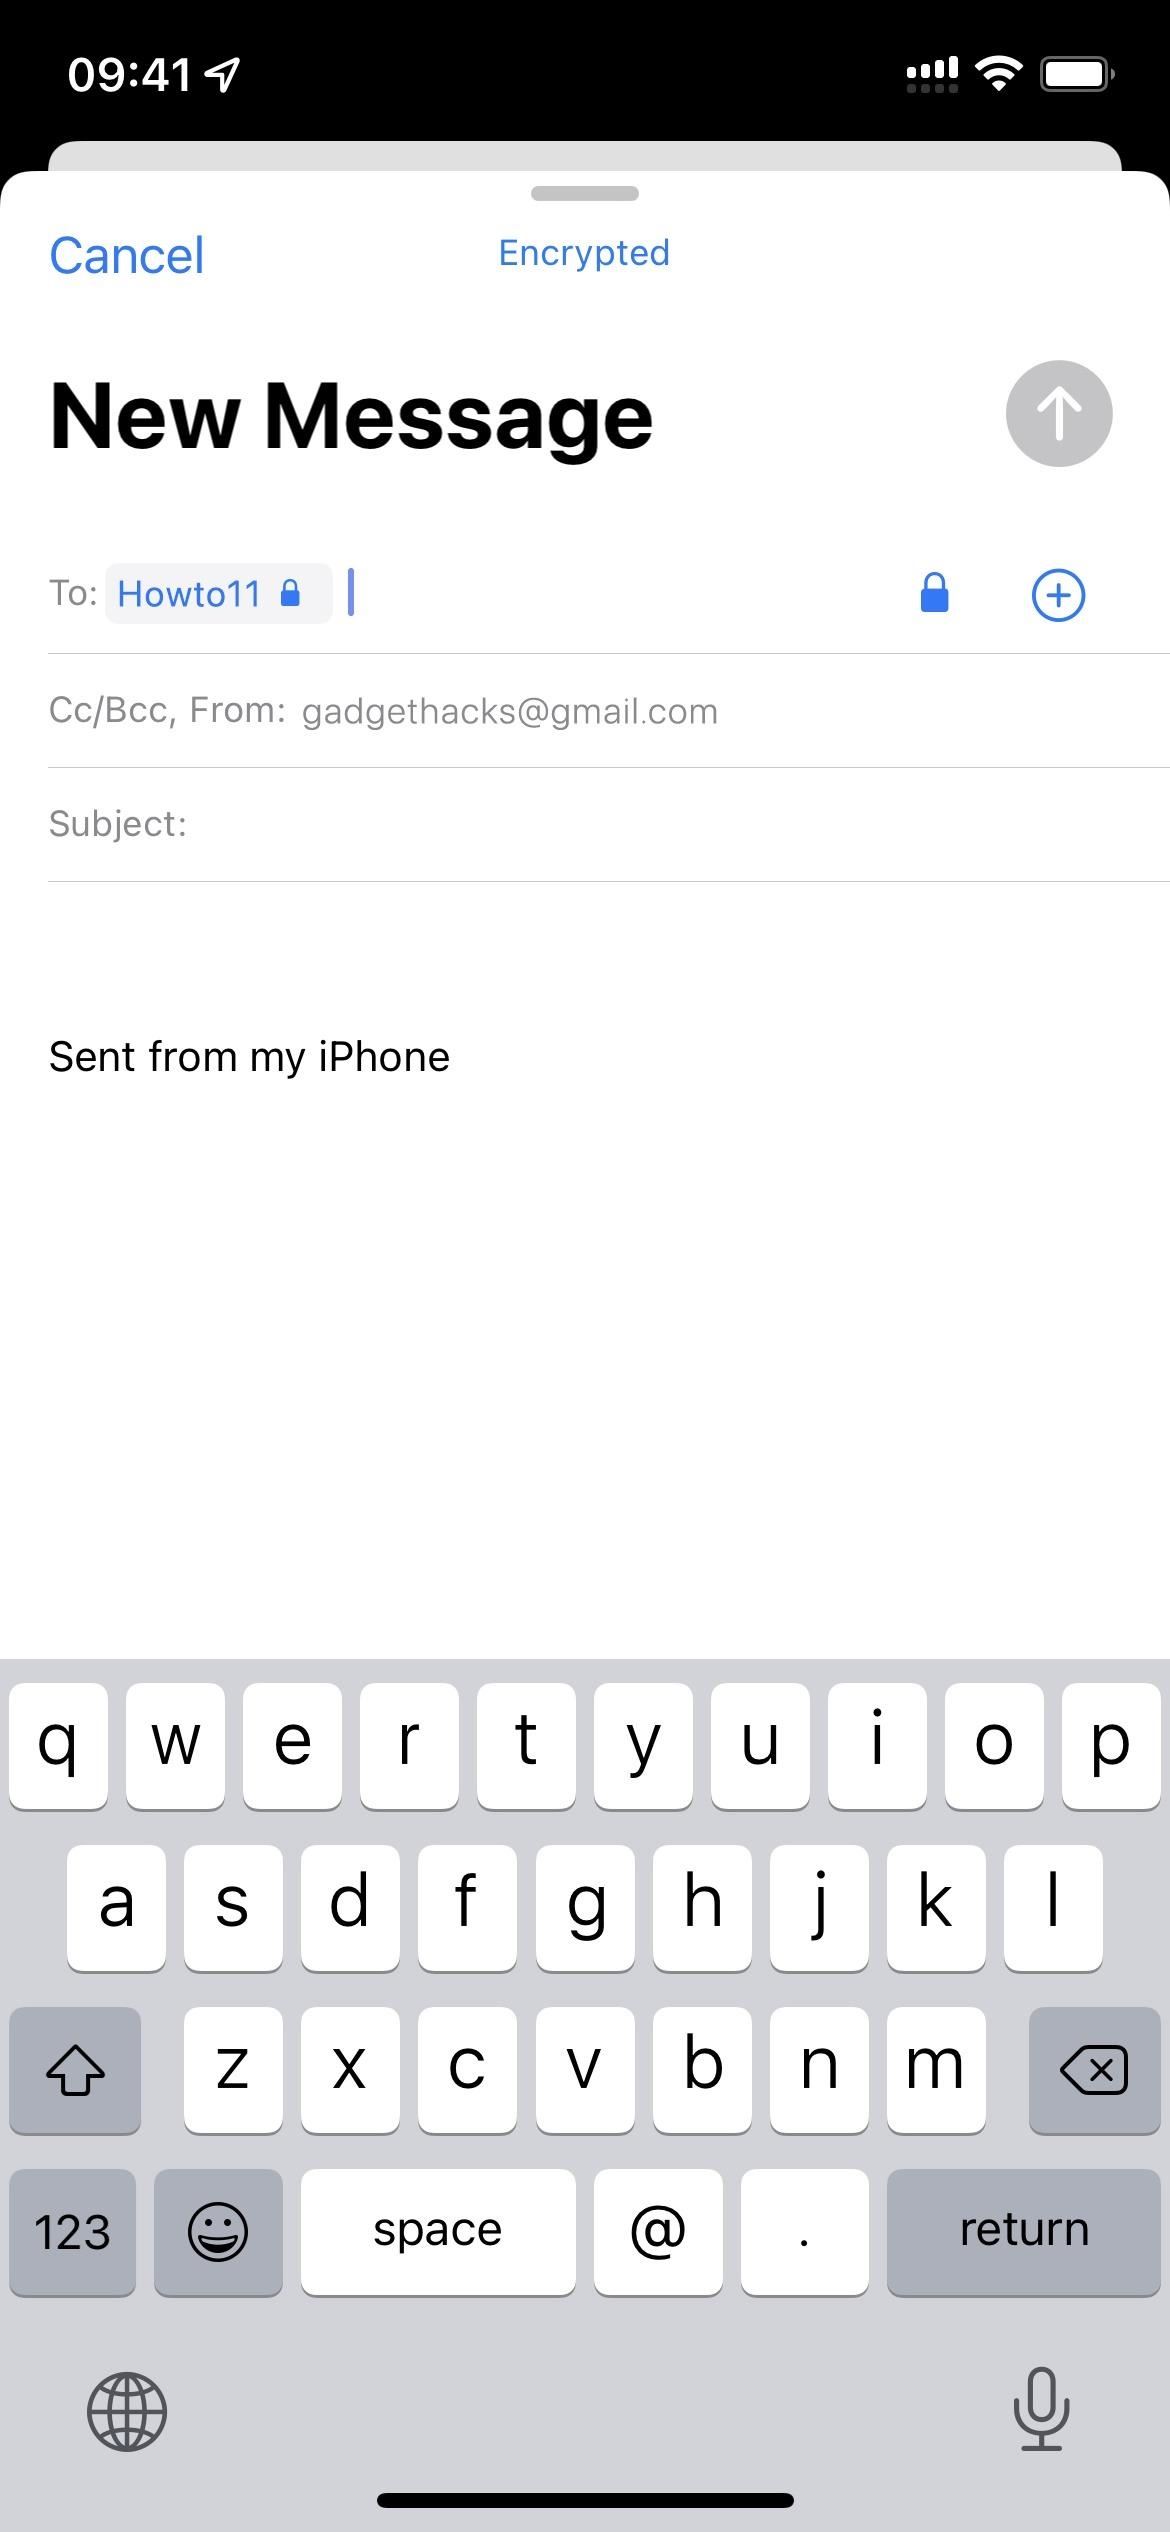
After you successfully S/MIME, you can see its encryption status by looking for a blue lock in your message's "To" field whenever you create, reply to, or forward a message. You can disable encryption by tapping on the blue lock as well. If you don't have the recipient's public key on your iPhone, you'll see a red lock instead, indicating you can't get E2E protection.
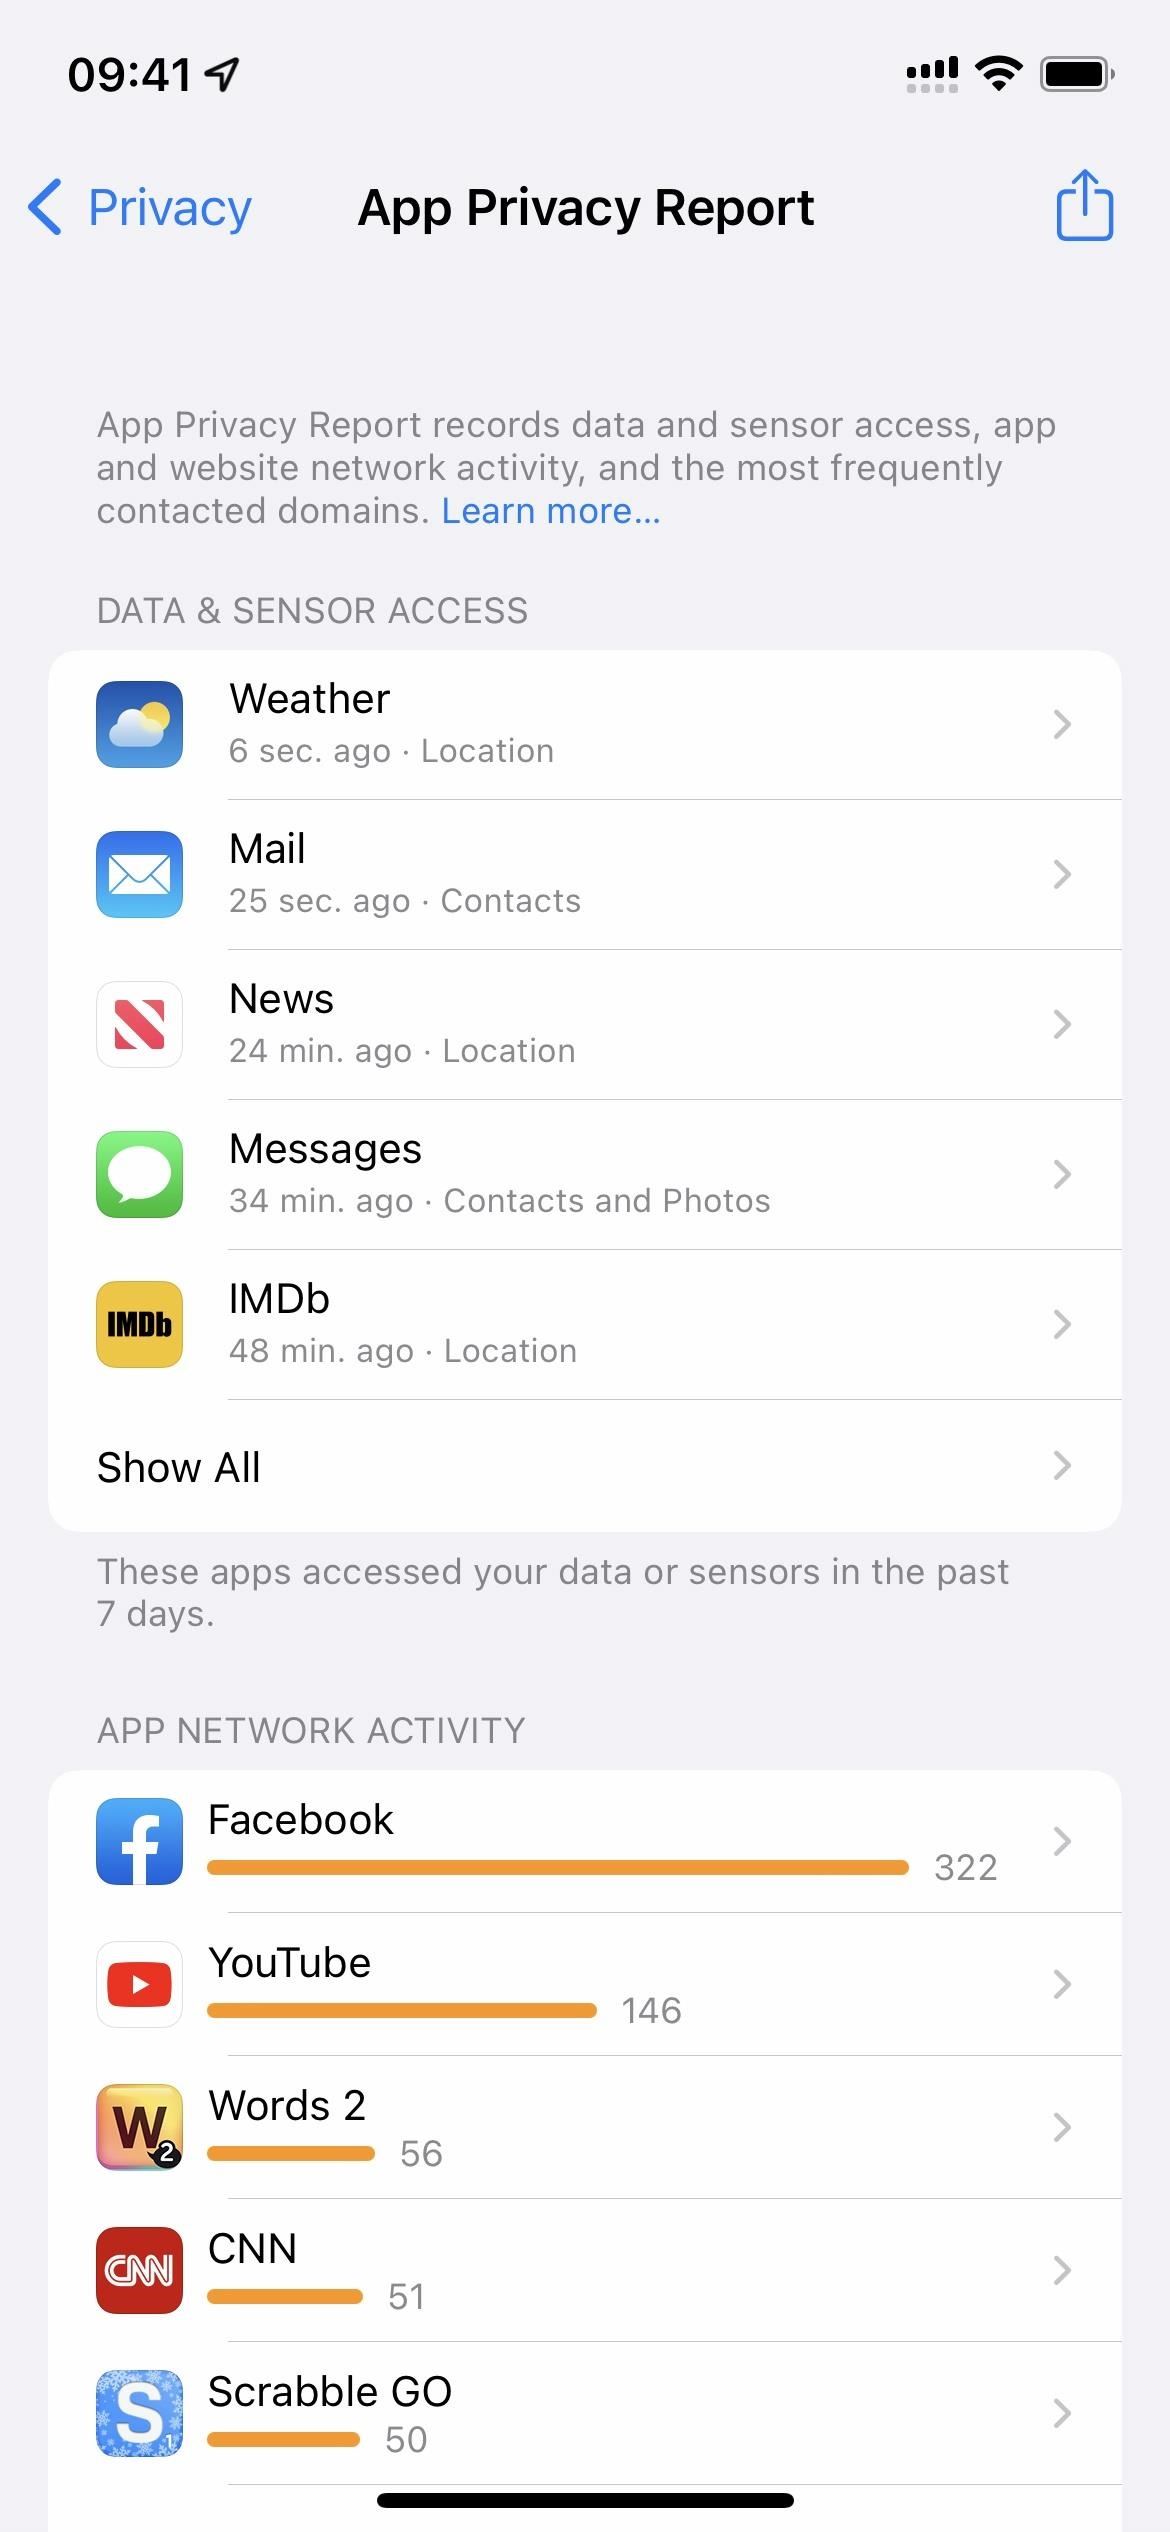
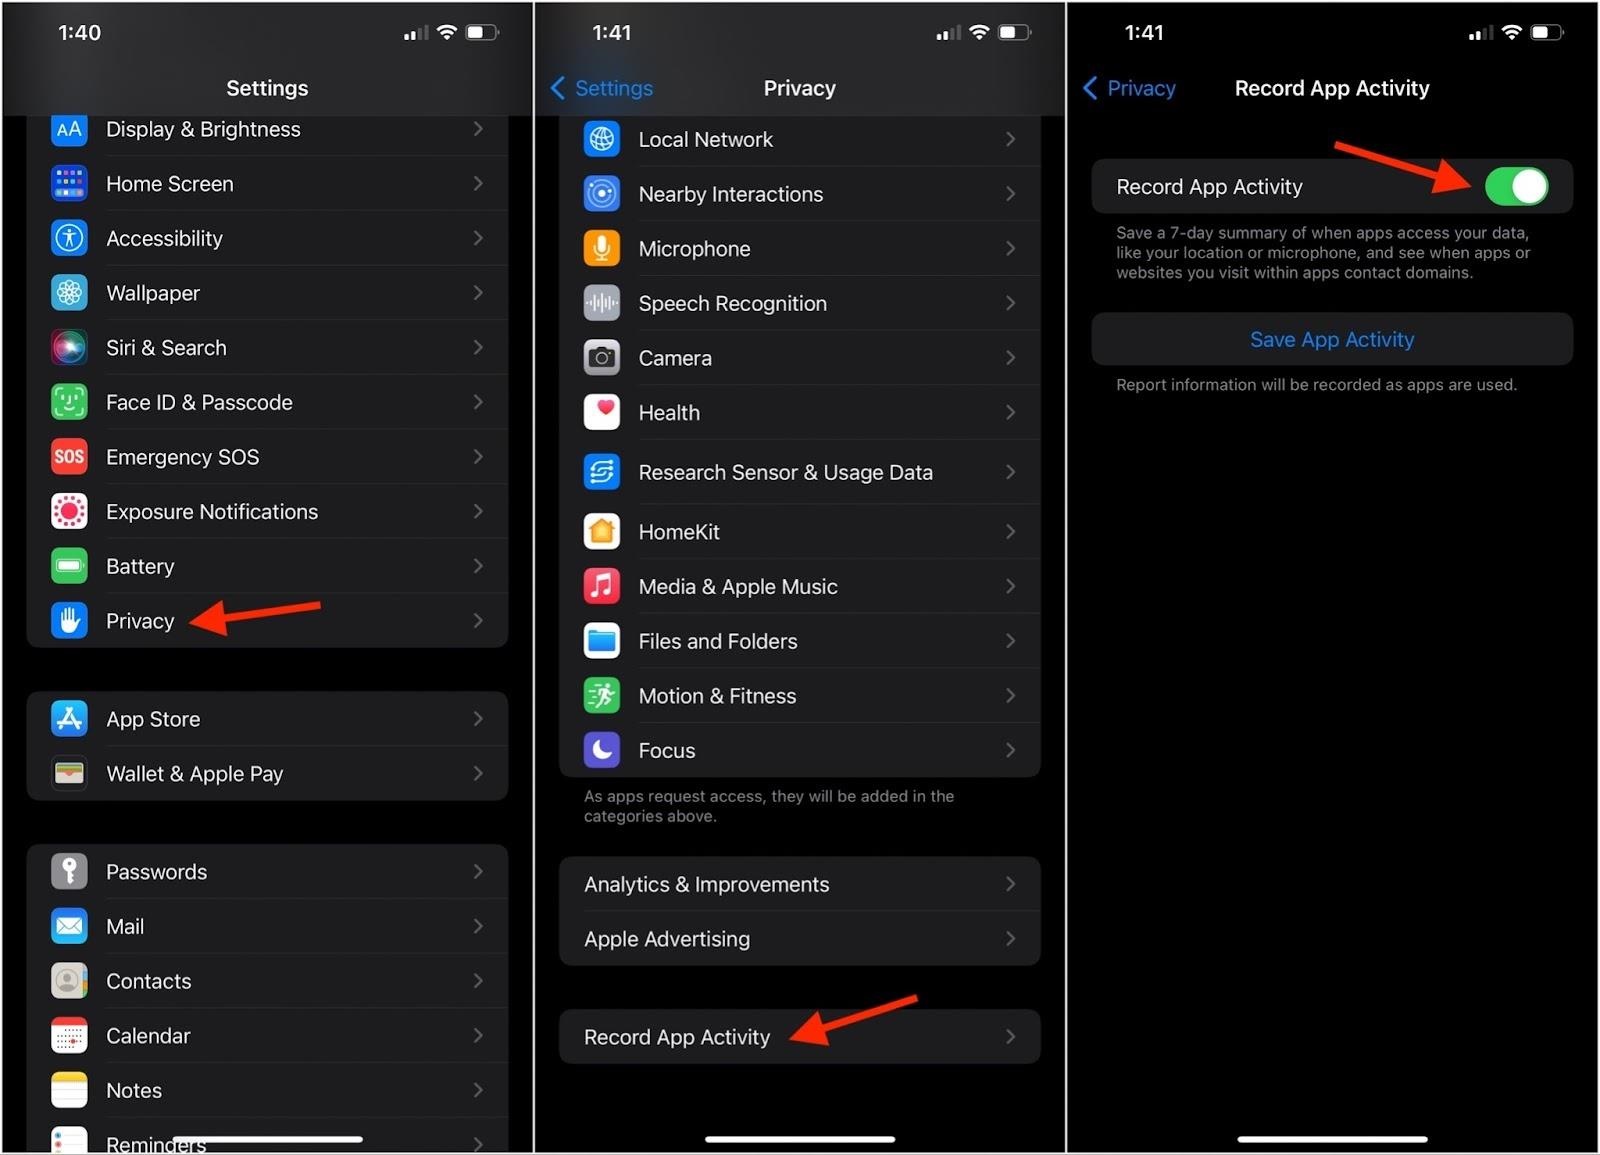
Tip 5: Monitor App Privacy Report
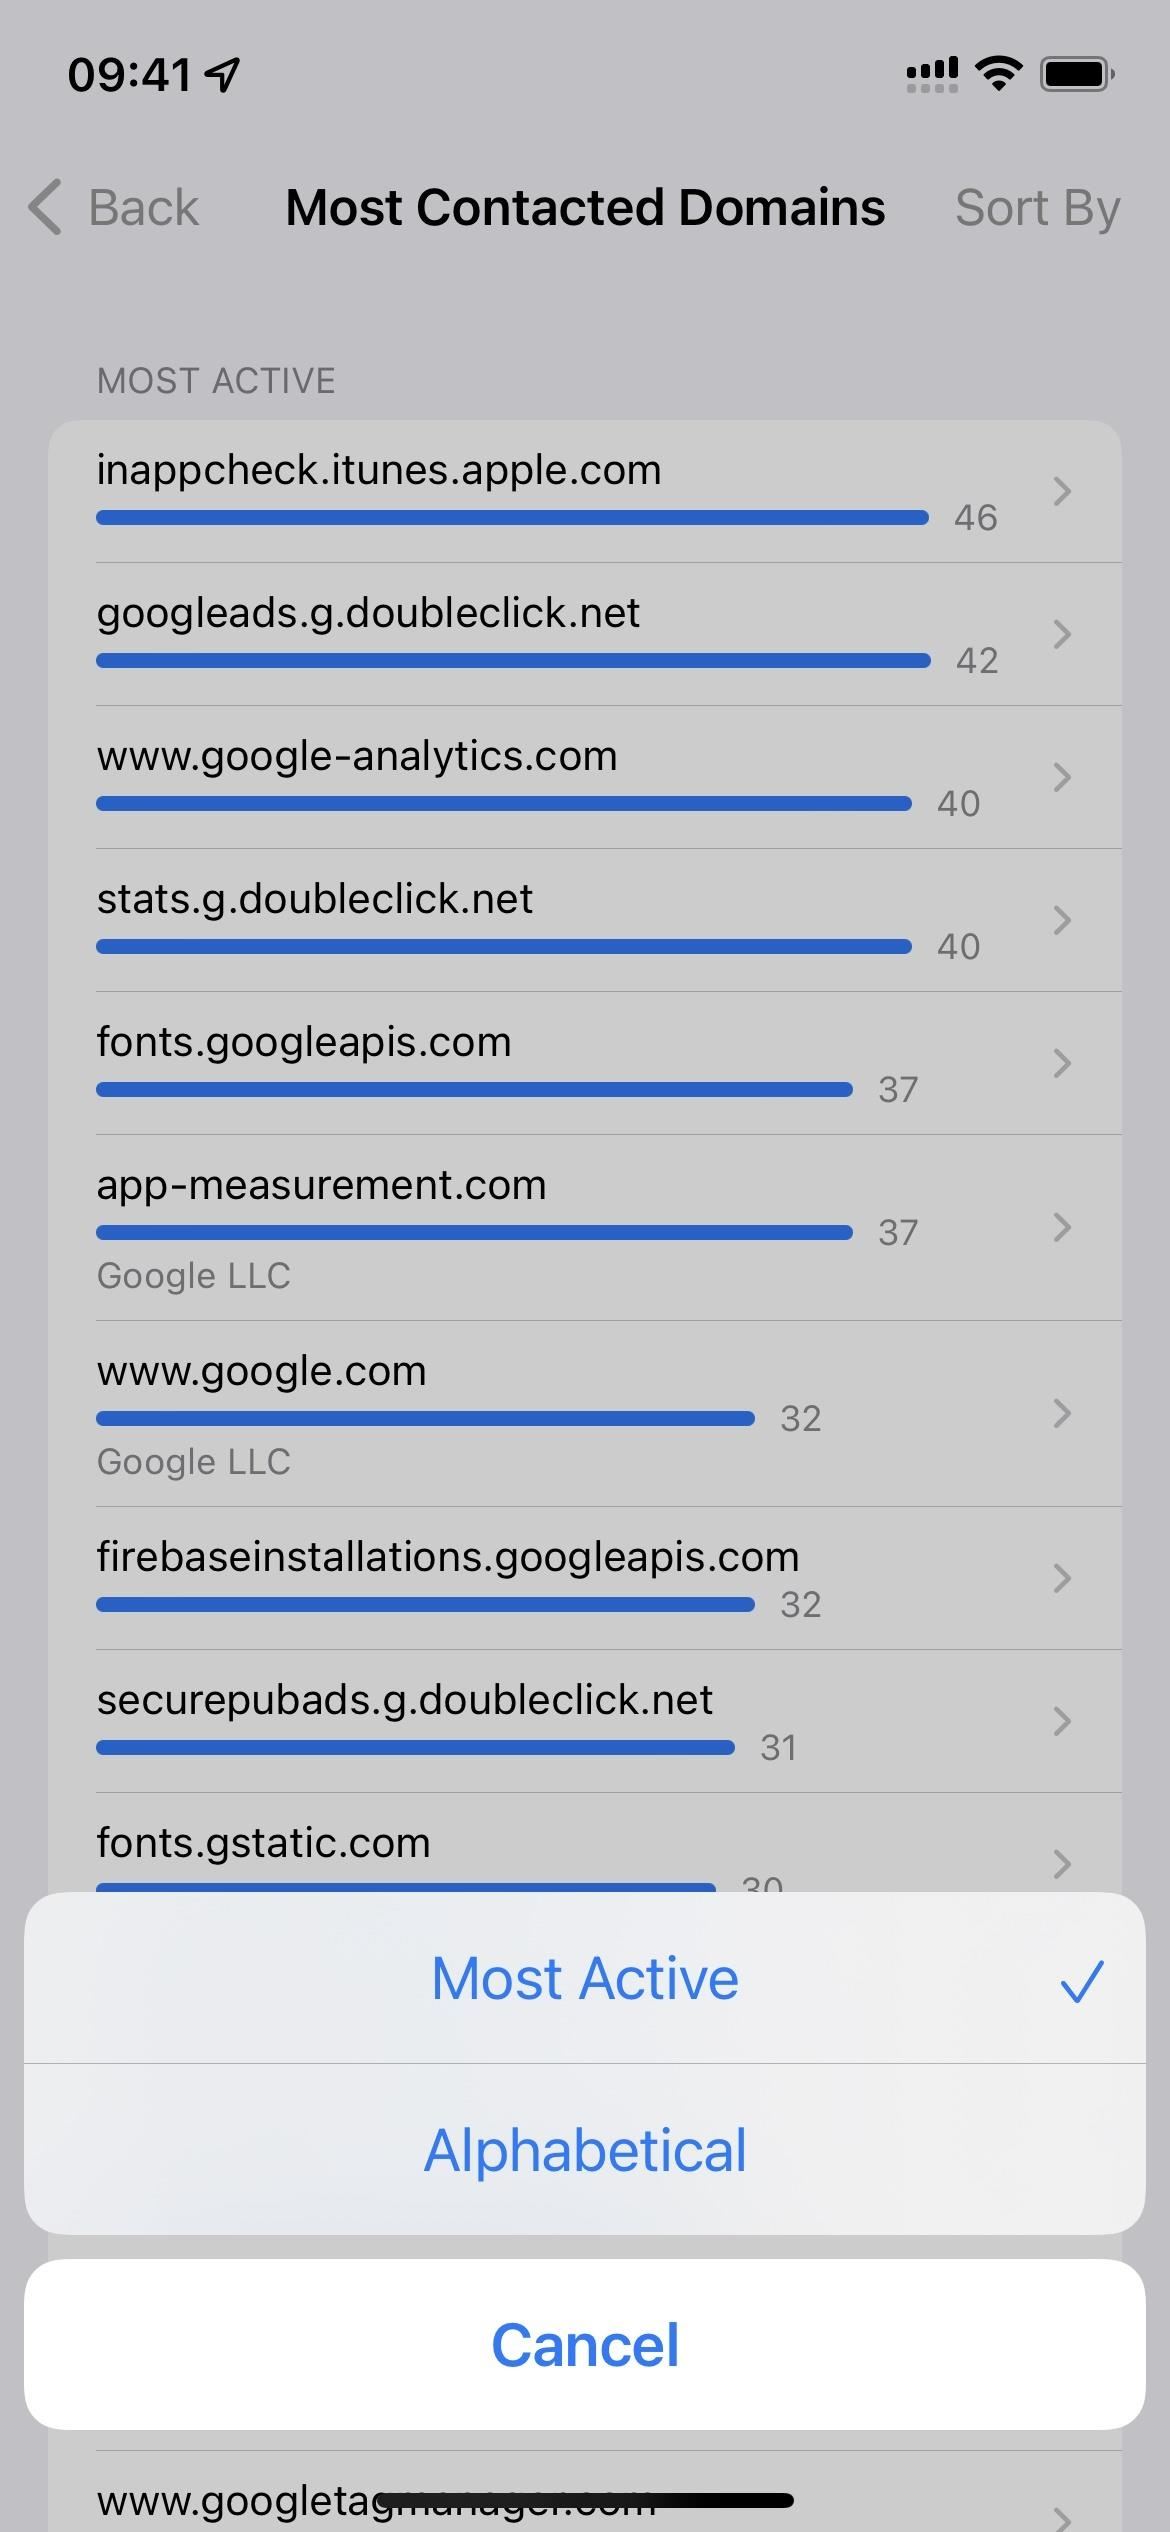
As of iOS 15.2, your iPhone has an App Privacy Report feature that monitors how often apps use features that could potentially violate user privacy. The App Privacy Report includes details about how often apps and websites gather location data, access storage, activate the microphone, and use the camera. It even tells where they are sending data.
To find it, go to Settings –> Privacy –> App Privacy Report. The report makes it much easier to monitor in detail what apps are doing, including the Mail app and third-party email clients. The more you know about how apps use your data, the safer all the data on your iPhone will be, including emails.

From iOS 15.0–15.1.1, the feature was called "Record App Activity," and it didn't give a pretty little interface with tons of data at the tip of your fingers. Instead, you had to export your data as a JSON file, then read it within a separate app. Reading it directly within the newer UI is a much more convenient method, as you don't have to leave the screen.
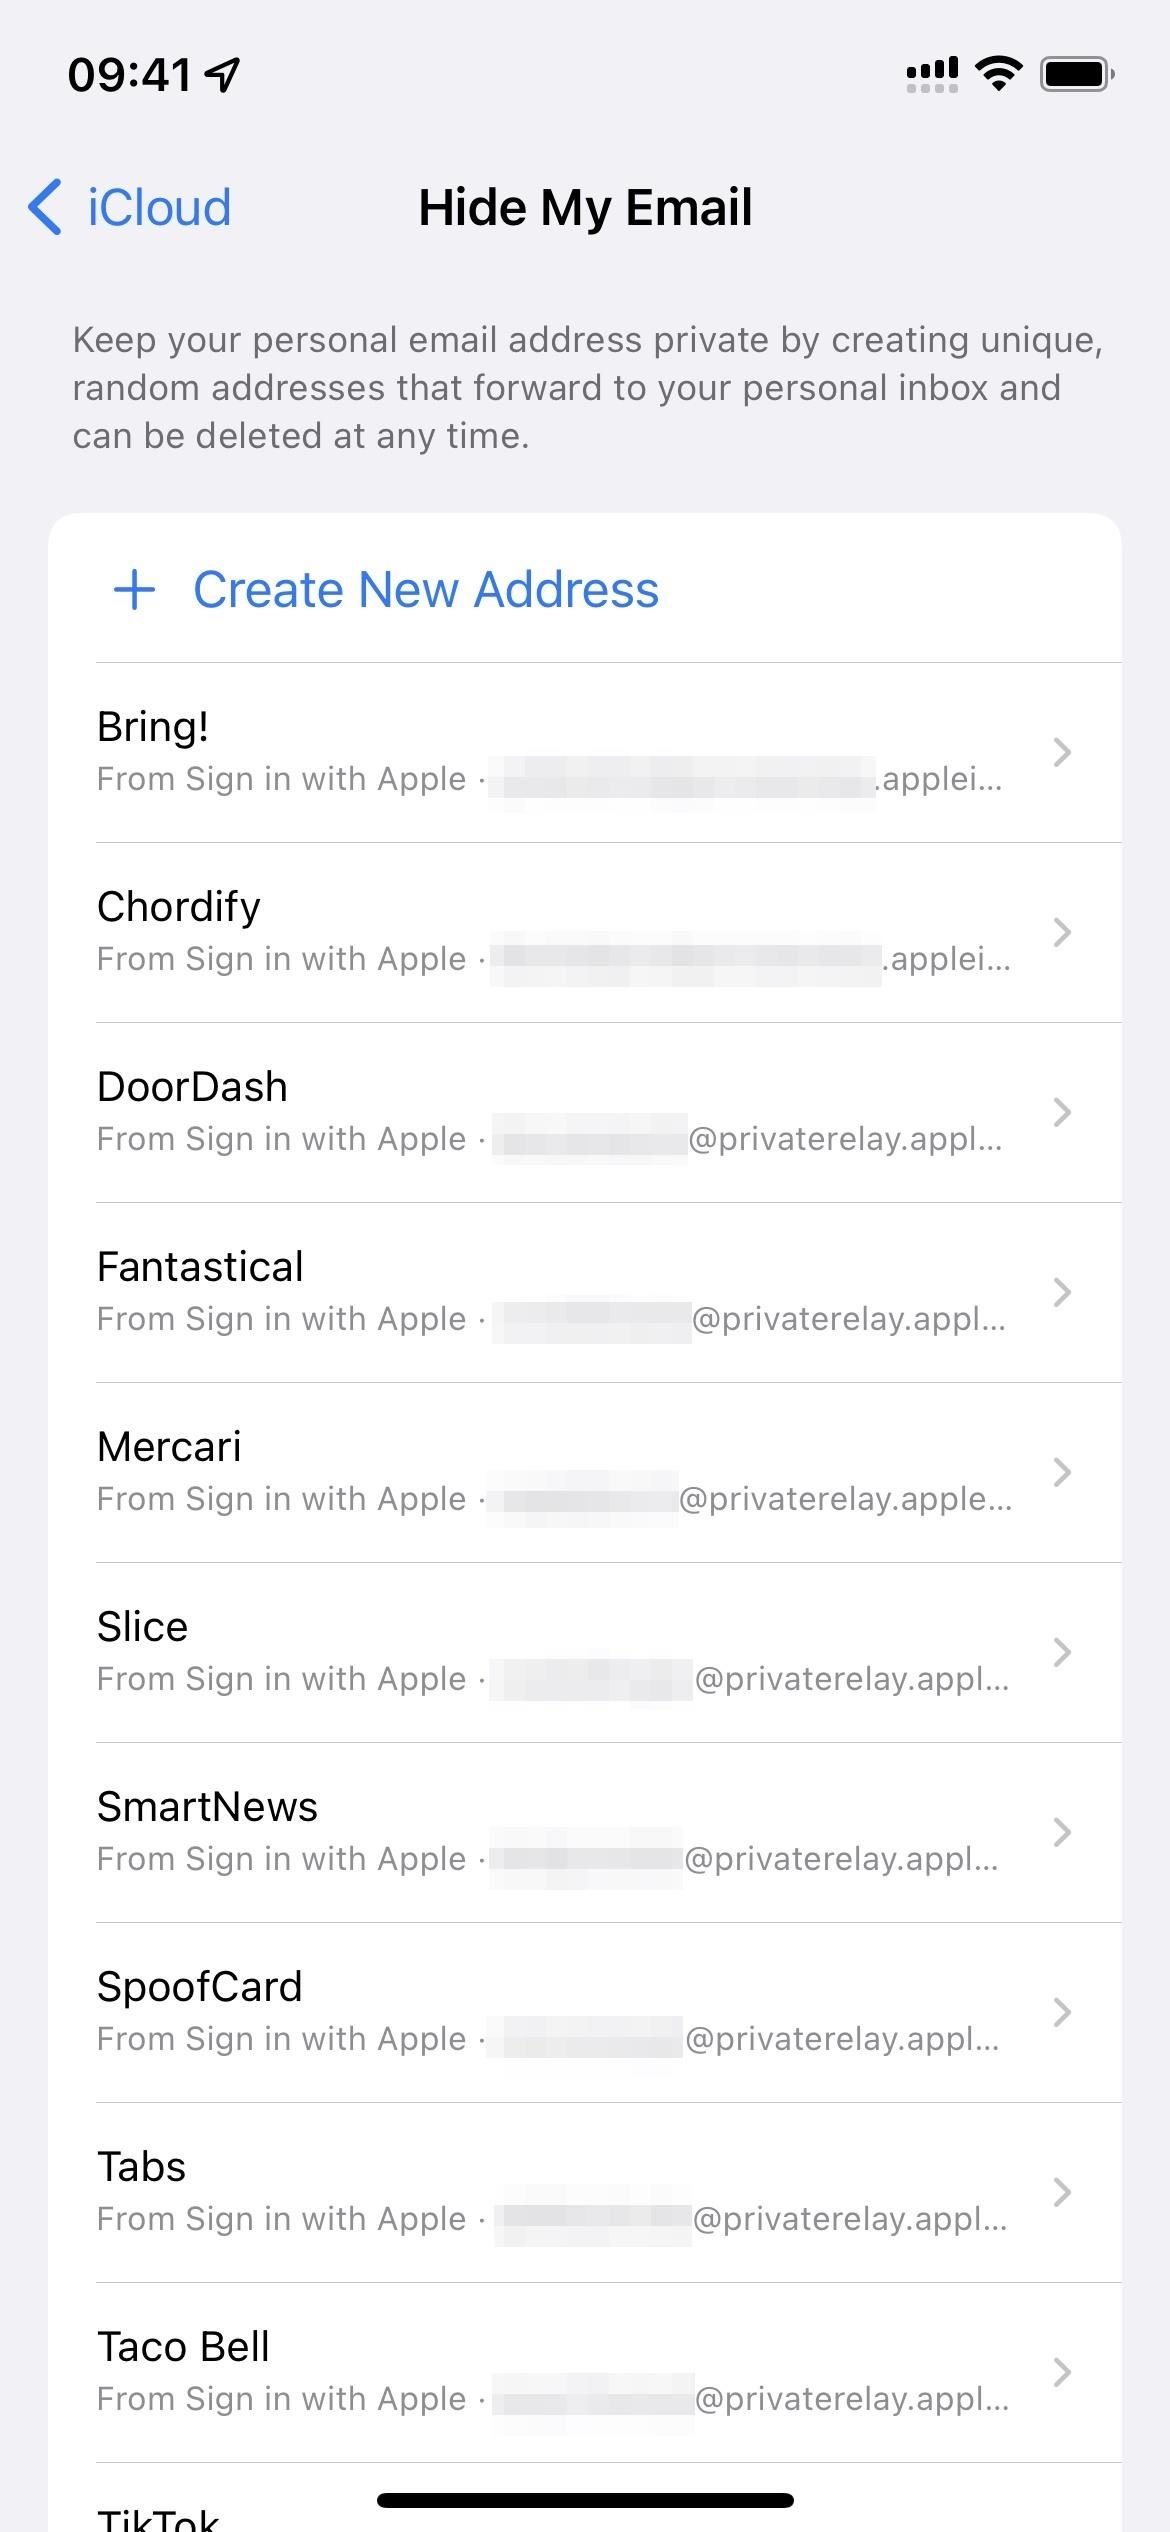
Tip 6: Take Advantage of Hide My Email
Sometimes you want to sign up for an app or a service but don't want to give your actual email address. Otherwise, the app or service might annoy you with too many emails or sell your contact information to third parties. Fortunately, there's Hide My Email.
Hide My Email creates a dummy email address that redirects back to your real one. When you want to stop getting emails from whoever you give it to, simply delete the dummy and they won't be able to reach you.
Apple has included Hide My Email as a part of its Sign in with Apple service that appeared in iOS 13, and you could only use it when creating new accounts from apps and browsers using Sign in with Apple.
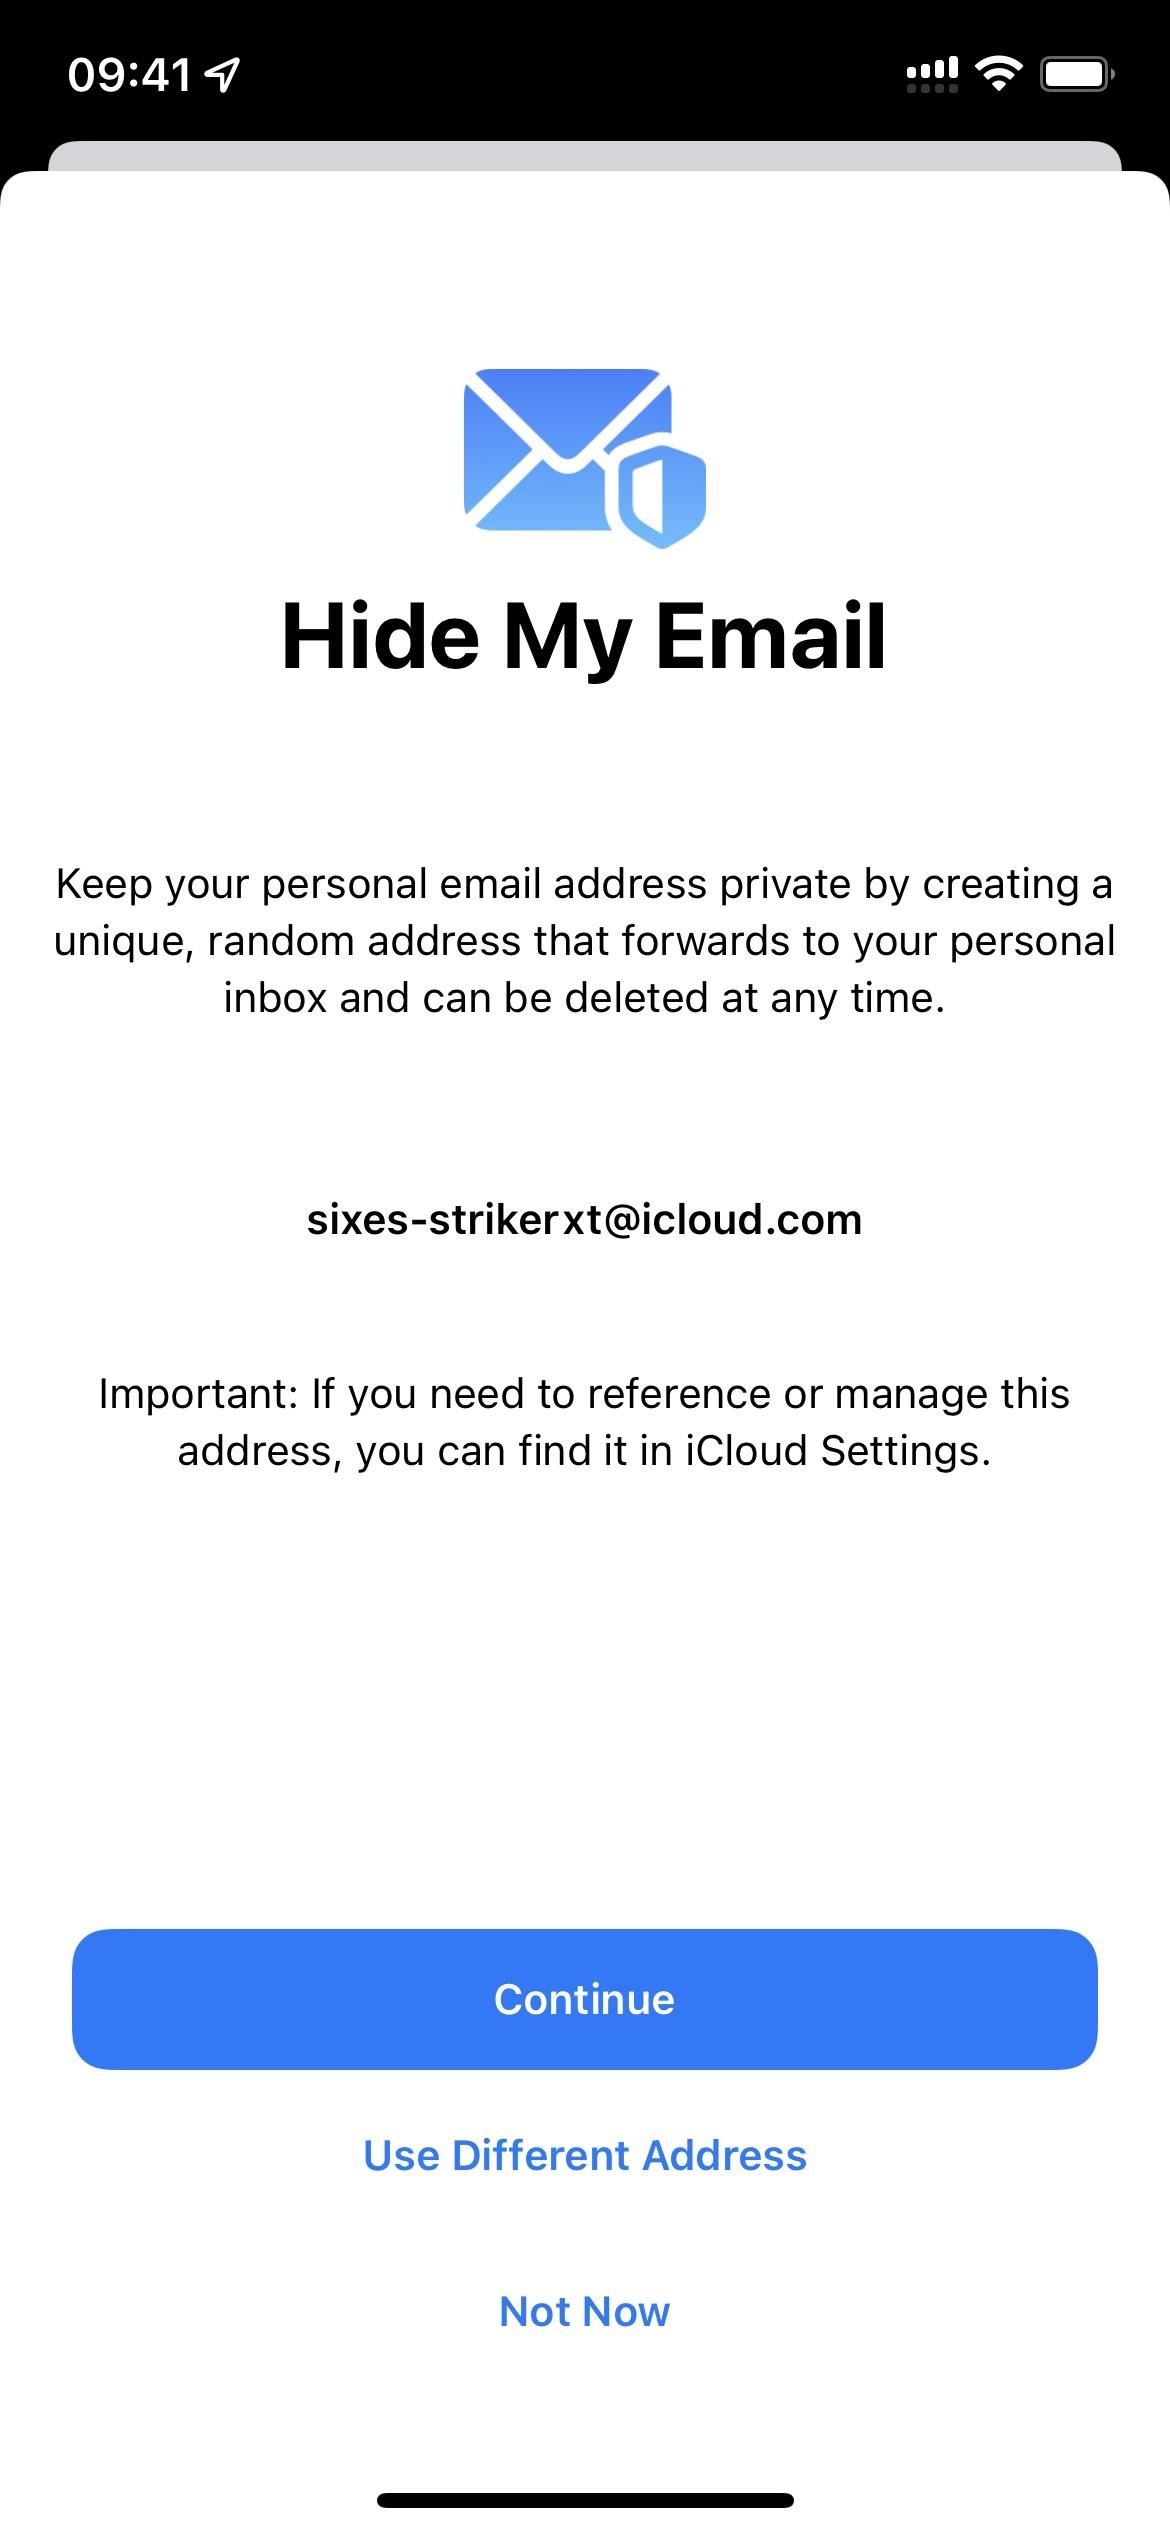
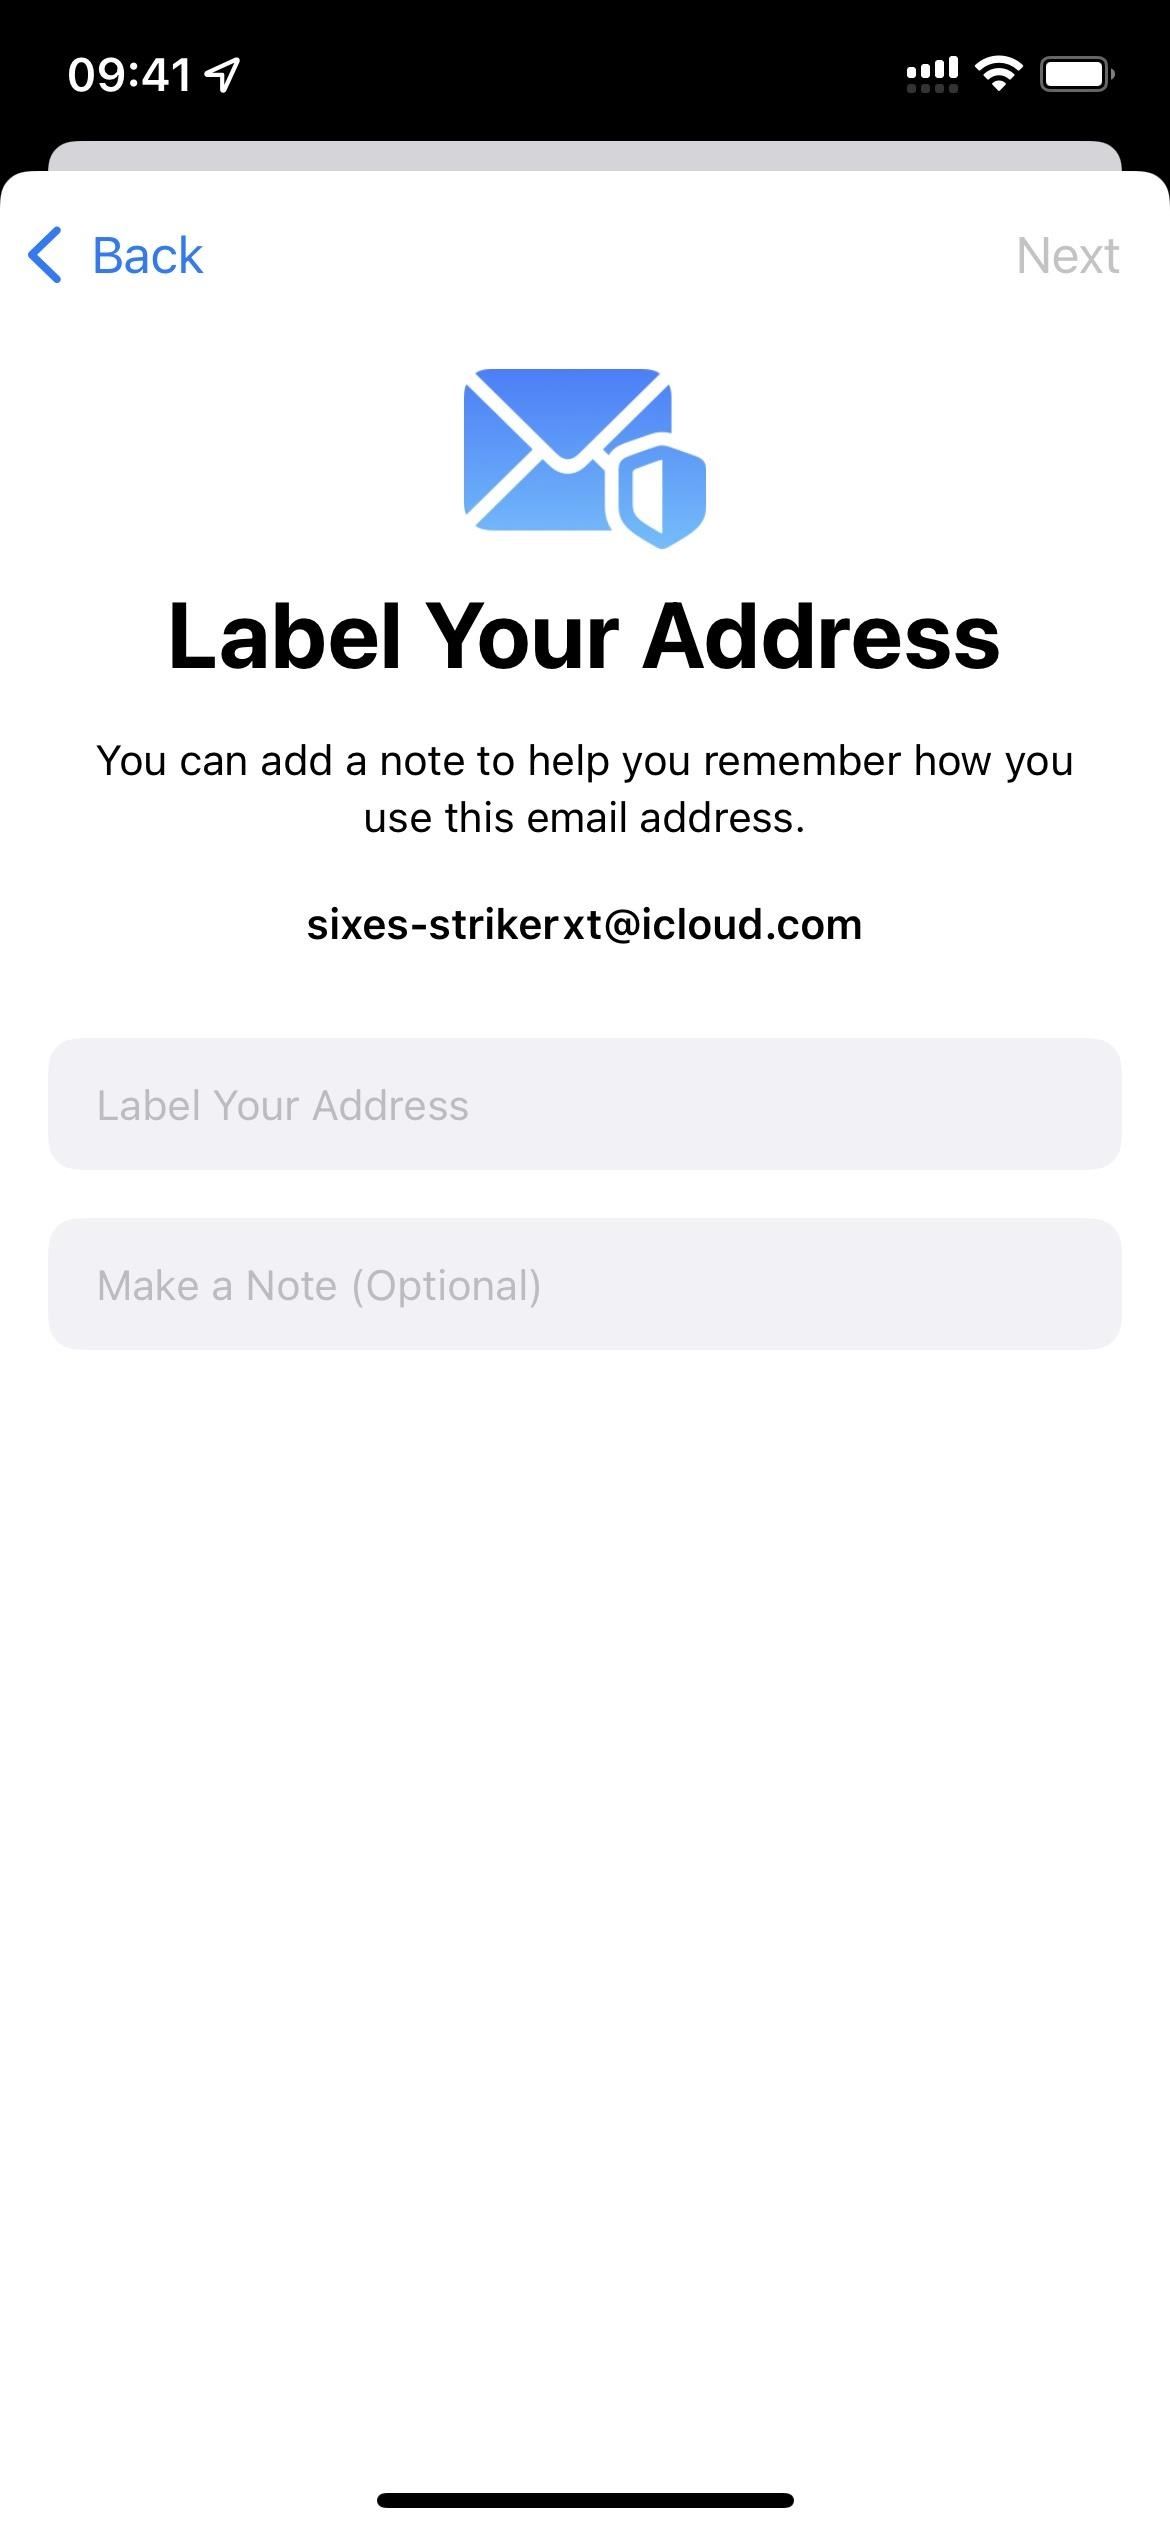
You can do much more with Hide My Email, thanks to iOS 15.2. Now, you can use it to generate random throwaway email addresses that you can use for anything, not just when creating accounts. The proxy email address will forward emails to your actual inbox, and you can delete the proxy any time you want. The only requirement is that you have a paid iCloud+ plan.
To create fake emails, go to Settings –> [Your Apple ID] –> iCloud –> Hide My Email, then tap "+ Create New Address." You can label each proxy address, making it easy to remember why you're using them. At the bottom of the Hide My Email screen, you can even change which email address the proxies forward emails to.
Tip 7: Change Your Default iOS Email Client
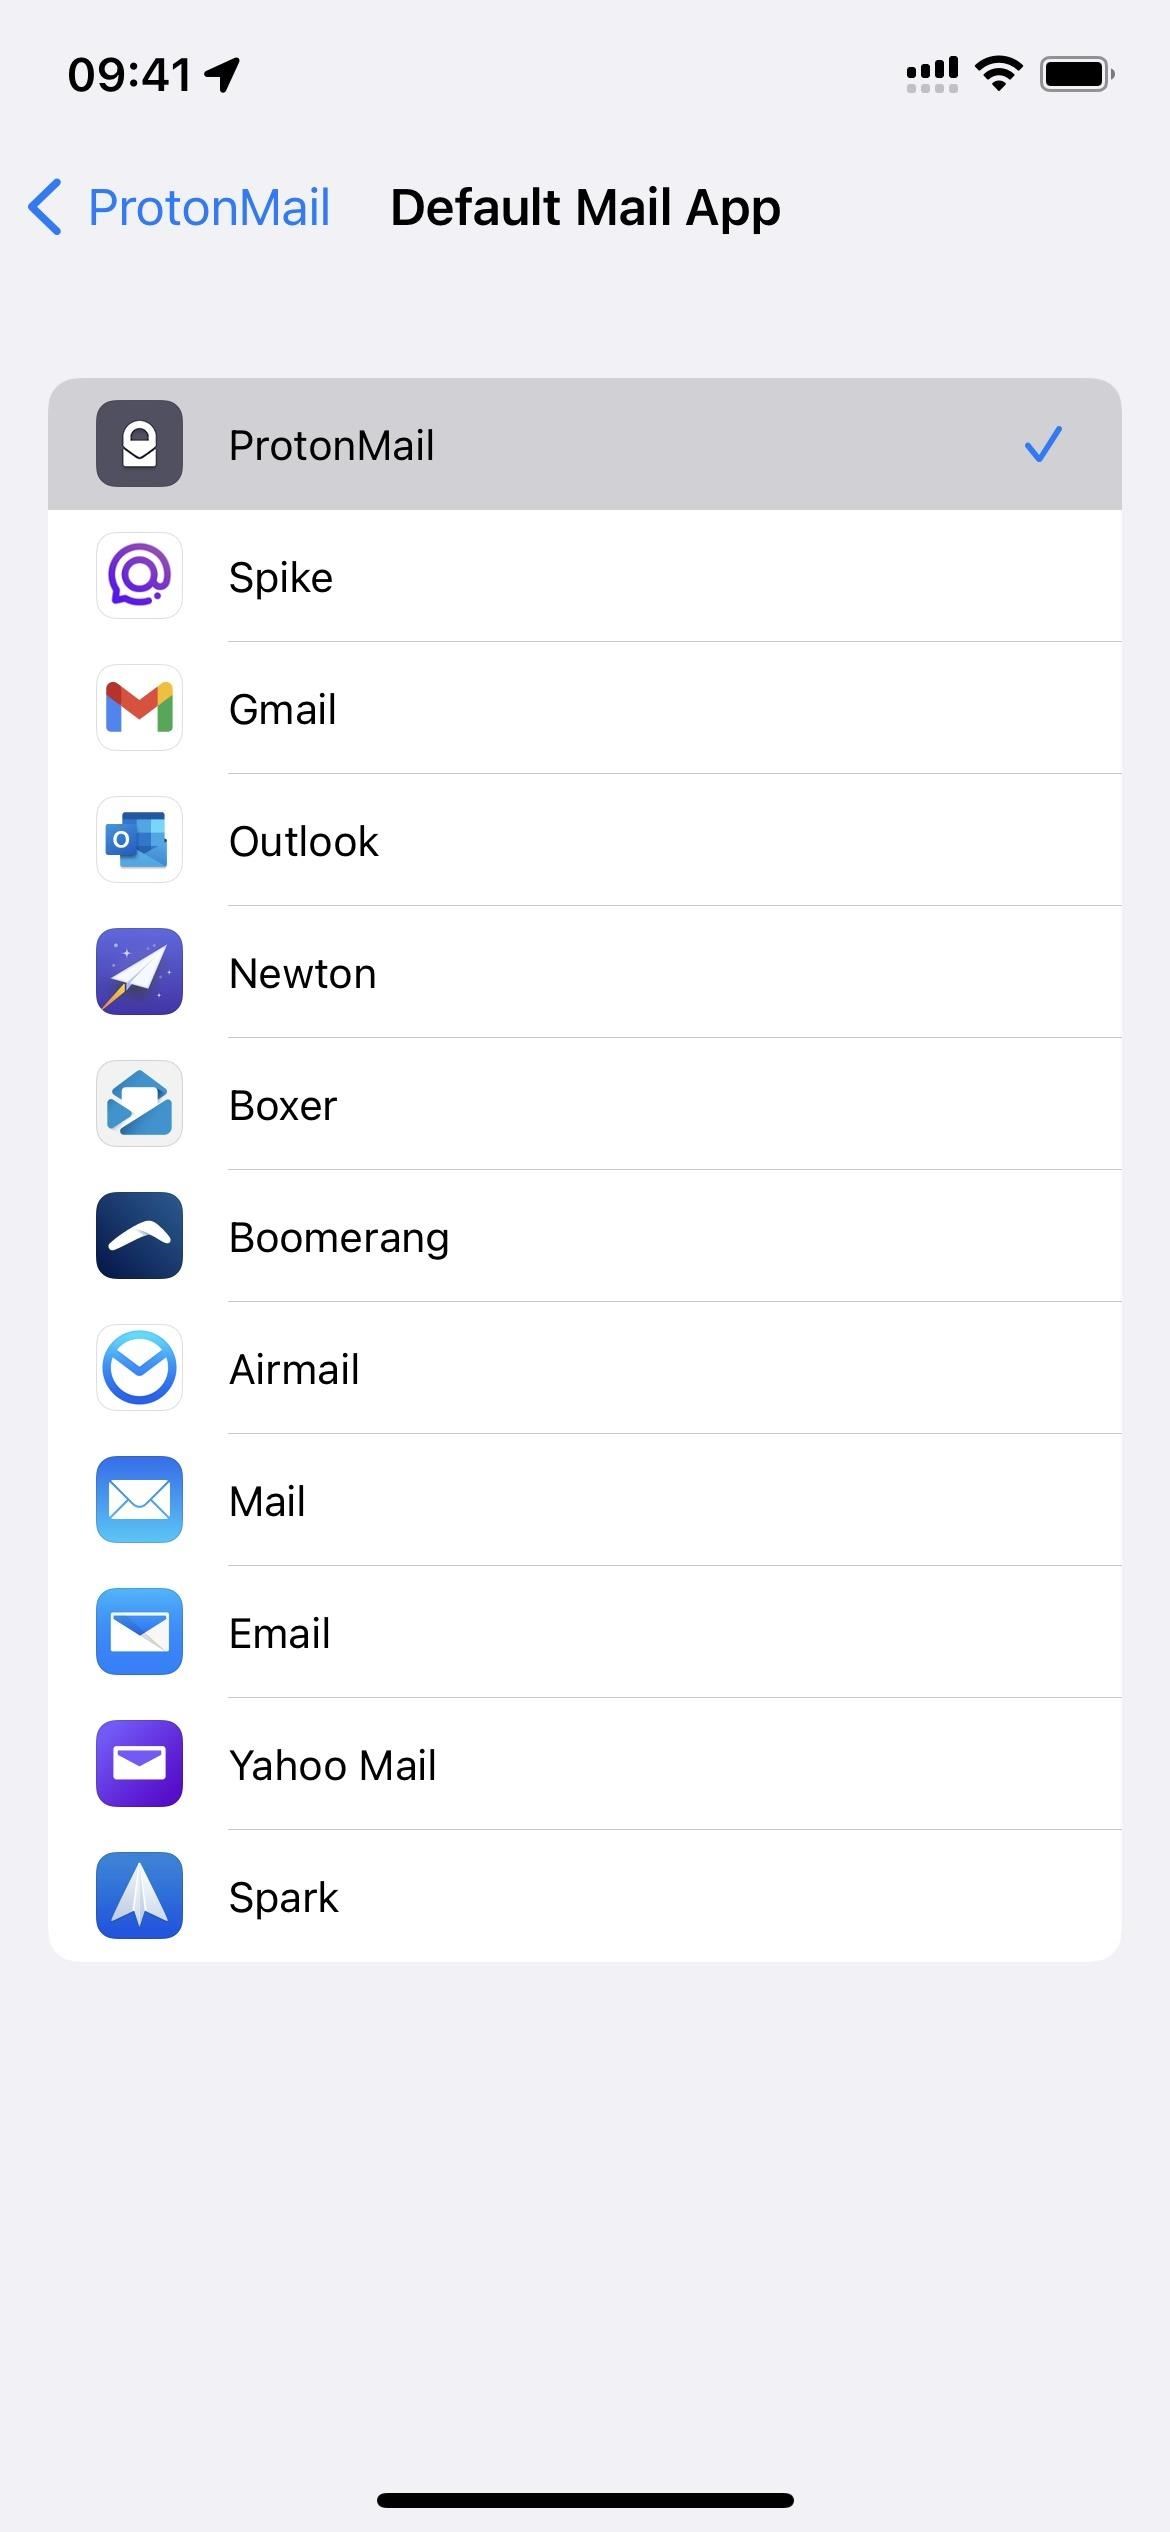
Even with S/MIME encryption, you may feel more comfortable using a more secure email client or service such as ProtonMail. Whatever email app you prefer, you can likely make it your default mail app so that any time you open mailto: links, your preferred app will open instead of the stock Mail app.
ProtonMail has an iOS app, and it uses PGP (Pretty Good Privacy) encryption options with advanced security features, third-party client support, message sending options, and iron-clad anonymity. Services like Tutanota or Hushmail are also suitable alternatives, though Tutanota is still trying to add support for becoming a default mail app and Hushmail is not free.
To change your default mail program, download the mail app of your choice, then open its preferences from the stock Settings app. Select "Default Mail App," then check the app you want, and exit the settings. The next time you tap on a link that would normally open in Mail, it will load in your selected email app. This feature has been available for iPhone since iOS 14.
- More Info: How to Change Your iPhone's Default Email App from Mail to Outlook, Spark, Gmail, and More

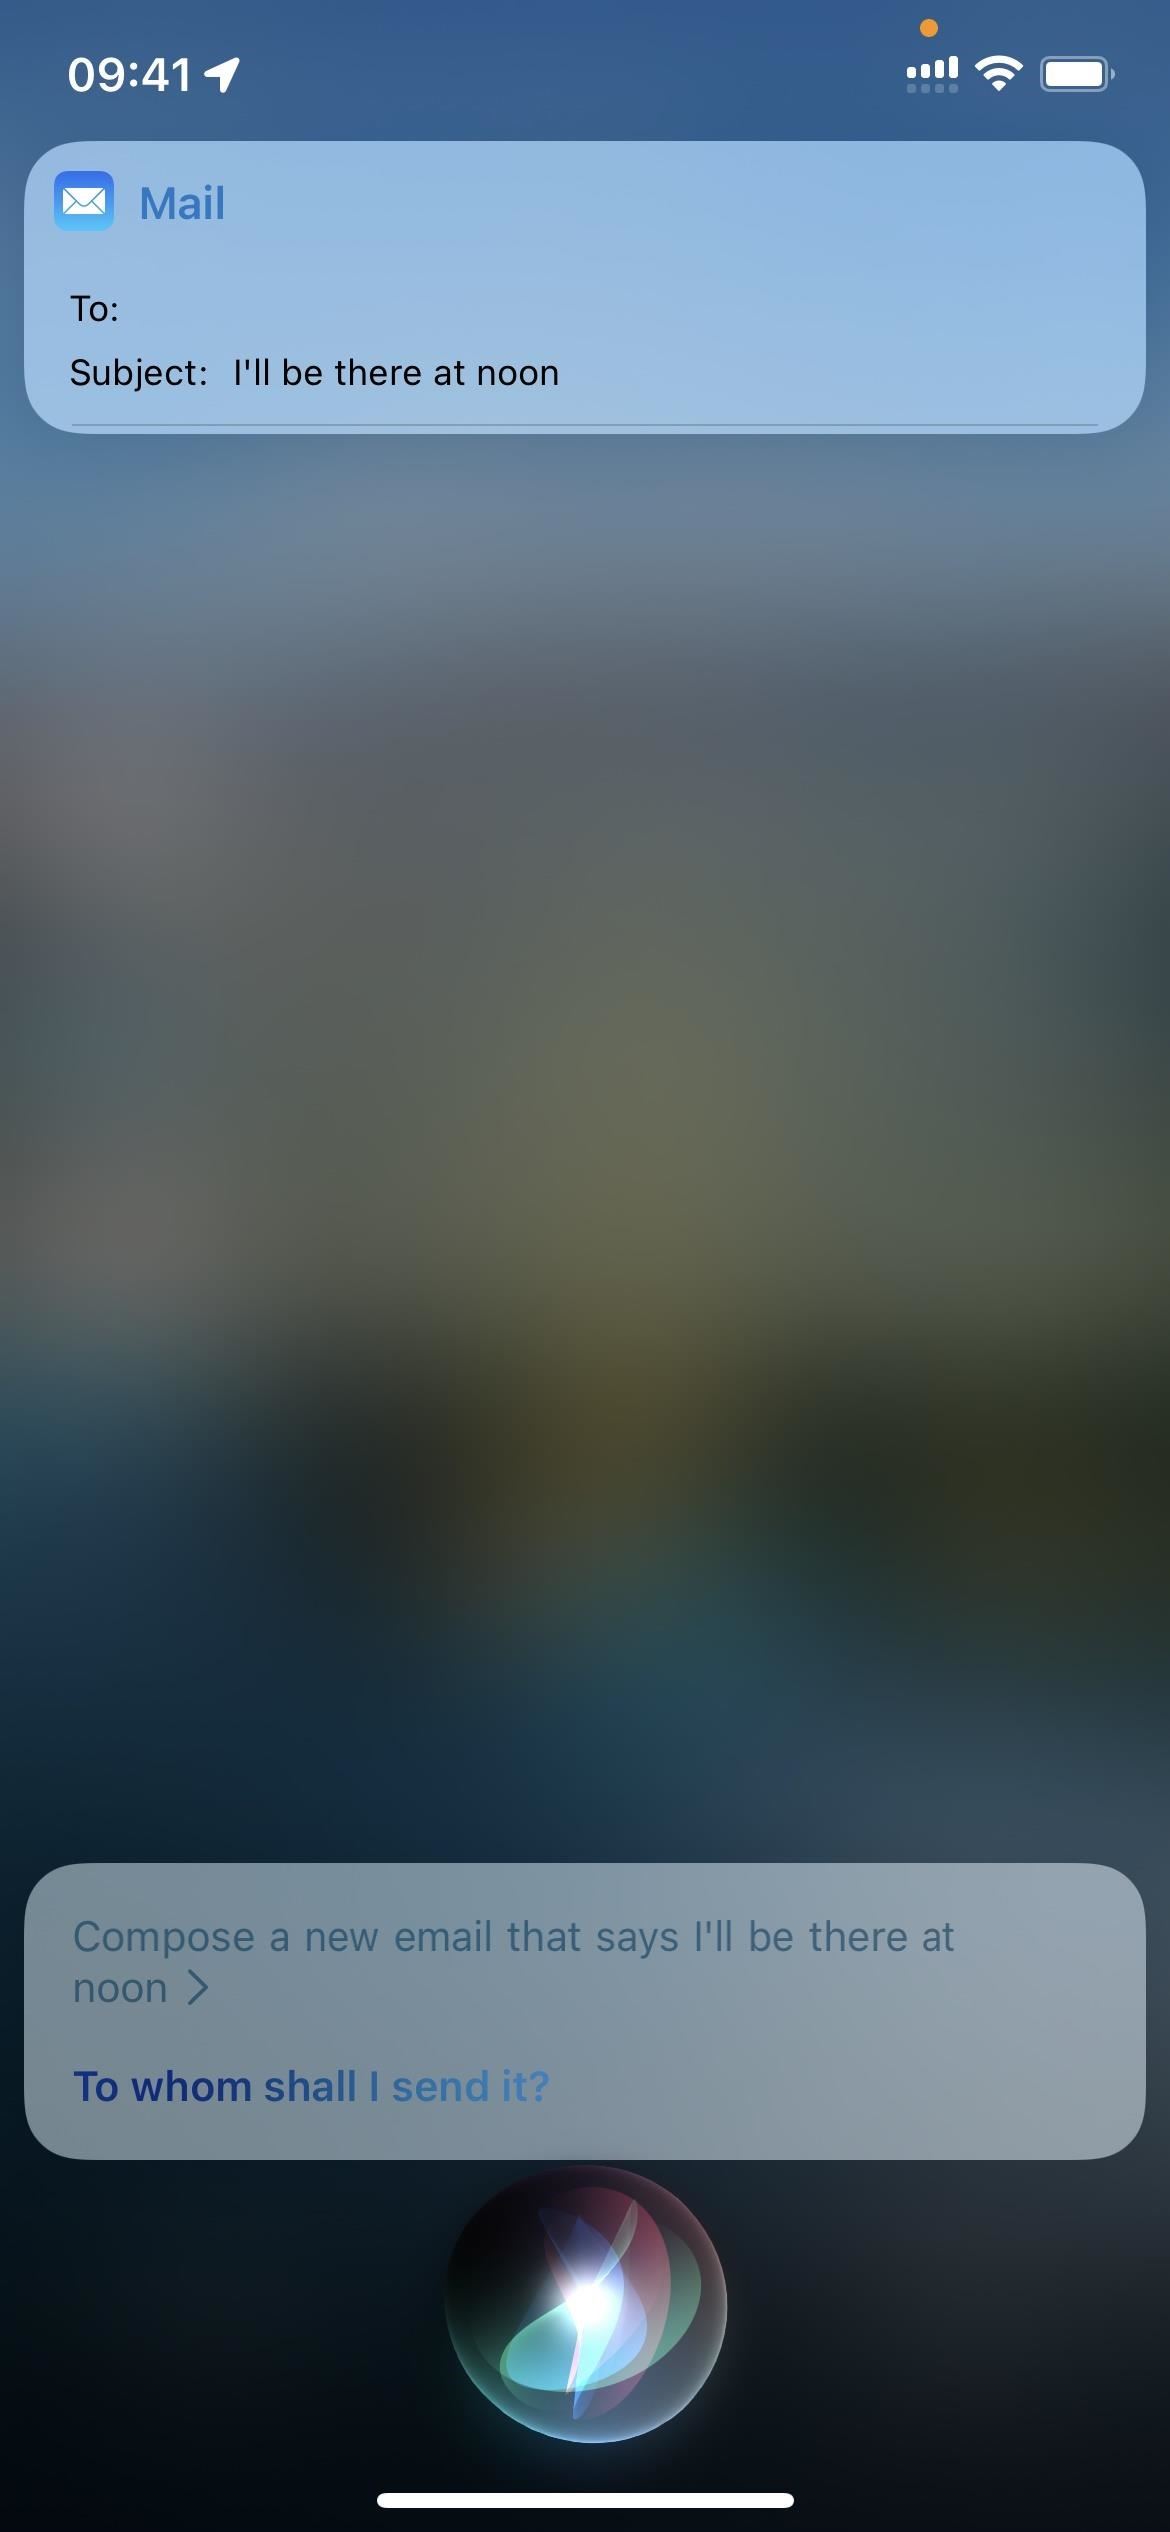
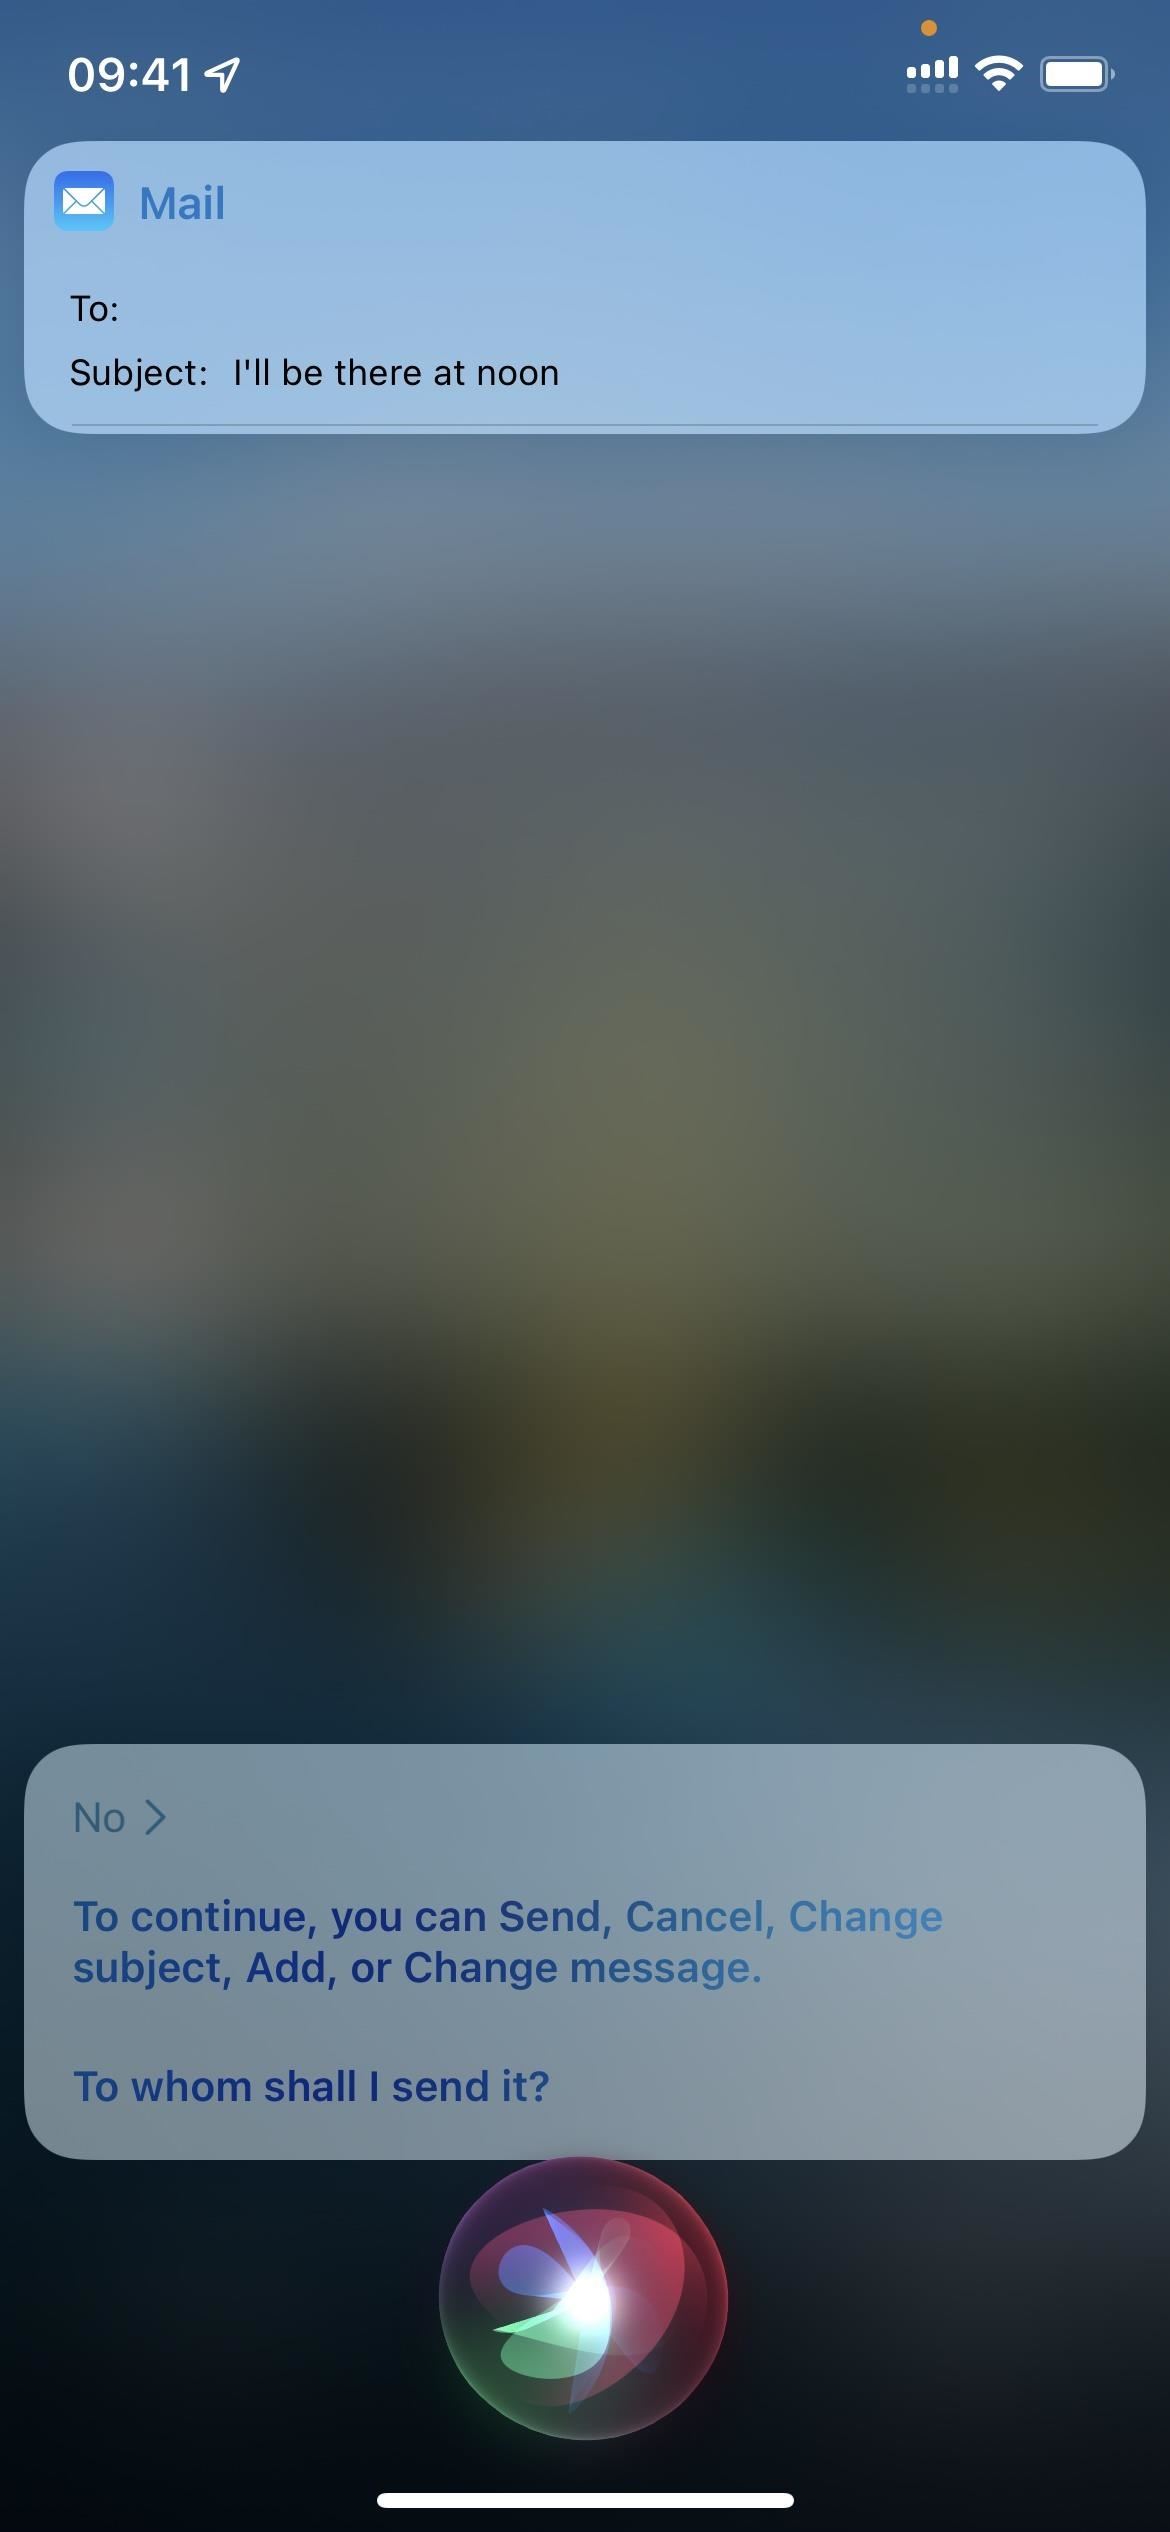
Tip 8: Use Siri to Compose Emails
You can use Siri to compose emails, but the voice assistant used to have to send the audio to Apple's servers to be processed. Unfortunately, this added an extra avenue through which your data could be compromised. Thankfully, Siri requests are processed on-device as of iOS 15.
There's nothing you have to do to enable on-device Siri requests that work even when offline. However, this feature is only available on iPhones and iPads that contain the A12 chip or newer. That means the oldest phones with this capability are the iPhone XS and iPhone XR lines.
Some commands Siri can process offline include making phone calls, responding to messages, adjusting preferences, setting timers and alarms, and more. And let's not forget composing and reading emails, of course.
Just updated your iPhone? You'll find new emoji, enhanced security, podcast transcripts, Apple Cash virtual numbers, and other useful features. There are even new additions hidden within Safari. Find out what's new and changed on your iPhone with the iOS 17.4 update.


Be the First to Comment
Share Your Thoughts