

Disabling the snap windows feature in Windows 11 can help streamline your workflow, especially if you prefer a different window management tool. This tutorial will guide you through the steps to disable window snapping using three different methods for a more personalized desktop experience.
Why You Might Want to Disable Windows Snap Assist
The main reason you’d want to do this is if you already use a third-party solution for Window snapping that has more options or conflicts with the default Windows 10 behavior. PowerToys, for example, lets you set custom window layouts for all of your apps. Thankfully, there are a few ways in Windows 11 to turn off snap. You can use the slickly designed settings app, the legacy control panel, or make a registry tweak.
Windows 11: Disable Snap Assist via Settings
This method is the simplest way to turn off snap assist and requires no technical expertise.
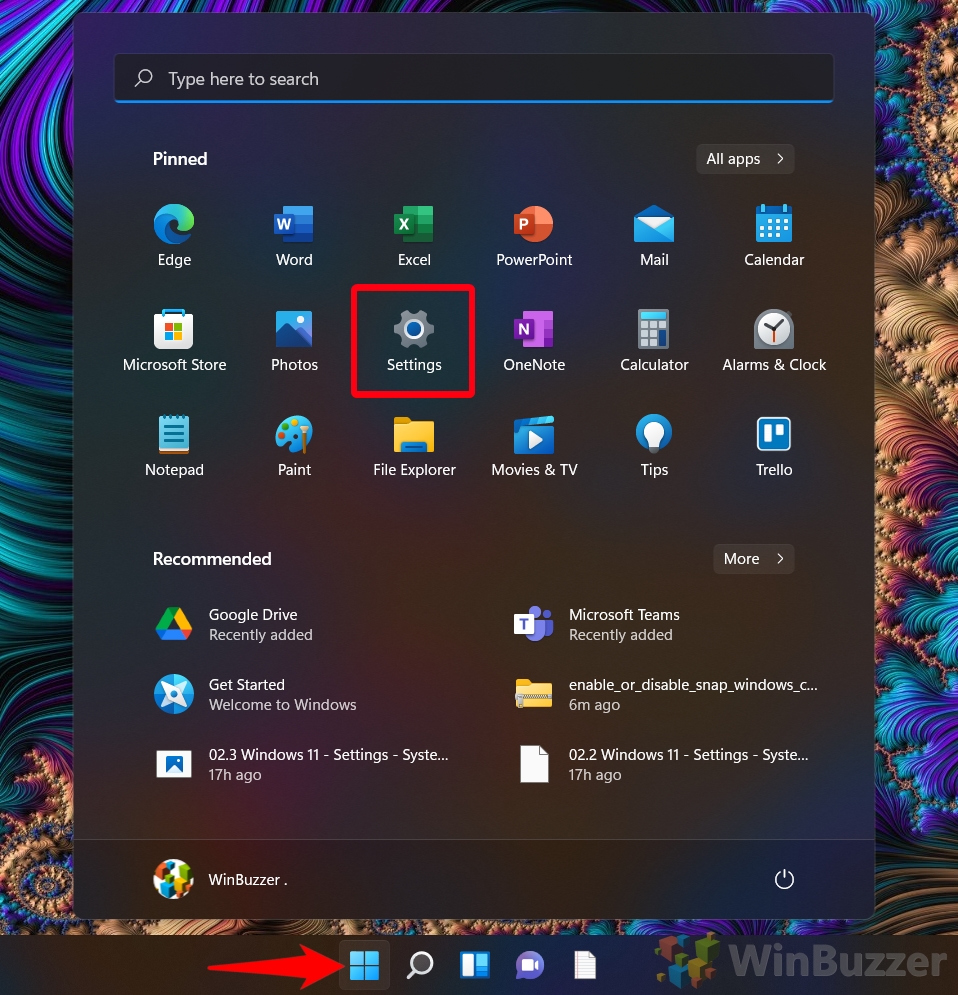
- Open Settings
To launch the Settings app, click on the Windows icon in your taskbar and select the “Settings” icon from the Start Menu. Alternatively, you can press “Windows + I” on your keyboard to open Settings directly.

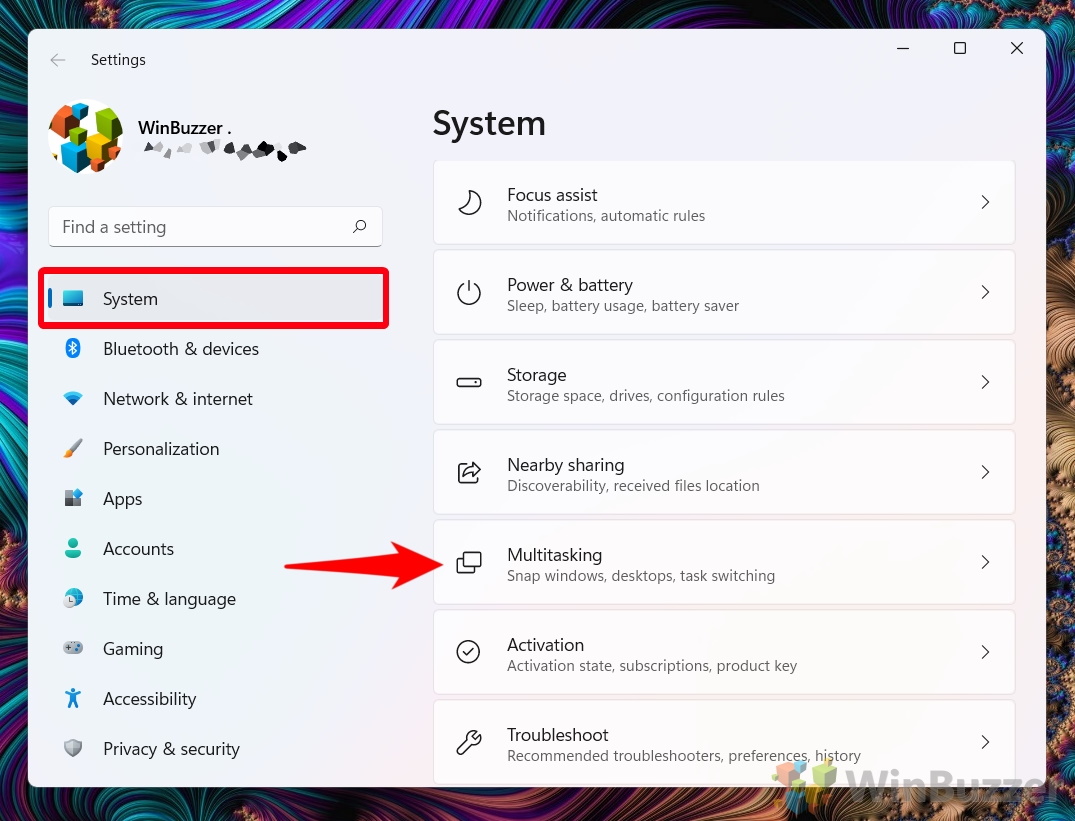
- Open Multitasking Settings
Navigate to the “System” section in the Settings sidebar, and then select “Multitasking” from the options in the main panel to adjust how windows are arranged on your desktop.

- Turn Off “Snap windows”
Within the Multitasking settings, locate the “Snap windows” option and switch the toggle to “Off” to disable the snap assist feature. This setting can be toggled back on at any time if you wish to re-enable snap assist.


Windows 11: Disable Windows Snap in Control Panel
For those who prefer using the Control Panel, this method provides an alternative way to disable window snapping.
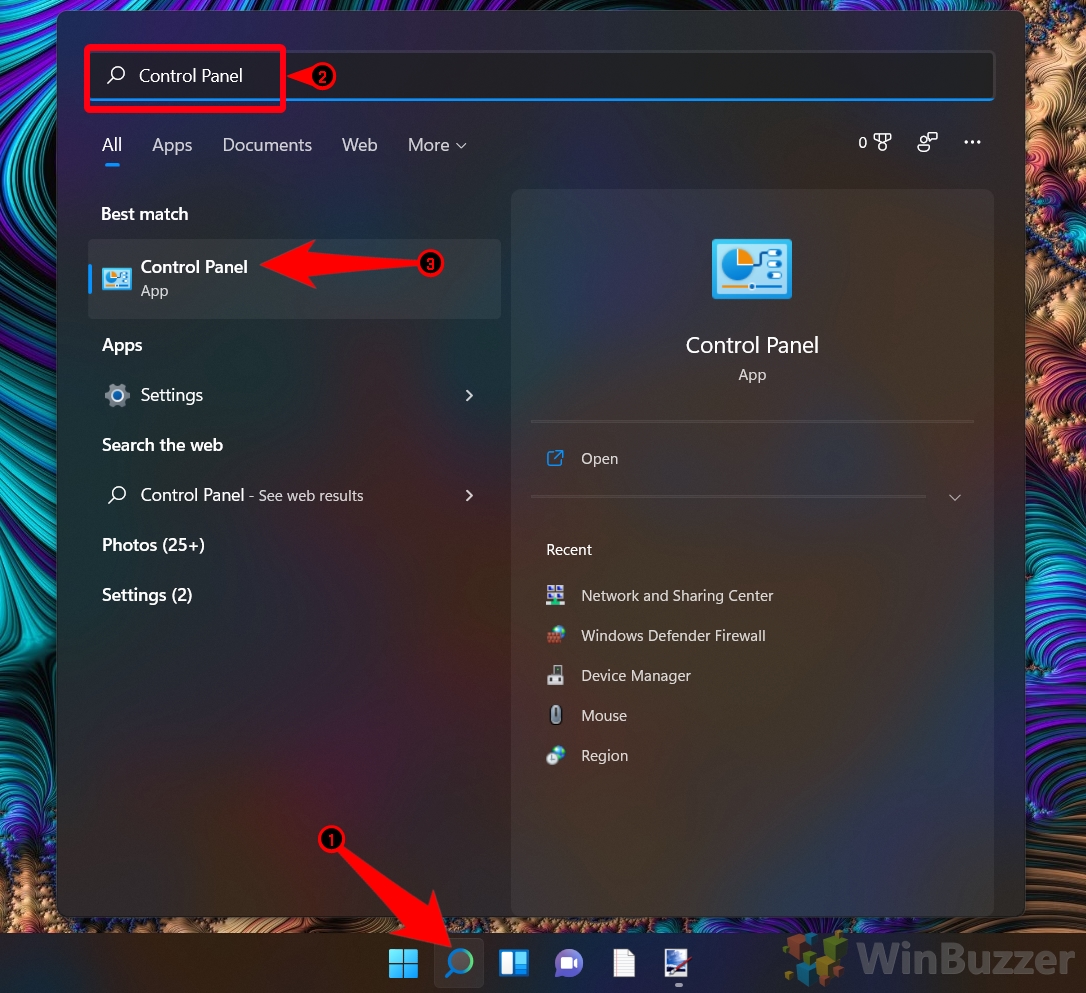
- Open the Control Panel
Access the Control Panel by typing “Control Panel” into the search bar on your taskbar and clicking the top result. The Control Panel offers a variety of system settings and configurations.

- Open the “Ease of Access Center”
Use the search function in the Control Panel to locate the “Ease of Access Center” and click on it. This center is designed to make your computer more accessible.

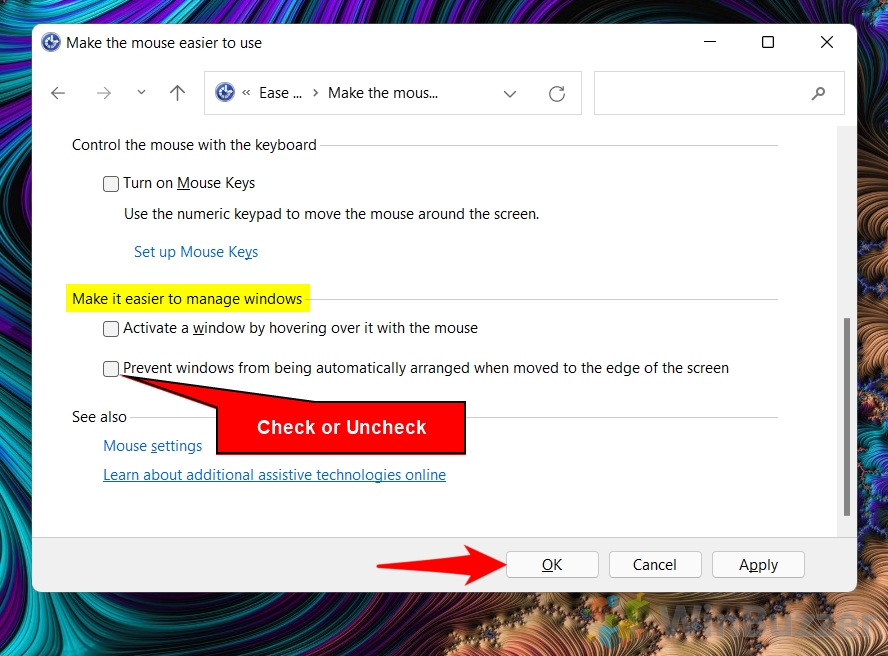
- Find the “Make it easier to manage windows” Setting
Select the “Make the mouse easier to use” or one of the other two options shown in the screenshot.

- Prevent Automatic Window Arrangement
Under “Make it easier to manage windows“, check the option “Prevent windows from being automatically arranged” to disable automatic window snapping. Click “OK” to save your changes.


Disable Window Snapping in Windows 11 via Registry
If you’re looking for a more advanced method, modifying the Windows Registry is another way to disable snap assist. We have created a specially crafted registry file to make doing so even easier. You can download it here.
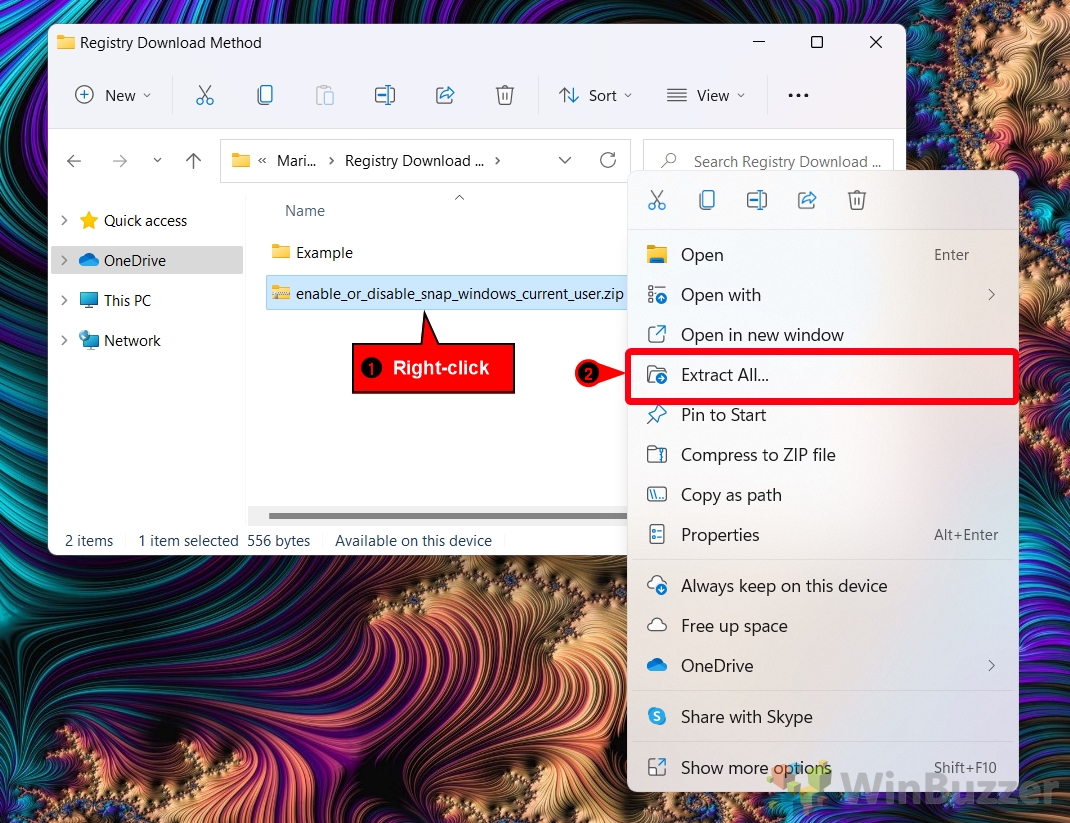
- Extract the Registry Zip File
Download and extract the registry file from the provided link to begin. Right-click the downloaded zip file and select “Extract All…” to proceed.

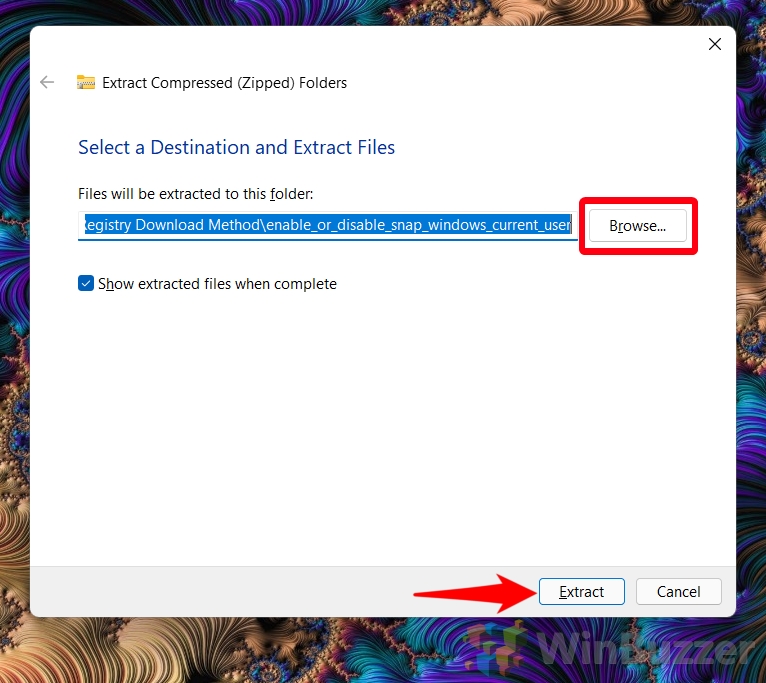
- Navigate to the Extracted Files
After extraction, browse to the location where you extracted the files and press “Extract” to access the necessary registry files.

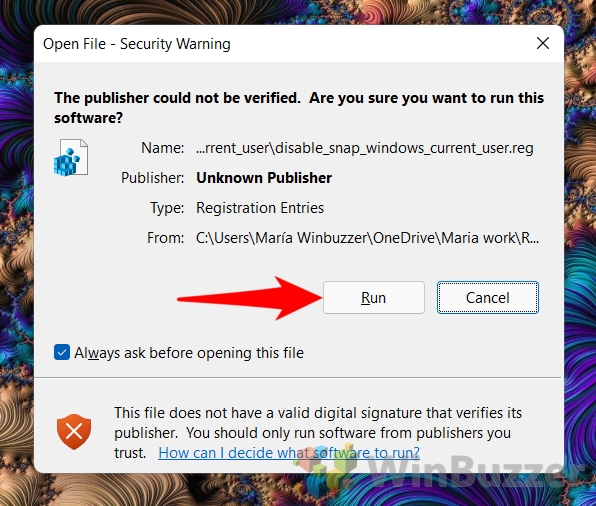
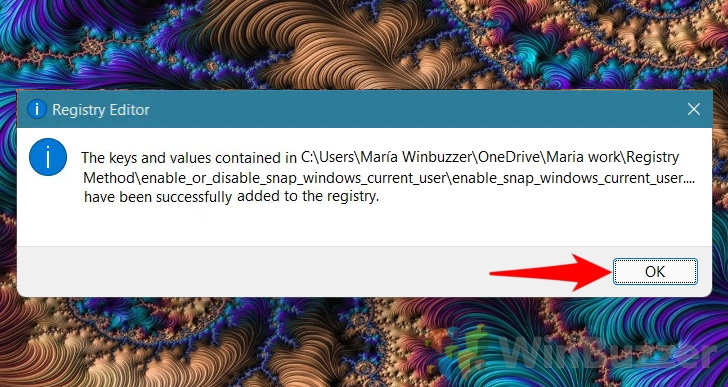
- Apply the Registry Edit
Locate and double-click the “disable_snap_windows_current_user.reg” file to apply the registry edit and disable snap assist.If you want to enable it again in the future you can store the other registry file and double-click it when needed.

- Press “Run” on the security warning

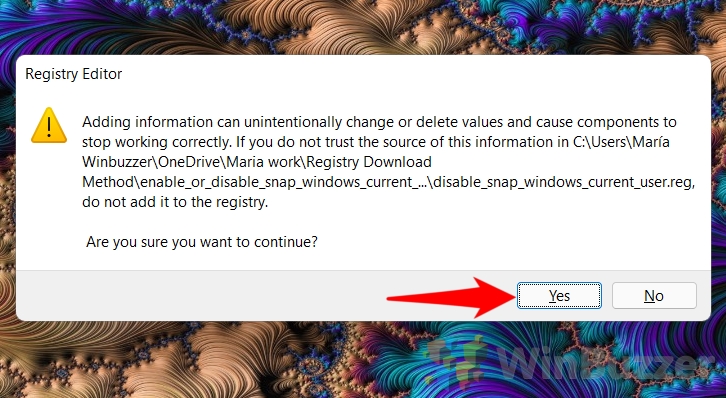
- Press “Yes” to the prompt

- Confirm the Action
After double-clicking the registry file, you will see a security warning. Click “Run“, then “Yes” on the User Account Control prompt, and finally “OK” in the confirmation menu. Snap assist will be disabled after a system restart or sign-out.


How to Disable Snap Layouts on the Maximize Button
In Windows 11, Microsoft has made the Windows snap feature more obvious and robust. Windows 11 snap layouts let you easily snap a window to a specific area by hovering on the maximize button and clicking where the window wants to go. If you’re a power user, however, this feature may be more of a nuisance than an aid. In our other guide, we show you how to disable the snap layouts pop-up on the maximize button in Windows 11 using both the Settings menu and the Registry Editor.

FAQ – Frequently Asked Questions About Windows 11 Snap Assist
Can I disable snap assist for a specific application in Windows 11?
Unfortunately, Windows 11 does not offer an in-built feature to selectively disable snap assist for specific applications. Snap assist settings are applied globally, affecting all applications the same way. Users looking for application-specific window management may need to explore third-party software options that offer more granular control.
Does disabling window snapping affect performance in Windows 11?
Disabling window snapping in Windows 11 does not significantly impact the overall performance of the system. The feature is designed to enhance user experience by organizing windows more efficiently without consuming considerable system resources. Therefore, turning it off simply changes how windows are arranged on your screen, without affecting the computing power or the system’s performance metrics.
Can I use Group Policy to disable snap assist in Windows 11?
Directly manipulating snap assist settings via Group Policy Editor is not straightforward in Windows 11, as there are no explicit policies provided for this specific feature. Group Policy Editor primarily focuses on enterprise settings and broader system behaviors rather than individual user interface features like snap assist. Users seeking to disable snap assist must rely on the methods outlined in the Settings app or Control Panel, as highlighted in the tutorial.
If I disable snap assist, can I still use windows in split-screen or side-by-side manually?
Yes, even with snap assist disabled, users retain the ability to manually arrange windows in split-screen or side-by-side configurations. Disabling snap assist stops the automatic docking and resizing of windows when dragged to the edges of the screen, but it does not remove the function of manually resizing windows to fit multiple applications on the screen at once. This flexibility allows users to maintain control over window arrangements according to their preferences.
How can I quickly access the Ease of Access settings without going through the Control Panel?
The quickest way to access Ease of Access settings in Windows 11 is by using the keyboard shortcut Windows + U. This command bypasses navigation through the Control Panel or Settings app, directly opening the Ease of Access center. This method is especially useful for users looking to adjust accessibility features swiftly.
After disabling snap assist, how can I manage multiple windows effectively?
Without snap assist, users can still manage multiple windows effectively using manual resizing, third-party window management tools, or taking advantage of features such as virtual desktops. Virtual desktops, accessible through the Task View button on the taskbar or the Windows + Tab shortcut, offer an alternative way of organizing applications by grouping them on separate virtual screens. Third-party tools may also offer enhanced functionality, like automatic window tiling, more customizable snap areas, and gesture controls for window management.
Is there a keyboard shortcut to disable snap assist quickly in Windows 11?
Windows 11 does not provide a direct keyboard shortcut for toggling snap assist on or off. Adjusting this setting requires navigating through the Settings app or Control Panel, as outlined in the provided tutorial. However, users familiar with scripting or automation tools like PowerShell may script the enabling/disabling process for quicker access, although this requires advanced technical knowledge.
Can changing accessibility settings interfere with snap assist functionality?
Changing accessibility settings primarily affects features designed to improve system usability for users with specific needs and does not directly interfere with how snap assist functions. However, some settings found in the “Ease of Access” center, such as those for controlling how windows are arranged to aid focus, may indirectly impact your window management experience. Always review the specific settings you are adjusting to ensure they align with your desired usage patterns.
How do I ensure my changes to disable snap assist are saved properly?
To make sure your changes to disable snap assist are saved, follow through with the action (clicking “OK” or toggling a switch) as required in the method you’re using, whether it’s through the Settings app or Control Panel. For changes done via the Registry Editor, confirming your action in the security prompts is essential. Additionally, it’s a good practice to restart your computer after making these types of system adjustments to ensure that changes are applied correctly and thoroughly.
Can I customize other aspects of window management in Windows 11 aside from disabling snap assist?
Yes, Windows 11 offers a broad range of options for customizing window management. In the System > Multitasking section of the Settings app, users can adjust settings for virtual desktops, including how windows are grouped when moving apps across different desktops. Additionally, the “Snap windows” settings allow users to customize how the snap assist feature functions, such as showing snaps layouts when hovering over a window’s maximize button, and enabling snap layouts on smaller screens.
What are the risks of modifying the Windows registry to disable snap assist?
Modifying the Windows Registry carries the risk of system instability or malfunction if not done correctly. Incorrectly entered or altered registry keys can lead to application errors, system crashes, or in severe cases, prevent Windows from booting. Always back up the registry before making changes and follow instructions carefully. If unsure, opt for the Settings app or Control Panel methods to adjust snap assist settings.
Can disabling snap assist improve my system’s privacy or security in any way?
Disabling snap assist does not have a direct impact on system security or privacy. The feature is designed for enhancing user experience through efficient window management and does not collect or expose user data. Concerns over privacy and security should be addressed through relevant system settings and practices, such as updating software regularly, using security software, and managing app permissions.
Will disabling snap assist impact my ability to use multiple displays effectively?
Disabling snap assist does not hinder the effectiveness of using multiple displays with Windows 11. Users still have full control over arranging windows across multiple screens, manually resizing and positioning them as needed. Features specific to multi-monitor setups, like extending or duplicating screens, remain unaffected by the status of snap assist.
Can I re-enable snap assist easily if I change my mind?
Re-enabling snap assist after disabling it is a straightforward process that simply involves reversing the steps performed to disable it. Through the Settings app, navigate back to System > Multitasking and toggle the “Snap windows” option back on. If the change was made through the Control Panel or Registry Editor, follow the respective procedure in reverse to re-enable the feature.
What alternatives exist to Windows snap assist for managing windows?
For users seeking alternatives to Windows snap assist, the market offers a variety of third-party window management tools that provide enhanced functionality, such as DisplayFusion, AquaSnap, and WindowGrid. These tools offer features like more comprehensive snap functions, custom snap areas, window tiling, and multi-monitor taskbars, catering to users with specific window management needs or preferences. Using these applications can bring a new level of control and efficiency to organizing windows on your desktop.
Related: How to Move the Taskbar in Windows 11 and Windows 10
With the advent of Windows 11, Microsoft introduced a centered taskbar and Start menu, aiming to align with modern design trends and user behaviors. However, not all users have embraced this change. If you’re among those who want to experiment with different taskbar positions for a more personalized setup, Windows offers the flexibility to move the taskbar to suit your preferences. In our other guide, we show you how to move the Windows taskbar to other places.
Related: How to Disable “Show More Options” in Windows 11 to See the Full Context Menu
The “Show More Options” line in the Windows 11 context menu is a departure from the traditional, instantly accessible full menu that users have become accustomed to in previous versions of Windows. While visually appealing, this change can disrupt the workflow by adding an extra step to access commonly used functions. In our other guide, we show you how to restore the classic context menu in Windows 11, removing the need to click “Show More Options”.


