Light painting might be a staple technique most photographers try and learn early on in their time with their first camera, but it has occasional commercial applications. One of the best examples of that is automotive photography. In this video, see an edit of a light-painted Porsche from start to finish.
There are few things in this world that get me talking quicker and more passionately than cameras and cars. I have a standing love affair with both that isn't going anywhere soon, and while cars haven't had much time in front of my camera as a professional photographer, they are a subject I love to see captured.
The difficulty with cars is they essentially stand alone as a genre, particularly if you're creating commercial images. They are more or less giant products that need to be captured how you would a piece of jewellery or an ornament. You have to ensure that the subject is well lit and lit in a way that accentuates the design. You have to capture all of the key details and focal points. You have to get the reflections in places that add to the image rather than detract from the car. The difficulty is, a car is significantly larger than most products.
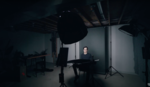
One option would be to use huge lights and a studio, but if you have to shoot on location, light painting is your best option. It's time-consuming, takes a lot of knowledge and vision, and then takes time in post-production, but as you can see in this video of an edit by Dominykas Liberis, the results can be superb.