Heading out the door? Read this article on the new Outside+ app available now on iOS devices for members! Download the app.
Apparently, the whole team at YJ has issues—wrist issues, that is. We recently found ourselves commiserating on how creaky or tender our wrists are—and how they affect our yoga practice. And as publication pros, we spend hours at our computers each day, which could make our wrist problems worse, according to Dr. Steven Bailey, an Atlanta-based hand surgeon.
A 2019 study found that wrist injuries are more common among people who have physically demanding jobs and those that require you to use your hands for repetitive tasks. Women and older people may be more at risk, and if you’re involved in sports, you’re also a candidate. But a regular yoga practice can also take its toll—if you’re not careful with alignment in asanas that require weight on the hands.
“Often people inadvertently put too much weight on their wrists,” according to experts at Go To Ortho, an orthopedic urgent care in Portland, Oregon. “They tend to dump their body weight on the base of their hands, accidentally straining their wrists.” Instead, focus on creating a hasta bandha—a hand lock—by pressing into the mat with your fingertips and the base of your fingers, and taking pressure off the heel of the hand.
To keep the wrists strong and supple, therapists may recommend hand rotations and other exercises that bend and flex the wrist to strengthen this delicate part of the body. But if you’re experiencing severe or persistent pain, consult your doctor or a physical or occupational therapist.
Meanwhile, you can practice yoga without putting pressure on your hands and arms at all. Some of our favorite yoga asanas offer alternatives or modifications for wrist injuries—all of which deliver the same benefits as ones that put weight on the hands.
5 yoga modifications for wrist injuries and pain
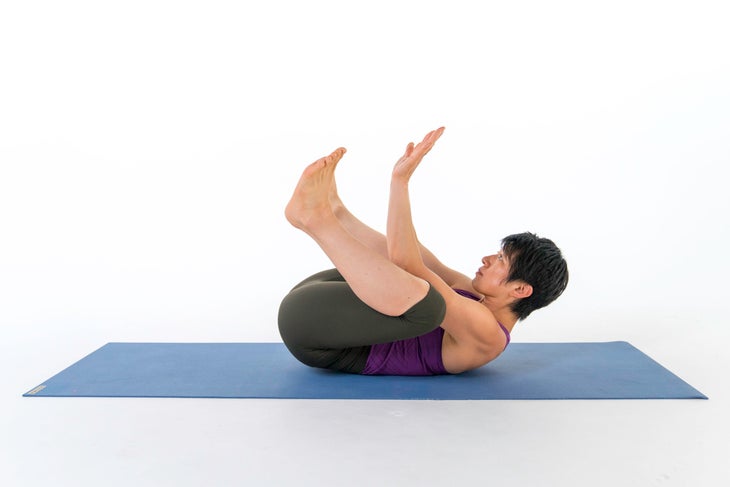
Instead of Bakasana (Crow Pose)… practice Supine Crow
Performing an upside-down Crow gives the same benefits as crow on your hands. It improves focus, stretches your glutes and quadriceps, and strengthens your core, upper back, chest, hip flexors, and hamstrings.
How to:
- Lie on your back.
- Bring your knees toward your chest and reach through your legs.
- Bring your shins to the outside of your upper arms. Press your arms up and forward strongly while simultaneously pressing your arms and shins together.
- You can keep your head down or lift your head, neck, and shoulders off the mat. Hold from 5 breaths to 1 minute.
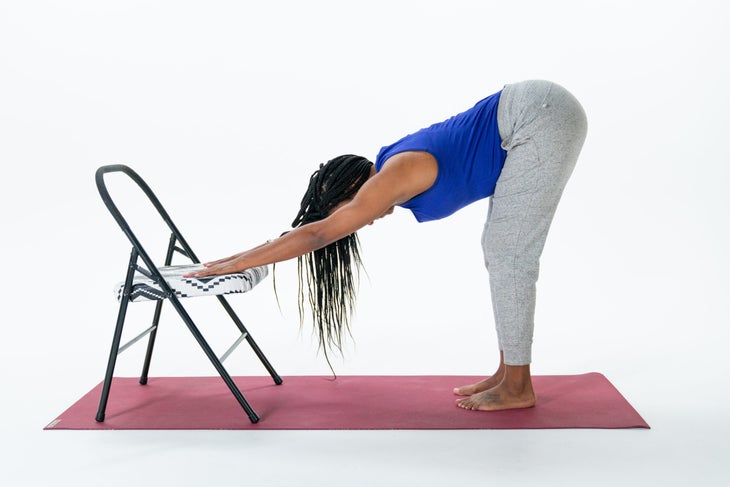
Instead of Adho Mukha Svanasana (Downward-Facing Dog)… practice Down Dog with a chair
The pose strengthens your core, front of your thighs (quadriceps), shoulders, arms, and upper back. It stretches the muscles along your spine, the back of your thighs (hamstrings), and your buttocks (glutes).
How to:
- Stand in Tadasana about 3 feet from the front of a sturdy, armless chair. Keep your feet hip-width apart and parallel.
- Fold forward at the hips and reach toward the seat, grasp the sides of the chair seat.
- Allow your shoulder blades to spin out, away from your spine and toward your outer armpits (upward rotation) to articulate the bones of your shoulder and create space at the base of your neck.
- Step back as much as necessary to create length in the spine and the back of the legs, while you lift the hips.
- Let your head hang freely so there is no tension in the neck; bring your gaze toward your feet. With each exhalation, lengthen the back; with each subsequent inhalation, send your hips up and back even more.
- Hold for a few breaths or a few minutes, then release.
- This can also be done with hands on the back of a chair.
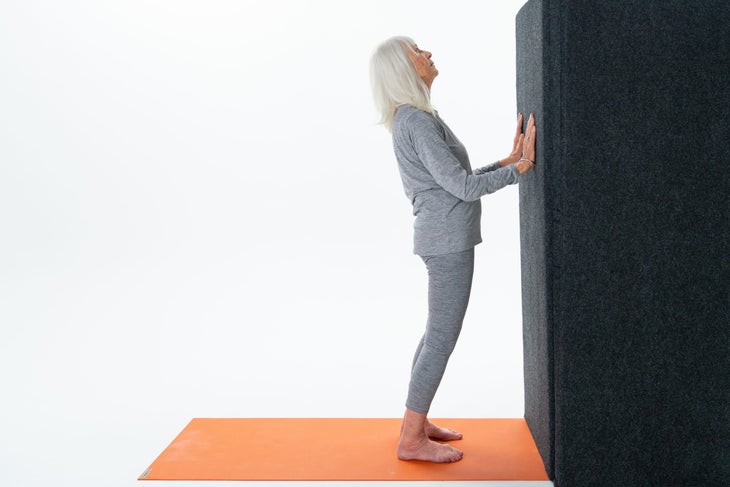
Instead of Chaturanga Dandasana (Four-Limbed Staff Pose)… practice Chaturanga at the wall
The pose stretches the hamstrings and calves, and strengthens the shoulders.
How to:
- Stand in Tadasana, arm’s length from the wall. Drop your tailbone down, draw your pubic bone up toward your navel, and contract your abs.
- Reach out and place your palms on the wall. Step back as far as necessary to keep the arms straight.
- Keeping your belly toned, lean forward, bending your elbows and pressing your chest toward the wall.
- Allow your forearms to come into contact with the wall.
- Pin your elbows into your midline and keep your shoulders rolling back.
- Keep the abdominals activated and feel the stretch along the back of your legs.
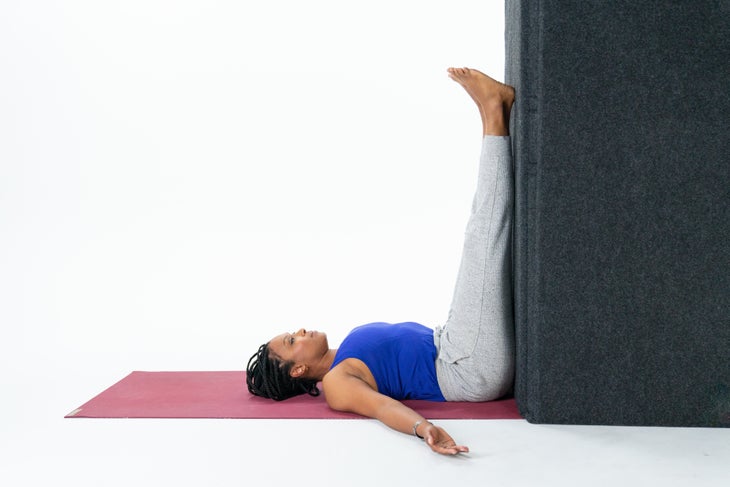
Instead of Adho Mukha Vrksasana (Handstand)… practice Viparita Karani (Legs-Up-the-Wall Pose)
This pose gives you many of the benefits of an inversion, including taking pressure off your feet and legs. It improves lymphatic and blood circulation. It is also calming and can help you manage stress.
How to:
- Sit on the floor with your left hip and leg against a wall.
- Walk your hands to the right and begin to lean right to lie down on your side.
- As you do, swing both legs up the wall and come to lie on your back.
- Shift as much as necessary to bring the sit bones in contact with the wall with the legs at a 90 degree angle.
- Reach your arms straight up overhead or down toward your hips. Create length in your neck.
- As an option, you may lift your hips and slide a block under your sacrum to elevate the hips.
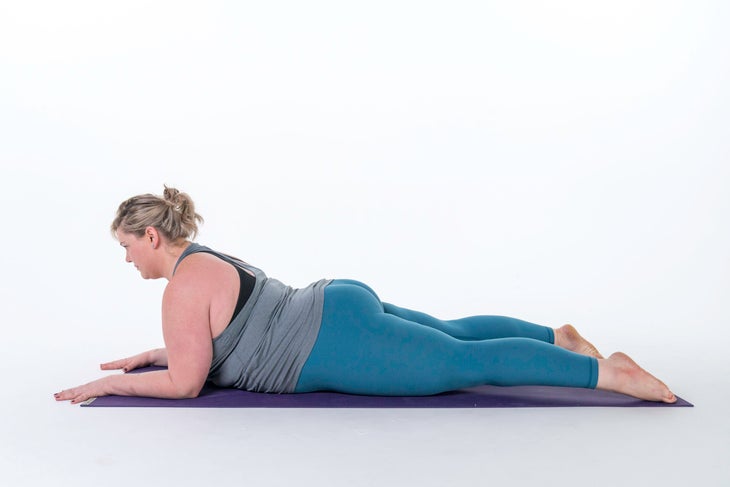
Instead of Urdhva Mukha Svanasana (Upward Facing Dog)… practice Sphinx Pose
Like Up Dog, this pose can counter slumping, slouching, and kyphosis (abnormal curvature of the spine). It may relieve lower back pain.
How to:
- Begin on your belly with your feet hip-distance apart and your forearms parallel and slightly ahead of your ribs.
- Your hands and elbows should be shoulder-distance apart, with your elbows a slightly in front of your shoulders.
- Extend your big toes straight back and press down with all ten toenails to activate your quadriceps. .
- Isometrically pull back with your forearms in order to draw your chest forward.
- Arch your thoracic spine, but keep length in the back of your neck and the lumbar spine.
- On each exhale, press down with the tops of your feet. On each inhale lift and open your chest.
- Hold for anywhere from several breaths to 1 minute.
See also:
Have a Wrist Injury? These Pose Swaps Will Help You Maintain Your Yoga Practice