Revolved Triangle Pose: The Complete Guide
As a twisting pose, Parivrtta Trikonasana focuses on full-body flexibility and strength.
Heading out the door? Read this article on the new Outside+ app available now on iOS devices for members! Download the app.
Parivrtta Trikonasana (Revolved Triangle Pose) is a deep twist that compresses and squeezes the disks in your spine, which improves circulation. The twisting motion also nourishes the tissues that are critical to having a supple spine—and deliciously coaxes tension from your back muscles.
“Twisting poses maintain and even enhance your ability to rotate your spine,” says yoga teacher and former Yoga Journal columnist Barbara Benagh. Thoracic twists like Revolved Triangle tone the muscles surrounding your torso, which have to work together to produce enough torque to rotate your spine. The resulting mobility and balance on the sides of your spine can help you power through everyday tasks that involve pushing, pulling, or turning—like reaching into the back seat of your car or passing a dish at dinner.
In Revolved Triangle, your pelvis stays neutral while your shoulders rotate. This spinal rotation can uproot your back leg and disturb your balance, so root strongly through all four corners of your feet to feel grounded. Focus on the stability of your pelvis (think about keeping your hip bones horizontally and vertically even) in order to maintain your stance.
Section dividerRevolved Triangle basics
Sanskrit: Parivrtta Trikonasana (par-ee-vrit-tah trik-cone-AHS-anna)
parivrtta = to turn around, revolve
trikona = three angle or triangle
Pose type: Twist
Targets: Full-body flexibility
Section dividerBenefits
Revolved Triangle can improve your balance, as well as your postural and body awareness. This energy-boosting pose can also help fight fatigue and stimulate proper digestion by facilitating movement through the digestive tract (peristalsis).
Other Revolved Triangle perks:
- Strengthens your thighs, hips, core, back, and shoulders, while stretching your chest, back of thighs (hamstrings), and the calf muscle of your back leg.
- Improves posture and counteracts the effects of prolonged sitting and computer work
Step-by-step instructions
- Begin in Tadasana (Mountain Pose) at the top of your mat and place your hands at your hips.
- Step your left foot back 2 to 4 feet
- Line up heel to heel with your back foot at a 45-degree angle. Root down with your right big toe mound while pinning your right hip back and in toward your left heel.
- Spin your left inner thigh back.
- Inhale, raise your left arm; exhale reach your torso forward, aiming your sternum toward the front of your mat.
- Place your left hand to the outside of your right ankle and take your right arm to the ceiling, with your hand above your right ear. Gaze to your top thumb.
- Continue to pin your right hip back.
- Inhale to lengthen your spine.
- Exhale to revolve around that length.
- To exit the pose, bring your hands to your hips and use the strength of your legs to come all the way up.
Explore the pose
Beginner’s tip
- It can be tempting to do whatever it takes to reach your bottom hand to the mat. Resist that urge. Instead, place a block near your front foot as in the variation below. Press down through that palm and, with your other hand, reach just as strongly upward.
Common mistakes
- Don’t allow your head to go past your front leg because you will lose the axis of rotation, which could lead to strain in your back and make it harder to maintain your balance.
- Don’t swing your front hip outward, as this takes the head of your femur away from its socket and can lead to instability in your hips or strain your inner groins.
- Avoid the easy (and potentially dangerous) habit of putting too much of a twist in the neck. Instead, channel your energy into your core. If you feel this pose more in your neck than in your upper back, lower your gaze and lessen the twist.
Be mindful!
Avoid or use extreme caution in this pose if you have acute back pain or injuries, including surgeries, osteoporosis, disc bulging or herniation, arthritis, or SI (sacroiliac) pain.
Notice how your right hip can tend to spin out as you revolve to the right. To prevent this, press your right thigh back, building stability in the lower back so that the twist blossoms in your upper back. To continue to avoid having too much movement in the pelvis, try to pull your right femur back as you shift your left hip toward your right heel.
Partnering
A partner can help you stabilize and align this position and get a better feel for the twist. Perform steps 1 through 10. Have your partner stand behind you and wrap a strap across your front hip crease. Then continue with the rest of the pose. As you move into the twist, the partner will pull firmly on the ends of the strap, dragging the front groin deeper into the pelvis and the outer front hip away from the shoulder. Also, he can pull in on the strap to help you keep the front hip tucked in and, with one of his feet, press against and ground your back heel.
Deepen the pose
Power Yoga creator Beryl Bender Birch says while you might think this pose is all about twisting, as soon as you reach for the floor, you realize it is also a delicate balancing posture that will feel completely steady and comfortable—if you know how to use your legs and core muscles for support. When those muscles are engaged and your alignment is correct, the pose can create strength and flexibility in the hamstrings and establish balance both physically and energetically. It can generate a steadiness of mind and a sense of complete freedom. As you take one hand to the earth (or a block), and reach the other to the sky, you find stability and are able to stand your ground while surrendering to both the present moment and the mystery of tomorrow.
Section dividerRevolved Triangle variations
This pose leads into a very interesting variation, not usually described in popular instruction manuals, called Parivrtta Ardha Chandrasana (Revolved Half Moon Pose). Perform the pose (twisting to the right). Then exhale, bend the right knee and reach the left hand forward on the floor (or onto a block) about 12 to 18 inches beyond the right foot (with the hand positioned on the big toe side of the foot). Inhale and straighten the right knee, lifting the left foot off the floor and bringing the leg parallel to the floor. Hold for 30 seconds to a minute, return the left foot to the floor with an exhalation, and leave the twist as described in step 5 above. Repeat on the other side.
Or, try one of these creative variations:
Revolved Triangle Pose with a block
Follow the directions above, but bring your hand to a block at any height rather than the floor. If you do not have a block, you can bring your hand up higher on your shin.
Revolved Triangle Pose against a wall
Stand facing the wall with the wall within arm’s reach. Keep your feet hip-distance apart. Bring your right leg in front, toes facing forward. Place your left leg as far back as is comfortable with your toes slightly angled outward.
Bring both hands to the wall. Go into the twist by keeping your left hand on the wall and opening your right hand out behind you.
Stay for several breaths, then step back toward the wall into Mountain Pose. Repeat on the other side.
Revolved Triangle Pose with a chair
Stand facing a chair, with your feet hip-distance apart. Bring your right leg forward, toes facing forward. Place your left leg as far back as is comfortable with your toes slightly angled outward.
Bring both hands to the seat of the chair (or if that is not accessible, flip the chair and bring both hands to the back of the chair). Move into the twist by opening your right hand out behind you, or placing it on your hip or low back.
Stay for several breaths, then step back toward the chair into Mountain Pose. Repeat on the other side.
Section dividerPreparatory and counter poses
Take yourself through some gentle twists and hamstring openers prior to taking on Parivrtta Trikonasana. You want to lengthen your back and provide respite for the hip, hamstrings, and torso afterward.
Preparatory Poses
Uttanasana (Standing Forward Bend)
Parsvottanasana (Intense Side Stretch Pose)
Utthita Trikonasana(Extended Triangle Pose)
Parivrtta Utkatasana (Revolved Chair Pose)
Bharadvajasana (Bharadvaja’s Twist)
Counter poses
Uttanasana (Standing Forward Bend)
Section dividerYour body in Revolved Triangle Pose | Anatomy
In Parivrtta Trikonasana, the shoulders rotate in one direction and the pelvis in another. We connect these opposing rotational actions with one hand to the opposite-side foot to create movement in the spine. The muscles of the shoulder turn the trunk in the opposite direction as the hips to create the twist. The lower side of the body contracts and the upper side expands.
In the drawings below, pink muscles are stretching and blue muscles are contracting. The shade of the color represents the force of the stretch and the force of contraction. Darker = stronger.

First, press your lower hand onto the side of your foot to lever your trunk into the twist. A muscle at the side of the rib cage and connected to the shoulder blade, the serratus anterior, draws the lower arm shoulder down to the foot.
Your front leg psoas conspires with your back leg glutei or buttock muscles to create a wringing effect across the pelvis, stabilizing the pose. That same psoas works with the pectineus, a muscle connecting the thigh bone to the pubic bone, and the adductor muscles to bend the front-leg hip.
Meanwhile, the back-leg buttock muscle extends the leg behind the body and turns it outward. The large inner-thigh muscle of the back leg, the adductor magnus, presses the thigh bone back and draws it toward the center line. The quadriceps straighten your knees when they contract.
Also in the back leg, the muscle along the edge of the shin (the tibialis anterior) turns the ankle slightly inward, drawing the top of the foot toward the shin. This action stretches the muscles in the back of the calf.
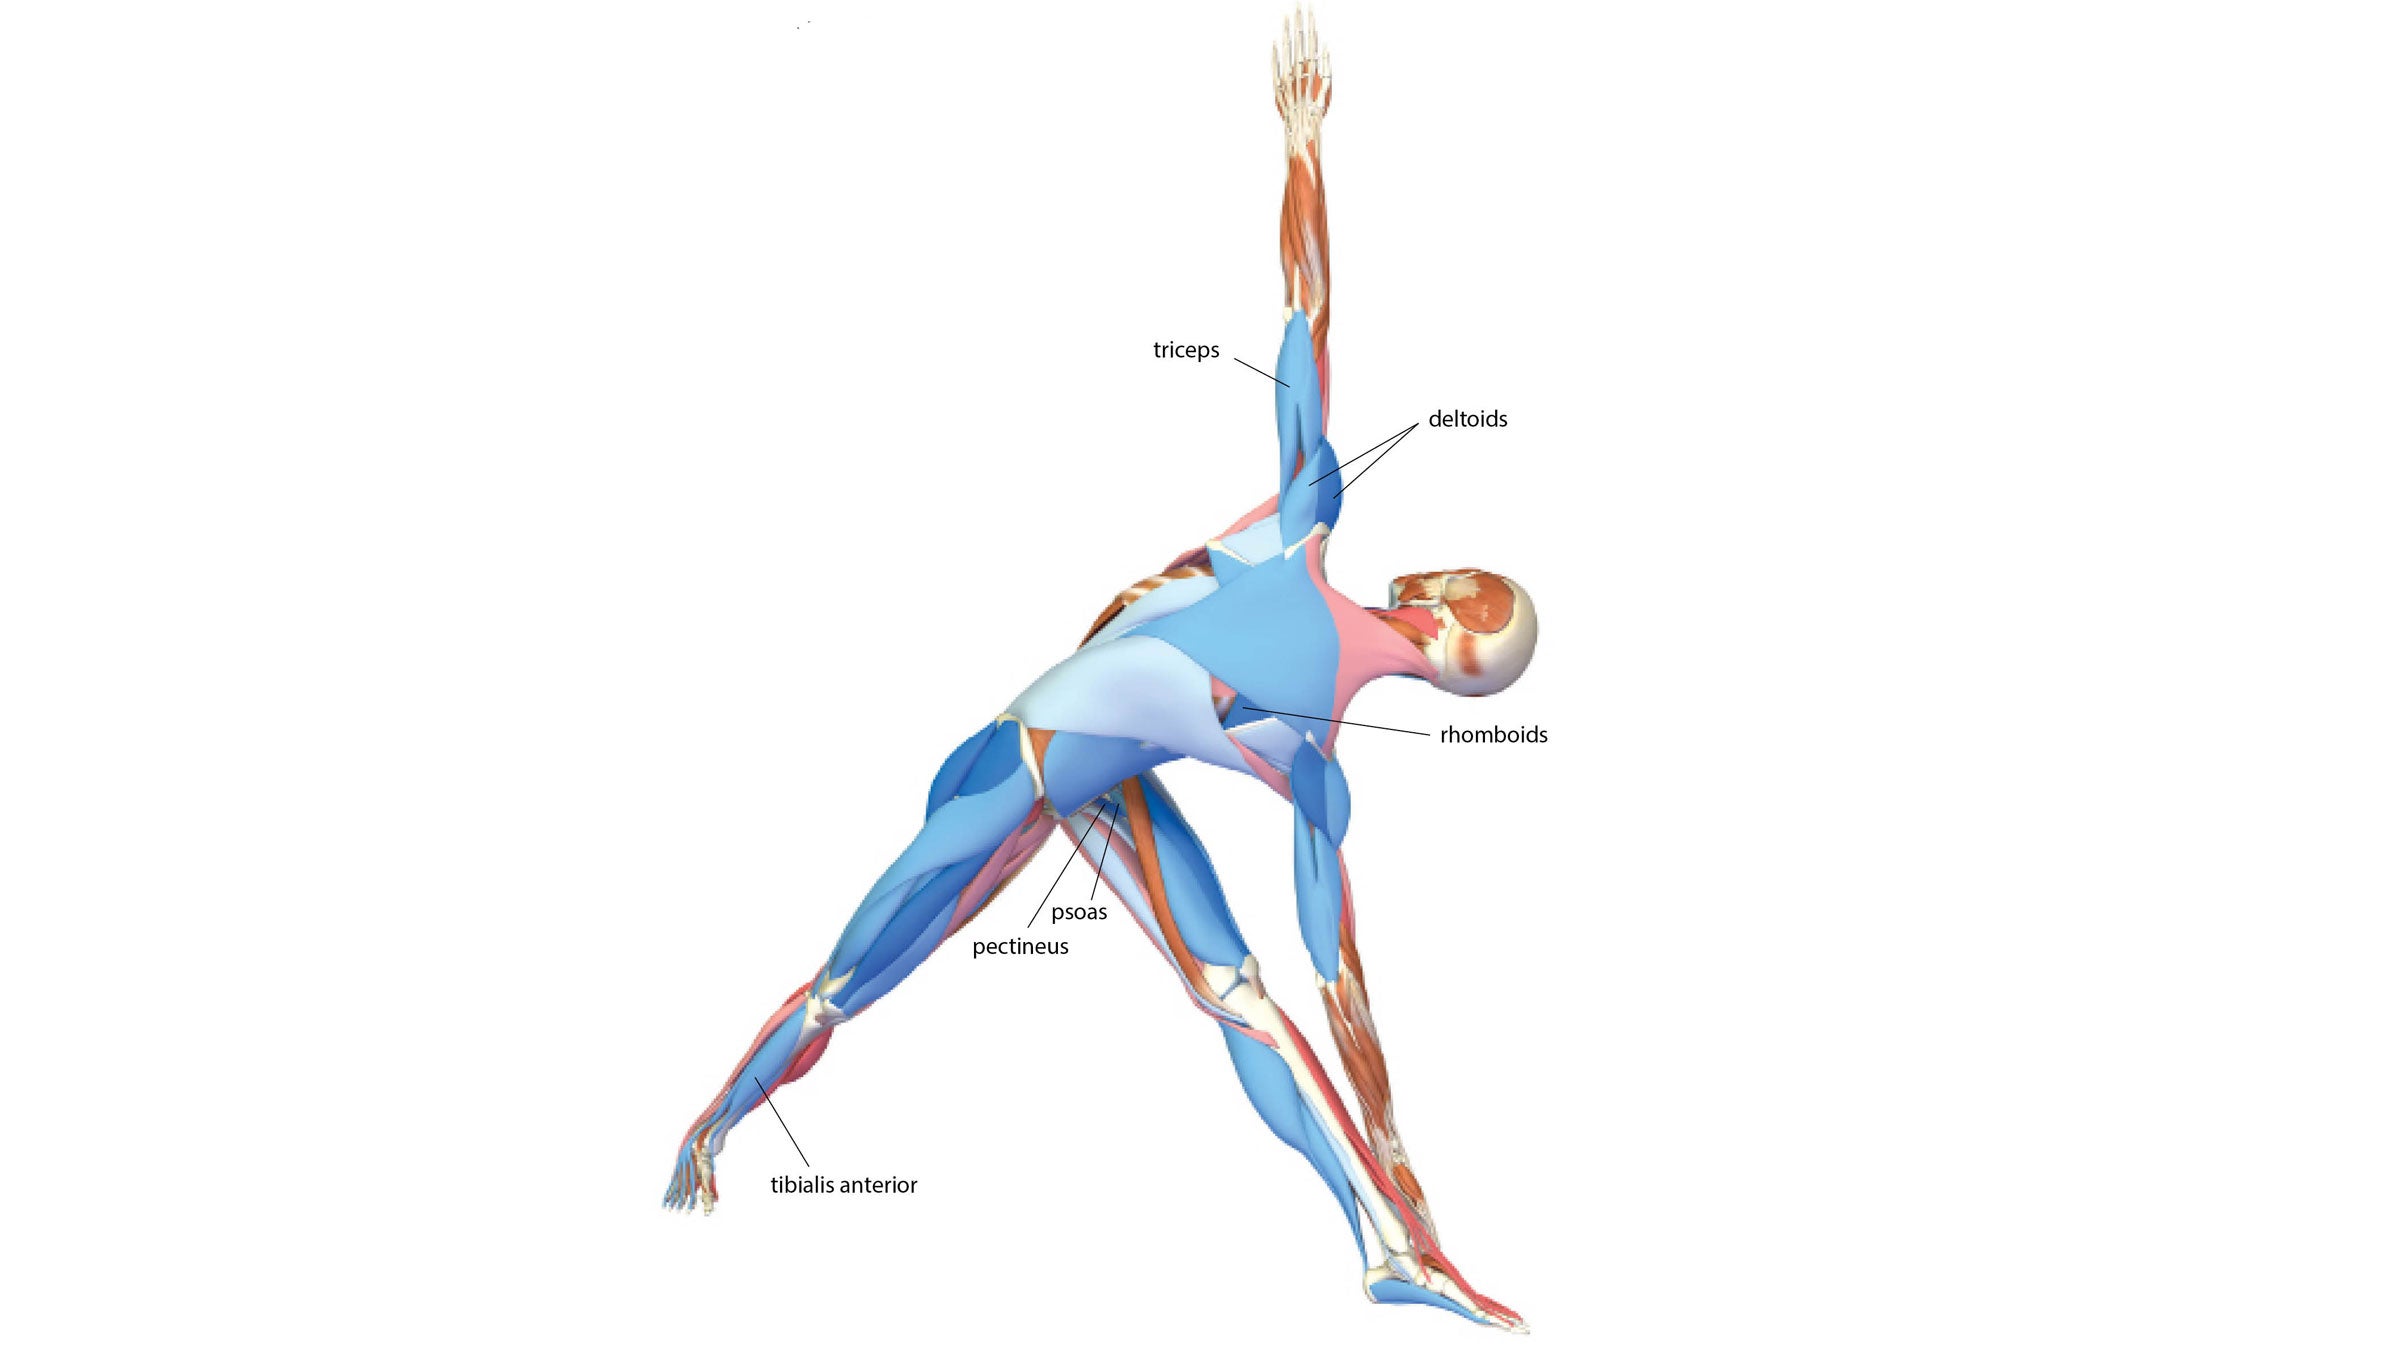
When you attempt to turn your trunk away from the center of your body, isometrically contract the abdominals and back muscles. Use no more than 20 percent of your maximum force as you attempt to turn your trunk. The muscles connecting the shoulder blade to the spine, the rhomboid, and the back portion of the deltoid draw the upper side of the trunk deeper into the twist.
Excerpted with permission from The Key Poses of Yoga and Anatomy for Vinyasa Flow and Standing Poses by Ray Long.
Section dividerPut Revolved Triangle into practice
About our contributors
Teacher and model Natasha Rizopoulos is a senior teacher at Down Under Yoga in Boston, where she offers classes and leads 200- and 300-hour teacher trainings. A dedicated Ashtanga practitioner for many years, she became equally as captivated by the precision of the Iyengar system. These two traditions inform her teaching and her dynamic, anatomy-based vinyasa system Align Your Flow. For more information, visit natasharizopoulos.com.
Ray Long is an orthopedic surgeon and the founder of Bandha Yoga, a popular series of yoga anatomy books, and the Daily Bandha, which provides tips and techniques for teaching and practicing safe alignment. Ray graduated from the University of Michigan Medical School and pursued post-graduate training at Cornell University, McGill University, the University of Montreal, and the Florida Orthopedic Institute. He has studied hatha yoga for over 20 years, training extensively with B.K.S. Iyengar and other leading yoga masters, and teaches anatomy workshops at yoga studios around the country.