Isn't it annoying trying to understand what the other person is saying during a video conference while their kids are jumping around and banging things in the background? That was one of the scenarios a high-profile YouTuber used when checking out NVIDIA's RTX Voice to prove it worked.
He was but one of many who were impressed by how users could use the "smarts" of the latest RTX GPUs by NVIDIA for more than game graphics. Features like this, combined with DLSS and raytracing, were reason enough for an upgrade.
Soon after, a "hacked" RTX Voice appeared, compatible with older, more widely available, and affordable GPUs by NVIDIA. GPUs that didn't include AI features.
Now, NVIDIA has officially added support for many of its older GPUs to RTX Voice. So let's see how you can use it for crystal-clear audio chats, even if you're using a relatively older NVIDIA GPU.
NVIDIA's Crystal-Clear Audio: Is It for Everyone?
Until recently, you had to jump through some hoops to use RTX Voice on your non-RTX NVIDIA GPU. However, its newer versions support older NVIDIA GPUs, including the GTX 970 that we'll use for this article.
Although many users have reported mixed results, you can theoretically use any of NVIDIA's GPUs supported from their older 410.18 drivers and on. This includes GPUs from the 600 series and up.
It's worth noting that some users claim they've even managed to run RTX Voice with AMD GPUs successfully, but we'll stay on the official path for this article.
How to Install NVIDIA RTX Voice
Even if you're using your headphones correctly, your voice chats with friends and colleagues can still be subpar. Annoying noises can get in the way, cover voices, introduce hiccups. Thankfully, NVIDIA's RTX Voice can deal with such problems.
To install it, start by visiting the RTX Voice Setup Guide page at NVIDIA's site. If you have one of NVIDIA's RTX GPUs or newer, you can use NVIDIA Broadcast, which includes an updated version of RTX Voice. For this tutorial, though, to cover more GPUs, we'll stick with the standalone RTX Voice application. Scroll down a bit to find the download link on the page, under the 1st step, Download the App.

The app uses NVIDIA's own installer, with which you'll probably be familiar with from the previous driver installations. After launching RTX Voice's installation, click on the friendly green Agree and continue button at the bottom of the window, and follow along to install the app.

The installer adds two new components to your PC: the RTX Voice app and a new driver. This driver is responsible for the two new NVIDIA-branded virtual audio input and output devices you'll see on your PC. Their purpose is to "sit between" your actual audio inputs/outputs and the communication software you're using, cleaning any transmitted audio.

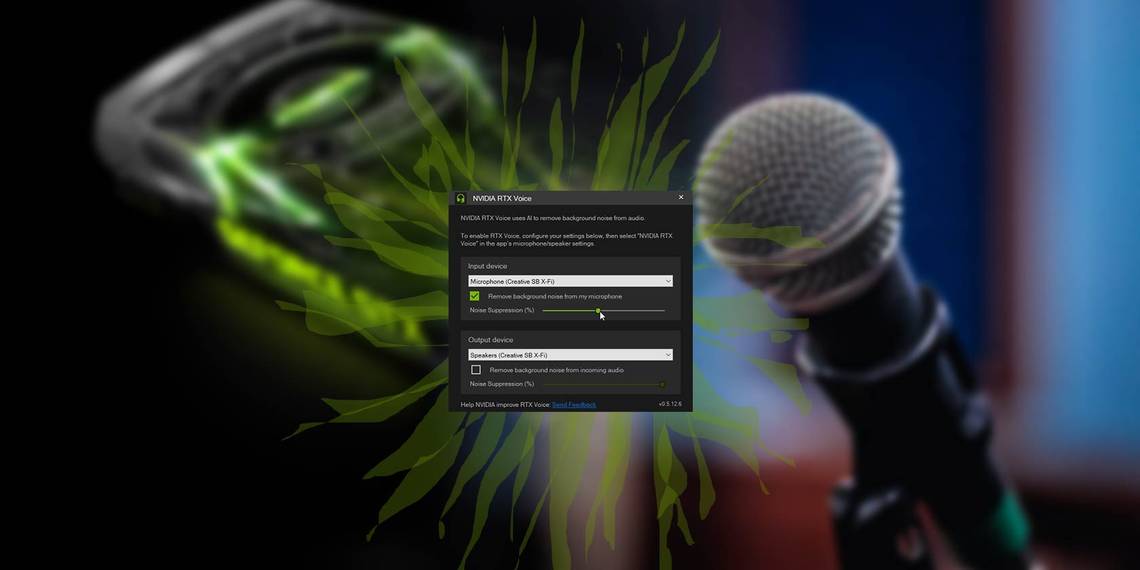
The RTX Voice app works as a simple front-end, accessible from the Windows tray. Locate its icon there and double-click on it to access its interface. Alternatively, right-click on it and choose Show NVIDIA RTX Voice.
Through RTX Voice's straightforward interface, you can choose your primary (audio) Input device, your main Output device, and their levels of Noise Suppression. You should select the same devices you have been using up to now for your audio.

As for the levels of Noise Suppression, they're up to you. It's a matter of personal preference. You'll have to tweak them according to the levels of unwanted noise in your environment.
The higher you set Noise Suppression, the more you increase the chances "useful" audio (like your voice) will sound garbled or clipped. Less Noise Suppression means "richer" audio but a higher chance of annoying noises getting through.
Note that you can also enable Noise Suppression (AKA: if RTX Voice will affect) none, either, or both audio Input and Output.

After choosing the correct audio devices, you can minimize RTX Voice's window. It will remain active in the background, cleaning up the audio streams in the devices you chose and enabled in it. For even better sound quality, also check our guide on how to adjust your microphone's sensitivity correctly.
Communicating Through RTX Voice
There's a reason we've touched on how RTX Voice installs virtual audio devices: you have to use them to have it clean your audio. Think of them as an extra layer on top of your audio devices.
Let's say you're using Discord's voice chat features. Up to now, you'd have it configured to use your primary microphone and either a pair of headphones or some speakers. You can keep using Discord like that, but you won't be taking advantage of RTX Voice. Its installation doesn't affect the audio input and output of your actual audio devices.
To use RTX Voice in any piece of software, you must select NVIDIA's virtual audio devices instead. To keep using Discord as our example, visit its settings. Then, choose Voice & Video and change your INPUT DEVICE from your default microphone to Microphone (NVIDIA RTX Voice). This is RTX Voice's virtual input device that "takes" the sound from the actual input device you chose (in RTX Voice app's settings) and cleans it from unwanted elements.

RTX Voice works by detecting and removing audio frequencies that don't match those of the human voice. That's why it's better to enable it only in communication-related apps and not "globally". At least, as far as audio output goes.
Using RTX Voice on music streams or game audio could have the opposite effect than intended. It could reduce audio quality, mis-detecting parts of the music or a game's sound effects as "annoying audio" and trying to remove them.
For audio input, though, it's easier to do the opposite if you're using your mic primarily for chatting. Set Microphone (NVIDIA RTX Voice) as your default input device in Windows "globally". This will make it the default choice for most apps that utilize an audio input without affecting your audio output.
To do that, right-click on the icon with the speaker in the Windows tray. Choose Open Sound settings. From the Sound settings window that will show up, use the drop-down menu under Input to Microphone (NVIDIA RTX Voice). Close the window and, theoretically, all apps will use RTX Voice as their audio input.
Voice, the Way It's Meant to Be Heard
We've tested RTX Voice extensively in many scenarios, and we can vouch for it. It successfully removed annoying background noises and kept only our voice in most audio and video chat scenarios. Or, at least, that's what people "on the other side" told us.
However, we've also tested it in a way we haven't seen others trying it out: voice recognition and dictation software. In both cases, it helped immensely, with voice detection accuracy rising significantly. That's with three different audio inputs: the microphone of an old webcam, a desk mic, and a professional headset microphone.
Thus, we're pretty sure it can also work for you. At least, as long as you have an NVIDIA GPU made during the last decade.
As RTX Voice's very name states, it can only help with incoming and outgoing voice audio. If what you're interested in is improving the quality of your music, check out our guide on The 7 Best Windows 10 Sound Equalizers for Better Audio. And if nothing helps, maybe it's time for a more radical solution, like a hardware upgrade. Maybe a shiny new pair of (even larger) speakers will be just what the doctor ordered!