- REVIEWS
Camera Reviews 
More Reviews Mobile Reviews Photography Reviews - GALLERIES
- VIDEOS
- BUYER'S GUIDES
The Easiest Way to Cut Out Hair & Fur in Photoshop in Just 4 Minutes (VIDEO)
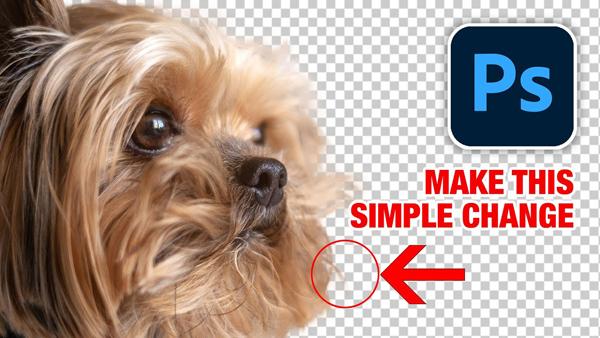
One of the most daunting challenges in Photoshop, regardless of your skill level, is doing a precise job of cutting out hair and fur. But in today’s tutorial you’ll learn a remarkably easy trick for achieving great results.
This task is important for all sorts of images, from portraiture and wildlife photography to shooting images of pets. Editing instructor Colin Smith gets right to the point, saying, “Everyone dreads cutting out hair and fur in Photoshop.”

The good news is that Smith has a trick up his sleeve, with an easy-yet-power method for better fur and hair masking, and he walks you through the step-by-step technique in less than four minutes. After watching the quick video below, you’ll definitely want to add this to your editing bag of tricks.
Smith begins by opening Photoshop’s Select Subject Tool and choosing the Select and Mask option. He then illustrates the most-common approach, which is to use the Refine Brush to paint the edges of a subject. But there’s a better way to get the job done, and it’s super simple.
As you’ll see, Smith’s preferred approach starts out the same way as above, but he adds a simple twist. This time he paints around the very outside edge of the subject, rather than using the more common method of placing the brush in the middle of the edge—with half of it intruding into the subject.

Even though Smith does a quick job of both techniques to keep the tutorial brief, not concentrating on perfection, you’ll see a dramatic difference in the results. And if you spend a bit more time using the approach he recommends, your hair and fur cutouts will look really great.
After watching the video, be sure to pay a visit to Smith’s YouTube channel for more tips and tricks. And don’t miss the tutorial we posted in which another editing expert explains how to quickly fix colors and white balance using Photoshop’s Color Balance Tool.
- Log in or register to post comments


![]()
Get the Latest Photo Tips, News & Reviews from Shutterbug!
| Camera Reviews Other Reviews | Mobile Reviews Photography Reviews Columns | News | Features | How-To | Resources |
 © 2024 Shutterbug
AVTech Media Americas Inc., USA
All rights reserved