Remote learning is here to stay for many. Google Jamboard makes teaching a remote classroom simple with easy-to-use tools that inspire collaboration between you and your students. Plus, it's available on Android and iOS mobile devices as well as on desktop.
What Is Google Jamboard?
Google Jamboard is a digital whiteboard found inside Google Workspace. The digital white paper is similar to a traditional whiteboard, which means you can write or draw using a pen as well as erase.
The app also allows you to add images, place sticky notes, highlight text, and so much more. And if you have the physical Google Jamboard device, you can share your “jams” straight to the device from your computer, tablet, or phone.
Want to know how to use Google Jamboard to improve your online classroom? Here are some features to add to your e-learning repertoire.
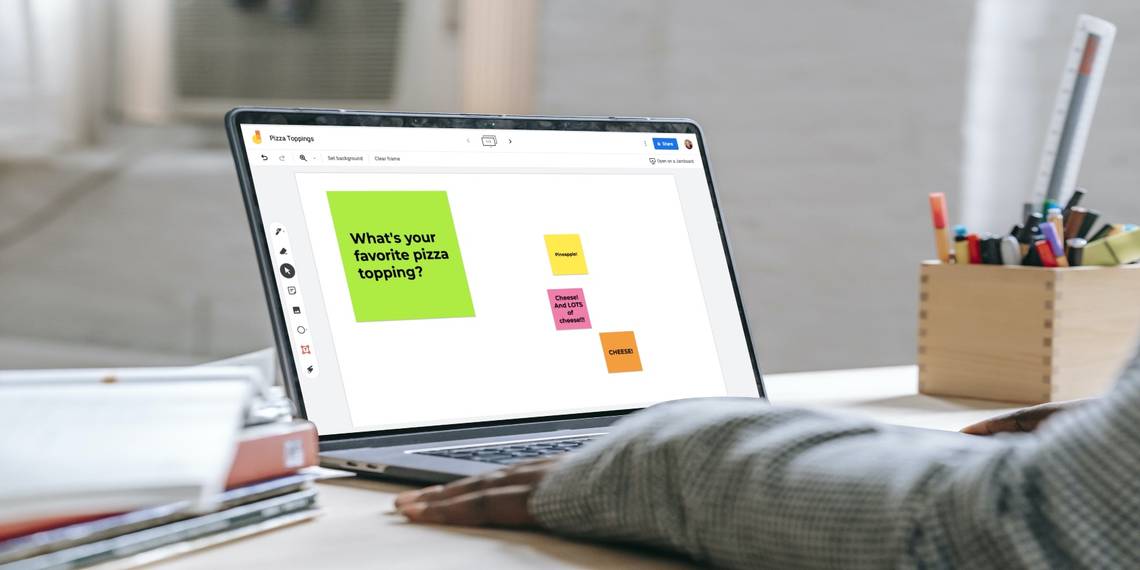
1. Brainstorm With Sticky Notes
The sticky note feature is a great tool for brainstorming ideas with your class. For example, you can ask a question and allow your students to answer using sticky notes. Or, ask for student feedback about a lesson or request questions about an upcoming assignment.

To use the sticky note tool:
- Open Google Jamboard on your device and create a new jam by selecting the + icon.
- In the toolbar to the left of your screen (on desktop) or bottom of your screen (on mobile), select the sticky note icon.
- Type the text you wish to add to your sticky note and select a color. Then, select Save.

You can move your sticky notes around to place them wherever you want inside your jam. You can also edit them by tapping or clicking on the note.
2. Use the Laser Pointer for Emphasis
If you're using Google Jamboard during a video call with your students, the laser pointer tool comes in super handy. It allows you to emphasize items on your screen with your finger, stylus, mouse, or touchpad.
To use the laser pointer:
- Select the laser pointer tool located in the toolbar to the left (on desktop) or the bottom (on mobile).
- Draw where you would like to place emphasis, and the laser pointer will follow.

3. Share for Group Collaboration
Just like any other Google Workspace app, Google Jamboard allows you to share your jams with anyone for easy collaboration.
For example, share your jam with your students to collaborate on a quiz or assignment. Or, break your classroom into groups and ask them to collaborate on a jam with each other.
To share a jam:
- Select Share at the top of your screen. If you're using the mobile app, select the three-dot menu at the top of your screen and then Share.
- To make it simple, select Copy Link to share the link with your entire classroom. If using the mobile app, select Who has access and then copy the link provided under Link settings.
- If you want to share a jam with a select few students, enter their emails to send them a separate link.


4. Create Visual Learning Aids With Images From Google
Add a bit of spice to your lessons with visual learning aids inside Google Jamboard. Using the images tool, you can add photos, diagrams, and more straight from Google Image Search.
This is a great way to illustrate a complex topic or make a boring topic a little less snooze-worthy. Plus, there's no need to source your own images—you can do it from right inside the app.

To add Google Image Search images to your jams:
- On your desktop, select the image tool from the toolbar to the left of your screen. Google Image Search inside Google Jamboard isn't a feature available yet on mobile.
- Select Google Image Search and enter your search term.
- Select your photo and then select Insert.
You can then move and resize your photo to customize your jam.

5. Open & Share Google Drive Files
Have a Google Sheet you want to share with your jam? Or, maybe you want to add a Google Document assignment to your jam for easy class collaboration. On the mobile app, you can share Google Drive files to your jam easily.
To share Google Drive files on the mobile app:
- Select the pencil icon in the bottom right corner to edit your jam.
- Select the “+” icon and then select Drive content.
- Find the file you wish to insert into your jam and select it.
The file will be inserted into your jam where you can expand it, resize it, and manipulate it using any of the tools.


6. Highlight Important Material Using the Highlighter Tool
The highlighter tool allows you to highlight text, images, and more inside your jam, so students know to pay closer attention to those items.

This is useful for many things, from pointing out material that will be on next week's quiz to highlighting writing mistakes in jam projects.
To use the highlighter tool:
- Select the pen icon to the left of your screen (desktop) or the bottom of your screen (mobile).
- Select the highlighter icon from the menu and a color you wish to use.
- Using your finger, stylus, mouse, or touchpad, highlight the area of your jam you want to emphasize.

7. Download Jams as PDFs
If you have both online students and in-classroom students, you may need to print physical copies of jam projects for in-classroom use. Or, your students may wish to have a physical copy of their project for studying or safekeeping. This is simple using the PDF tool.
To download a jam as a PDF on your desktop:
- Select the three-dot menu at the top of your screen.
- Select Download as PDF.
- The jam will automatically download to your computer.

Use Google Jamboard to Take Your E-Learning Classroom to the Next Level
Google Jamboard is a simple tool for improving collaboration between you and your remote learning students.
There's no limit to how you can use the app's tools. Take some time to dig deeper into the app and discover how it can benefit your e-learning classroom.