13 of the best Android 12 tips and tricks that you should know
Android 12 is finally here, and this release marks one of the most drastic Android releases that we’ve seen since Material Design was introduced and implemented all the way back in 2014. From privacy controls to theming engines and features that have been requested for years, there’s a lot to dive into when using Android 12. Since we’ve been spending time with it since the first Developer Preview was available, it’s time to take a look at some of the best Android 12 tips and tricks to make the most out of your Pixel device.
Theme everything and anything with Material You
![]()

It’s no secret that besides the privacy changes, the biggest change to Android 12 is the introduction of the all-new Material You theming engine. This brings dynamic theming to your entire interface, removing the need to jump through a bunch of hoops just to get different colors for the Quick Settings toggles and more. The theming is based on your wallpaper, as your device recognizes and pulls the primary and secondary colors from your device, in an effort to bring a uniform experience across your entire device.
- Open the Settings app.
- Tap Wallpaper & Style.
- Tap Change wallpaper.
- Select a wallpaper.
- Tap Set wallpaper.
- Return to the Wallpaper & Style Settings menu.
Now that you have a new wallpaper, you can start playing around with the different theming options provided by Material You. Beneath the wallpaper picker in Wallpaper & Style, there are two options to choose from with either Wallpaper colors or Basic colors. Material You is at its best (most of the time) when opting for the Wallpaper colors. However, you can pick and choose more basic colors that are still based on your wallpaper if that tickles your fancy.
![]()
Also from the Wallpaper & Style menu, we have the following options:
- Dark theme (toggle)
- Themed icons (toggle)
- App grid
Although the rest of the style can be applied to the entire interface, this can’t be said for Themed icons. Instead, this will only work when using the stock Pixel Launcher on your Android 12 device. When enabled, themed icons will appear on the Home Screen for any apps that are compatible. Currently, this only applies for most of Google’s own applications, but we’re hoping to see this expand to third-party apps in future Android 12 releases.
Use one-handed mode
![]()
Although this isn’t necessarily true for the Pixel 5, as it’s pretty easy to be used with one hand, the same can’t be said for the multitude of Android devices out there. We’re seeing screens getting bigger and more frustrating to use if you need to reach the top of the phone. Some phones, like the Galaxy Z Flip 3, can use the fingerprint scanner to pull down the notification shade. But this still doesn’t solve the problem of being able to tap one of the Quick Settings toggles with ease.
One-handed mode is nothing new in the Android world, as we’ve seen other phone makers implement it into their Android skins. But Google is finally on the same page, as Android 12 bakes one-handed mode into the operating system. Before you can start using it, you’ll first need to activate it.
- Open the Settings app on your Android 12 device.
- Scroll down and tap System.
- Scroll down again and select One-handed mode.
- Tap the toggle next to one-handed mode to enable the feature.
Also from this Settings panel is a toggle for exiting one-handed mode whenever you switch between apps. Additionally, you can tap Timeout and select how long your phone should keep one-handed mode activated before going back to full-screen.
Once you’ve enabled and customized One-handed mode, activating the mode is as easy as swiping down from the bottom center of the screen. Then, you can finally reach the top of the app, and you have two methods to go back to full-screen mode:
- Swipe up from the bottom center of the screen.
- Tap anywhere in the gray area above the app.
Add Smart Home Controls to the Lock Screen
![]()
One of the most frustrating aspects of Android over the past few years is Google’s indecision when it comes to providing quick access to your smart home controls. Last year’s implementation was pretty stellar, as the controls were added to the Power Menu. With Android 12, Google is changing things again, but after a rocky start in the beta program, you can now access your Smart Home controls from the Lock Screen.
- Wake, but don’t unlock, your phone.
- Tap the Home button in the bottom left corner.
- Tap the three dots in the top right corner.
- Select one of the following:
- Add controls
- Edit controls
- Enter your PIN, or scan your fingerprint.
- Select the smart home lights and accessories you want to add.
- If you need to add more, or can’t find a specific control, tap the See other apps button at the bottom.
- Tap the Save button.
As you would expect, selecting the Edit Controls option will provide the ability to remove devices and accessories from the list. But you can also drag and drop various smart home accessories, making some easier to reach or just higher in the pecking order when you access the Smart Home controls from the Lock Screen.
Go back and look at your Notification History
![]()
Missed notifications happen. Or, if you don’t pick your phone up for a while, the list of notifications can seem a bit daunting, so you just clear them all. The problem with this is that you might actually miss an important notification, but don’t know which app it came from. If that’s the case, Android 12 now lets you go back and view your Notification History.
- Open the Settings app.
- Select Notifications from the list.
- Tap Notification history under Manage.
- To enable Notification history, tap the toggle next to the prompt.
Once enabled, any notifications that your Android 12 device receives, will appear in this section of the Settings app. However, there’s also an easier way to view any notifications that you might have missed.
- Swipe down to reveal the Notification Shade.
- Under the notifications, tap the History button.
When tapping the History button, it will take right to the Notification History section within the Settings app.
Use the Power Button to activate Google Assistant
![]()
Just like controlling your smart home, Google continues to tinker with different methods for activating Google Assistant. Of course, we can always rely on the “Hey, Google” command, but sometimes you don’t want to use your voice and would rather opt for text input with Assistant. On Android 12, another new “gesture” has been added to the mix, allowing you to activate Assistant with the power button.
- Open the Settings app.
- Tap Apps.
- Scroll down and tap Assistant.
- Tap Hold Power for your Assistant.
- Tap the toggle to the On position.
By enabling this “gesture”, you will no longer have access to the Power and Emergency menu when you press and hold for Assistant. Instead, you will need to press the Power and Volume Up buttons at the same time.
Better auto-rotation
![]()
Nobody likes laying on the couch or in bed looking at their phones, only to have their screens continue to automatically rotate back and forth. It’s extremely frustrating, and we don’t always want to “lock” rotation, as we have a tendency of forgetting that the rotation was locked later on. Android 12 is implementing a different and unique feature that uses your front-facing camera and machine learning to determine the orientation of your face.
When Face Detection is enabled, your phone will only rotate based on the orientation of your face.
- Open the Settings app.
- Scroll down and tap Display.
- Scroll down and tap Auto-rotate screen.
- Tap the toggle next to Enable Face Detection.
Take Scrolling Screenshots
![]()
This has been one of the most requested features for stock Android users, and it’s finally here. Scrolling screenshots are available on Android 12, removing the need to take multiple screenshots and stitch them together before sharing.
- Take a screenshot on your Android 12 device by pressing the Power and Volume Down buttons at the same time.
- In the bottom left corner, tap the Capture More button.
- Drag the handle at the bottom of the screenshot until you have captured everything you want.
- Tap the Save button in the top left corner.
Search everything on your Pixel
![]()
One of the best Android 12 tips is the ability to search for practically anything on your device. Instead of just being able to search for specific apps or make a Google query, Android 12 introduces the ability to search things like Shortcuts, People, Settings, and even Pixel Tips. When searching for something as simple as “Home”, you are provided with a multitude of different options to choose from. This includes any apps are installed with “home” in the name, along with accessing anything else on your device that has to do with “home”.
This is enabled by default, however, you can jump into the Settings app and toggle what appears in the on-device search results.
- Swipe up on the Home Screen to reveal your App Drawer.
- Next to the search bar at the top, tap the three vertical dots.
- Tap Preferences in the drop-down menu.
From here, you can simply toggle what is shown when you perform an on-device search.
Keep tabs on your Privacy Dashboard
![]()
Google spent quite a bit of time on the privacy and security of your device at the Android 12 announcement during I/O 2021. The biggest change is the introduction of a new Privacy Dashboard, that displays any recently used permissions accessed by various apps. With the Dashboard, you can revoke permissions access, along with sweeing a breakdown of what permissions have been accessed in the last 24 hours.
- Open the Settings app.
- Scroll down and tap Privacy.
- Tap Privacy Dashboard.
By default, the Dashboard shows the Location, Camera, and Microphone permissions. But you can tap the See other permissions section to get the full list of permissions that are accessible on your device. Again, these only show which apps have accessed certain permissions within the last 24 hours, but this should be more than enough in order to determine if a rogue app is doing something that it shouldn’t be doing.
Toggle Camera and Microphone access for applications
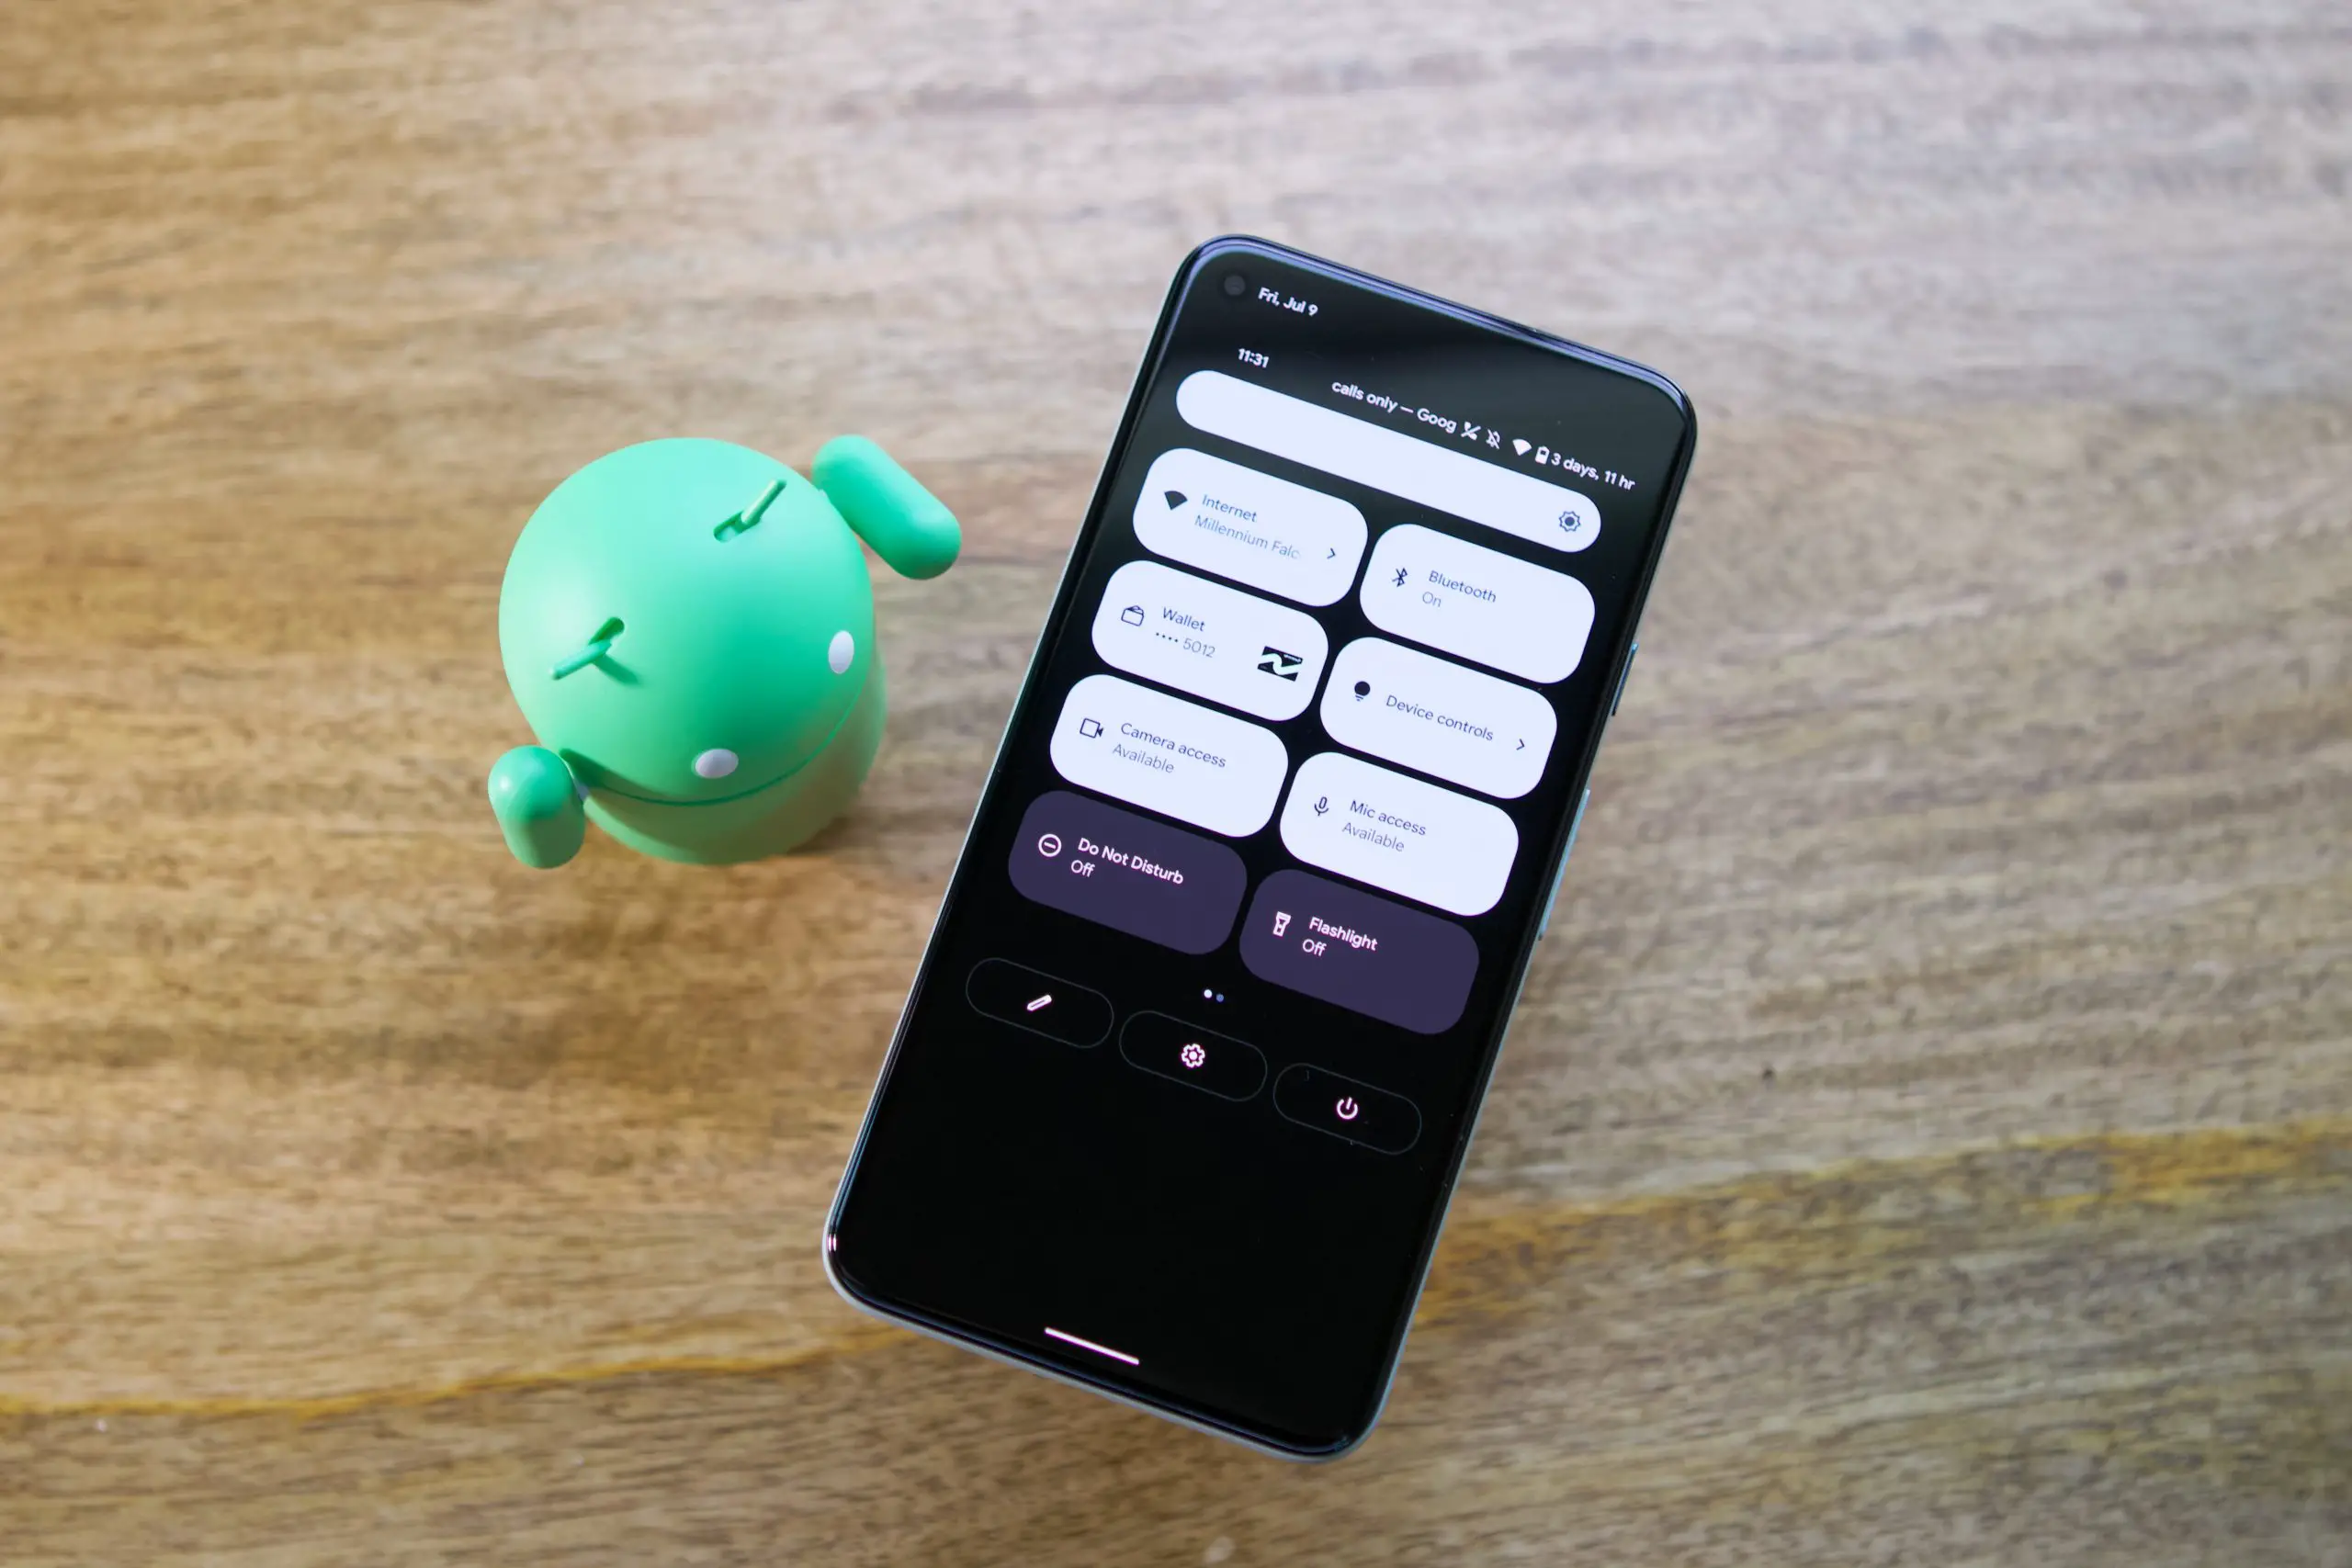

Android 12 has introduced a few new privacy controls that we weren’t exactly expecting. An example of this is the ability to turn off both your microphone and camera with just a swipe and a tap. While smart displays like the Amazon Echo Show feature a hardware switch for both, the same can’t be said for smartphones.
With the release of Android 12, you can now add a couple of toggles to your Quick Settings panel. This is essentially Google’s answer to that hardware switch but will allow you to disable an app’s access to the camera and microphone.
- Swipe down on your Home Screen to reveal the Quick Settings menu.
- Swipe down again to reveal the edit button in the notification shade.
- Tap the Pencil icon to edit your Quick Settings toggles.
- Scroll down and find the following buttons:
- Camera access
- Mic access
- Drag and drop those into the top portion to add them to your Quick Settings panel.
- Tap the back arrow in the top left to save.
Once these have been added, you can just swipe down to access the Quick Settings panel and tap either button to revoke access. By default, camera and microphone access are enabled, but tapping them will turn off access, regardless of what app you are using.
Super-charged gaming with Game Mode
![]()
This is another one of those features that we’ve seen from other smartphone makers, but Android 12 introduces a dedicated game mode. It’s not as robust as what you might find on something like the ASUS ROG Phone 5 or Redmagic 6R, but you still have a few quick options at your disposal while playing mobile games.
- Open the Settings app.
- Tap Notifications.
- Scroll down and tap Do Not Disturb.
- Scroll down and tap Schedules.
- Next to Gaming, tap the Gear icon.
- Tap the toggle next to Game Dashboard to the On position.
- If you want to enable DND while playing games, you can also enable that from here.
After Game Mode has been enabled, you will see a sidebar menu appear on the right side of the screen. This provides quick access to the new Game Dashboard, along with the different options hidden within. These include a button to stream your gameplay directly to YouTube Live, along with a Game Optimization toggle (when available), and a button to access your Google Play Games account.
Customize and edit widgets
![]()
Widgets have been revamped in Android 12 with rounded corners and a better overall aesthetic. Google has even implemented guidelines and tools for app developers to update their app widgets to bring a more uniform look on your Home Screen. Plus, there’s a new way for you to edit select widgets, without needing to remove them and then re-add the widget to your Home Screen.
- Add a widget to your Home Screen.
- After added, tap and hold on to the widget until the home screen editor appears.
- Tap the Pencil icon in the bottom left corner of the widget.
For this example, editing a Conversation widget allows me to switch to a different conversation. The options will vary, depending on what widget it is that you are trying to customize. For example, trying to perform the same steps on Google’s Clock widget, doesn’t provide any additional settings to edit the widget.
Find the Android 12 Easter Egg
![]()
Although the desserts are (officially) gone, Google still has an easter egg for Android 12 that you can find so you can show off your love for Android 12 with pride.
- Open the Settings app.
- Scroll all the way to the bottom and tap About phone.
- Under the Device details section, tap Android version.
- At the top of the list (with the smaller header text) tap Android version a few times.
- In order to get the Easter Egg to appear, you will need to rapidly tap the Android version until the Easter Egg reveals itself.
- When the clock appears, drag the minute hand until both hands are pointed upwards towards the “12” on the clock.
- Let go of the minute hand.
Voila! The Android 12 Easter Egg will present itself to you, with the bubbles being themed based on the colors being used across your device. Although the overall design will remain the same with the different bubbles surrounding the “12”, the colors will differ based on your wallpaper.