


Apple Galette
Galettes or the Italian equivalent crostata are a great alternative to a double crusted apple pie. Since they are assembled free form on a sheet pan, the shape is usually going to vary and it is not a perfect circle every time, that doesn’t matter. Dealing with only one crust is much easier and since the top is open we can add the sugar in stages, which also controls the amount of liquid created during baking. Sometimes even when taking precautions the juices will still leak out, but it will still have wonderful aromas and taste.
The dough for the crust includes an egg yolk which adds additional flavor, texture and color. The yolk also adds structure to the dough which helps it retain its shape during baking. To help retain the shape of the folded crust I brush egg whites, which act like a glue to hold the folds together during baking. It’s also the reason why I first brush the rolled dough with egg while, since it seals the dough, preventing leaks if the crust develops holes or cracks. It’s very important that you don’t skip the refrigerated steps in the recipe, which allow the whites to fuse the folded layers, firm the dough and relax the gluten that has been developed during shaping the galette. The best way to avoid an overflow of egg while on the pastry brush is to scrape each side of the brush against the edge of the bowl removing some of the whites.
Choosing the best apple is a bit subjective based on personal preference and time of year. Fortunately the Lakes Region still has many wonderful apple orchards. Unlike double crust apple pies when I prefer firm tart apples, for the galette I use firm, sweet apples such as Gravensteins (it’s what I used this time), Baldwin, Cortland, Northern Spy and Gala if you want the apples to hold up. Some people prefer Macintosh which has a tendency to break down and result in very soft filling , unless they are picked slightly green when they are firmer and contain more pectin. If you're at an orchard or farmers market, ask the grower that they recommend. These local apples are all great now when they are in season, later in the year many are not available. That’s when it gets more challenging, many swear by Granny Smiths, but I have only had luck with them when they are in season and not kept in long storage, for they have never held up. I much prefer to use green skinned Golden Delicious or Gala apples.
The small amount of spice that is blended with the sugar is intentional so the flavor of the apples isn’t overwhelmed. The apples are the primary flavor and the spices should be a subtle aftertaste. The sugar is added in stages to allow the liquid to reduce and intensify in flavor. It also develops a nice light glaze during baking. Avoid adding lemon juice to the apples to prevent the apples from browning. The sugar helps prevent that and the lemon juice can dramatically change and I think destroy the flavor of the apples.
Once the galette is formed on the pan, don’t move it or even try to slide it on the pan. Doing so most likely will cause a crack or tear in the dough. If it does leak during baking you can try scraping the escaped liquid up with a long wide metal spatula before it thickens and then pour back into the center over the apples. If you are worried and bothered by the possibility of the galette leaking you can place a disposable aluminum pie pan on a cookie sheet and assemble the galette in it. Then continue with the same instructions. Always cool the galette on the pan placed on a rack for even cooling so that the bottom crust remains crisp.
Yields 1 nine-inch crostata, 8 servings
Filling
3 large firm apples
6 tablespoons sugar
1/4 teaspoon ground ginger
1/8 teaspoon ground cinnamon
1 extra large egg white
Peel and core the apples. Cut into quarters from stem to bottom. Then cut each quarter into three long wedges. Place on a plate, cover and set aside until needed. Stir together the sugar, ginger and cinnamon until evenly blended. Set aside until needed.
Dough
1½ cups organic unbleached all-purpose flour
¼ teaspoon kosher salt
4 ounces cold unsalted butter
3 tablespoons cold water
1 extra large egg yolk
Line a cookie sheet with parchment paper so that it fits flat on the pan and close the outside edges. Set aside until needed.
Attach the bowl to a food processor and add the metal blade. Add the flour and salt. Remove the cold butter from the refrigerator, and cut into about ½ inch or smaller chunks. Add the cold butter chunks to the top of the flour, place cover securely on top and pulse twice to coat the butter chunks with flour.
Process continuously until a coarse meal has formed. The processing will begin loud and then suddenly less and finally start to hum, once it hums stop the machine immediately. Remove the cover and gently feel the flour butter mixture to check if a coarse meal has formed. The mixture should feel cool and grainy like cornmeal. If there are still large pieces of isolated butter, then you need to process a little bit more, but be careful not to over mix which would be beyond the coarse meal stage.
Once you have reached the coarse meal, remove the cover. In a small bowl, beat the yolk with 3 tablespoons of cold water until smooth. Pour over the top of the coarse meal halfway between the side of the bowl and the center blade. Place the cover on top and continue processing only until a ball forms and rolls around in the bowl once or twice. Stop the processor.
Lightly dust the top of a smooth counter with extra all-purpose flour. Turn the dough out onto the center of the dusted counter. Dust the top of the dough lightly with flour. Knead the dough gently and quickly until smooth.
Form into a round pad with smooth edges, about 6 inches wide. Place dough on a plate and refrigerate for 10 minutes.
Remove the dough from the refrigerator onto a lightly floured counter and knead the dough for about a few minutes to make it more pliable and smooth. Shape again into a 6 inch round pad. Roll the pad into a 13-inch circle. Occasionally glide your hand under the dough and rotate it in a circle to ensure it is not sticking to the counter and there is still flour under the dough. If the dough begins to stick to the counter or rolling pin, that’s when you want to dust with flour. It is better to use too much flour than too little which makes it easier to roll. Once you achieve a 13-inch circle, brush any extra flour off the dough.
Roll it up around the rolling pin and unroll on a parchment-lined cookie sheet with a rim.
In a small bowl, beat the egg white until smooth. Dip a small pastry brush into the egg white and scrape both sides of the brush against the top edge of the bowl. Paint a thin layer of beaten egg white over the top of the rolled dough. If the dough has become warm and soft, refrigerate for 5 minutes so that it firms up and becomes more manageable.
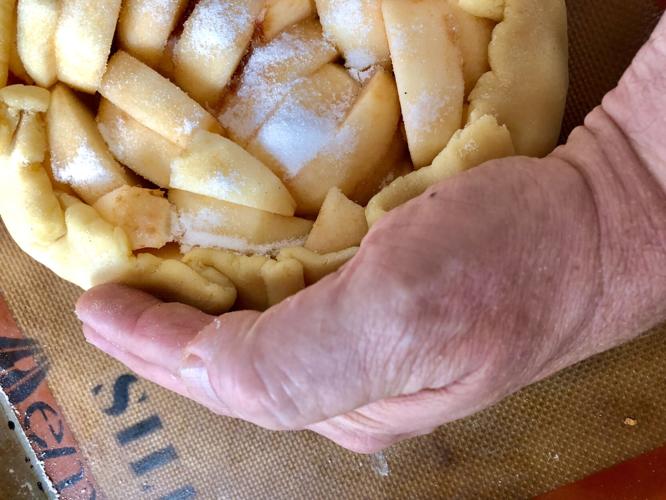
Starting two inches from the edge of the rolled dough, layer the apple wedges in tight rings until the center is covered. For small openings between apples, cut the apple wedges in half to fit in the openings. Dust the tops of the apples with 2 tablespoons of the sugar spice blend you prepared.
Starting at the edge glide your hand under uncovered dough until you reach the apples, then fold the dough over towards the center covering about 1/4 of the apples. Start at the edge again continuing the folding which will create an overlapping fold of dough or pleat, continue making a pleat as you fold each piece of the edge until you have finished and created an outer edge with an open center. Gently press the folded edge so they fuse. Once done, paint the top ring of folded dough very lightly with egg white to add more color to the crust as it bakes and prevent the folded dough from opening. Do not allow the whites to run down the side and pool on the parchment. Those isolated whites on the pan will burn. Refrigerate for 30 minutes to relax and firm the dough.
Adjust oven rack to the lower third level and preheat oven to 425°F, 400°F if you are using a convection oven.
Place in the preheated oven on the lower third rack. Bake for 20 minutes, remove from the oven and dust the tops of the apples with 2 tablespoons of the spiced sugar. Continue baking for another 20 minutes and dust again with another 2 tablespoons of sugar. Using the back of an oval soup spoon, gently press it against the sugared apples so that they are slightly below the liquid level. Continue baking until the apples are tender and the crust is golden brown. Rotate pan from front to back while baking for even baking and coloring. Place the pan on a rack to cool evenly.
Once completely cooled, transfer to a corrugated cake circle or a large round platter.
Serve at room temperature with softly whipped heavy cream or vanilla ice cream.


(0) comments
Welcome to the discussion.
Log In
Keep it Clean. Please avoid obscene, vulgar, lewd, racist or sexually-oriented language.
PLEASE TURN OFF YOUR CAPS LOCK.
Don't Threaten. Threats of harming another person will not be tolerated.
Be Truthful. Don't knowingly lie about anyone or anything.
Be Nice. No racism, sexism or any sort of -ism that is degrading to another person.
Be Proactive. Use the 'Report' link on each comment to let us know of abusive posts.
Share with Us. We'd love to hear eyewitness accounts, the history behind an article.