Heading out the door? Read this article on the new Outside+ app available now on iOS devices for members! Download the app.
As yoga teachers, we often default to providing hands-on assistance to guide students into more comfortable asana positioning. But despite our earnest efforts, we may sometimes cause more harm than good. As yoga teachers guided by the principle of ahimsa, staying informed and observant as we guide our students may be our highest expression of non-harming.
4 tips for providing hands-on adjustments
Revisit these guiding principles (which should always be considered before making any physical contact to your students), then upgrade your assists for five common pose types.
Consider a stepwise approach
Physical touch is not about getting someone physically “deeper” into the pose. It is about bringing awareness that can inform your student’s entire yoga practice. A more subtle approach may offer more intuitive benefits than physical touch: Start by using descriptive verbal cues, then trace the cued movement in the air, or offer a demonstration of the asana. If these steps are still not effective, then consider a hands-on assist.
Ask permission
Not all students are comfortable being touched by their instructor. Hands-on adjustments may uncover past traumas or aggravate injuries your student may have not discussed with you. And many people simply don’t like to be touched. After all, yoga is an energetic practice, and some energies don’t connect well in a physical way.
Always ask for explicit permission before you touch your students to build connection and trust with your students. Some teachers ask before every adjustment, not just the first time.
If your student is comfortable with manual manipulation, keep communicating during the adjustment itself. Notice if they stop breathing or tense up at any point.
Remember: there is no one-size fits all in yoga asana
Every body is different. The way each person’s asana looks (and feels) will differ based on their anatomy, injury history, inherent flexibility, and a thousand other variables. Each adjustment should be tailored specifically to each individual’s body. For example, assisting hypermobile individuals can lead them to overstretch; ask them to engage their muscles rather than to stretch further in certain postures.
Check in with your ego
Before approaching any student for a hands-on adjustment, first check in with your intentions. Are you adjusting because you want to make their pose look picture perfect? Or are you observing them struggle with an internal or physical conflict that might be eased with gentle physical guidance? Often the answers to these questions are not evident on the surface level, so you’ll have to pay attention to the subtleties in their positioning and breathing.
Approach every encounter from a place of awareness and connection. Physical assists can help the practitioner reflect upon what feels right within their own bodies, not what looks “right” based on the teacher’s personal opinion. What may start out as an innocent and earnest action may result in injury if you don’t maintain open communication with your student and remain attentive to each breath.
See also: The 10 Rules of Hands-On Adjustments for Yoga Teachers
5 dos and don’ts for hands-on assists
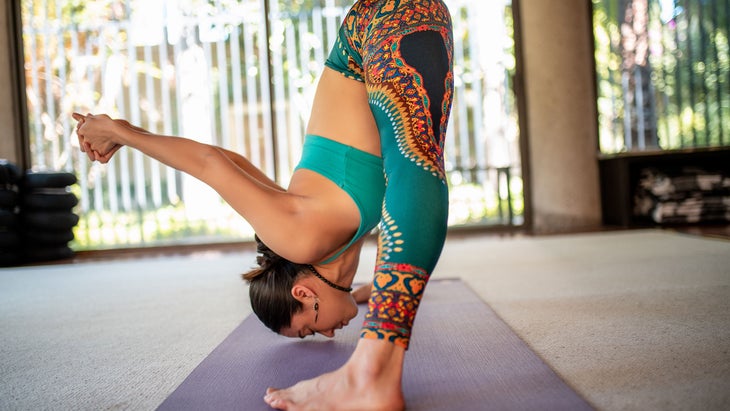
Forward Bends
Don’t: Push or pull down
Do: Encourage length and natural curves
Having super flexible hamstrings and being able to get your head all the way down your legs is often worn as a badge of honor in yoga. But forward bends are not simply about hamstring flexibility; they’re also about natural anatomy, the suppleness of back muscles, and the overall integrity and stability of the spine.
When a body is forced into deeper-than-natural forward bends, the vertebral bodies—the thick oval segment of bone forming the front of the vertebra—compress the anterior portion of the intervertebral discs, which can increase the risk for disc herniation.
Instead of pushing or pulling a student’s upper body down toward their legs in a forward bend, gently trace their spine from the low back to the neck to emphasize the back’s natural curvature and to bring kinesthetic awareness to where they might relax. This helps them elongate their muscles without placing pressure on the spine and legs muscles.
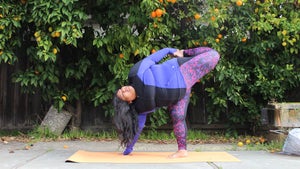
Twists
Don’t: Force a deeper twist
Do: Lengthen the spine
Twisting is a natural and essential task: Without this motion, we wouldn’t be able to put on our seat belts or get out of bed easily. But extreme twisting can actually cause an overstretching of the facet joints and lead to injury and pain. Healthy facet joints slide as the spine moves, and help prevent over-twisting. If you force a student into a twist that is too extreme, you may irritate the facet joints by creating more twist from the outside force of your adjustment.
Guide your students to twist from the inside out by gently lengthening the spine and allowing the breath to inform the rotation. Lightly place one hand on the outer rib cage and brushing upward along the spine. This motion encourages the student to elongate through their spine, allowing rotation in the anatomically available range.
See also: You Might Be Twisting All Wrong. Here’s a Better Way
Balance Poses
Don’t: Attempt to stabilize your student by holding their wrist or ankle
Do: Stabilize and guide from the shoulder or hip
In poses that require balance and extension of the limbs, such as Ardha Chandrasana (Half Moon) and Utthita Trikonasana (Extended Triangle), yoga teachers often hold onto the wrist or ankle to help stabilize their students. But, when you push or pull from the wrist or ankle, you risk overstretching the shoulder or hip.
When assisting in any position that requires balance, stabilize at the core and proximal joints (such as the hips and shoulders) first to support more freedom of movement in the limbs to encourage balance. Then, guide extension through the distal joints (wrists and ankles). When the movements begin at a joint’s core, they are more stable and strong, and create intrinsic ease and strength in the pose.
See also: Learn—Then Teach—This 3-Part Yoga Curriculum Focused on Balance
Bound Angle
Don’t: Push down on knees
Do: Work on rotation at the hip joints
I’ve seen it too many times, and wince just thinking about it: A teacher sits behind his or her student in Baddha Konasana and attempts to force their knees toward the ground so as to achieve the “full expression” of the pose. Sometimes I even see students try to coerce their own knees to the mat.
The ability to touch the floor with your outer knees is more about your particular anatomy than it is about flexibility. In fact, the flexibility in the adductor or groin muscles is far less important than the rotational ability in the hips. For this reason, forcing the knees down with external pressure risks injury to the hips and knees. It also misplaces the mechanics necessary for “open hips.”
When offering physical assists in Bound Angle, guide the hip joints into external rotation, cueing your student to gently engage the core and allow the knees to float up slightly. This synergistic movement assists in creating stretch in the groin, and mindfully maintains the integration of the legs into the pelvis and their indirect connection to the spine.
See also: 5 Yoga Poses to Safely Stretch Tight Groin Muscles
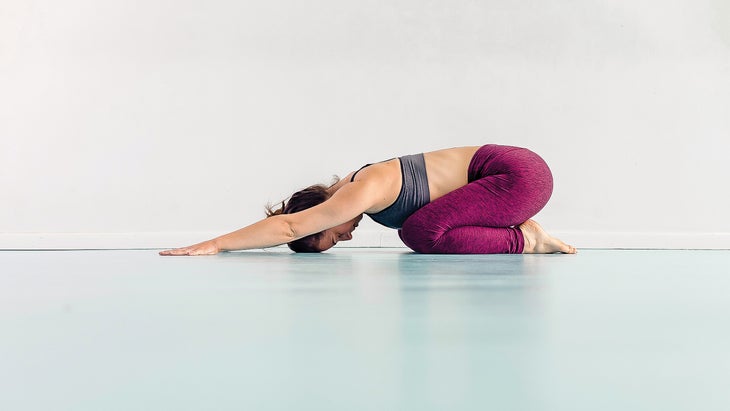
Child’s Pose
Don’t: Press down on the knees and shoulders
Do: Use a nuanced hands-on approach
Recognizing that Balasana (Child’s Pose) is not always considered restful and comforting to some students is an important concept for those who teach yoga. Applying assertive hands-on pressure to increase spinal flexion in Child’s Pose can harm the spine, hips (which are in deep flexion), ankles (which are in extreme plantar flexion), and shoulders (also in end-range flexion when the arms are overhead). Placing weighted downward pressure on your student’s back in Child’s Pose may cause discomfort or injury to the knees and ankles, especially in those with tighter joints.
Pressing straight down in the upper back region may also create undue pressure and pain in the vertebra of the neck. If your intention is to help your student achieve more flexion throughout the spine, first encourage them to engage their abdominal muscles and then lightly glide your hands in a manner that encourages them to elongate their spine to naturally increase the elongation of the spine inherent to this pose.
Want to learn more about making the jump from yoga student to yoga teacher? Check out our guide: So You Finished Your Yoga Teacher Training… Now What?